Verana records sound with every video take. The choice that governs everything else is whether the camera decides how that sound is captured or you do, and it is made at the top of one page.
Audio settings belong to video. The page is present in video mode only, since still capture records no sound, and the audio meter appears on the camera screen only in video mode for the same reason.
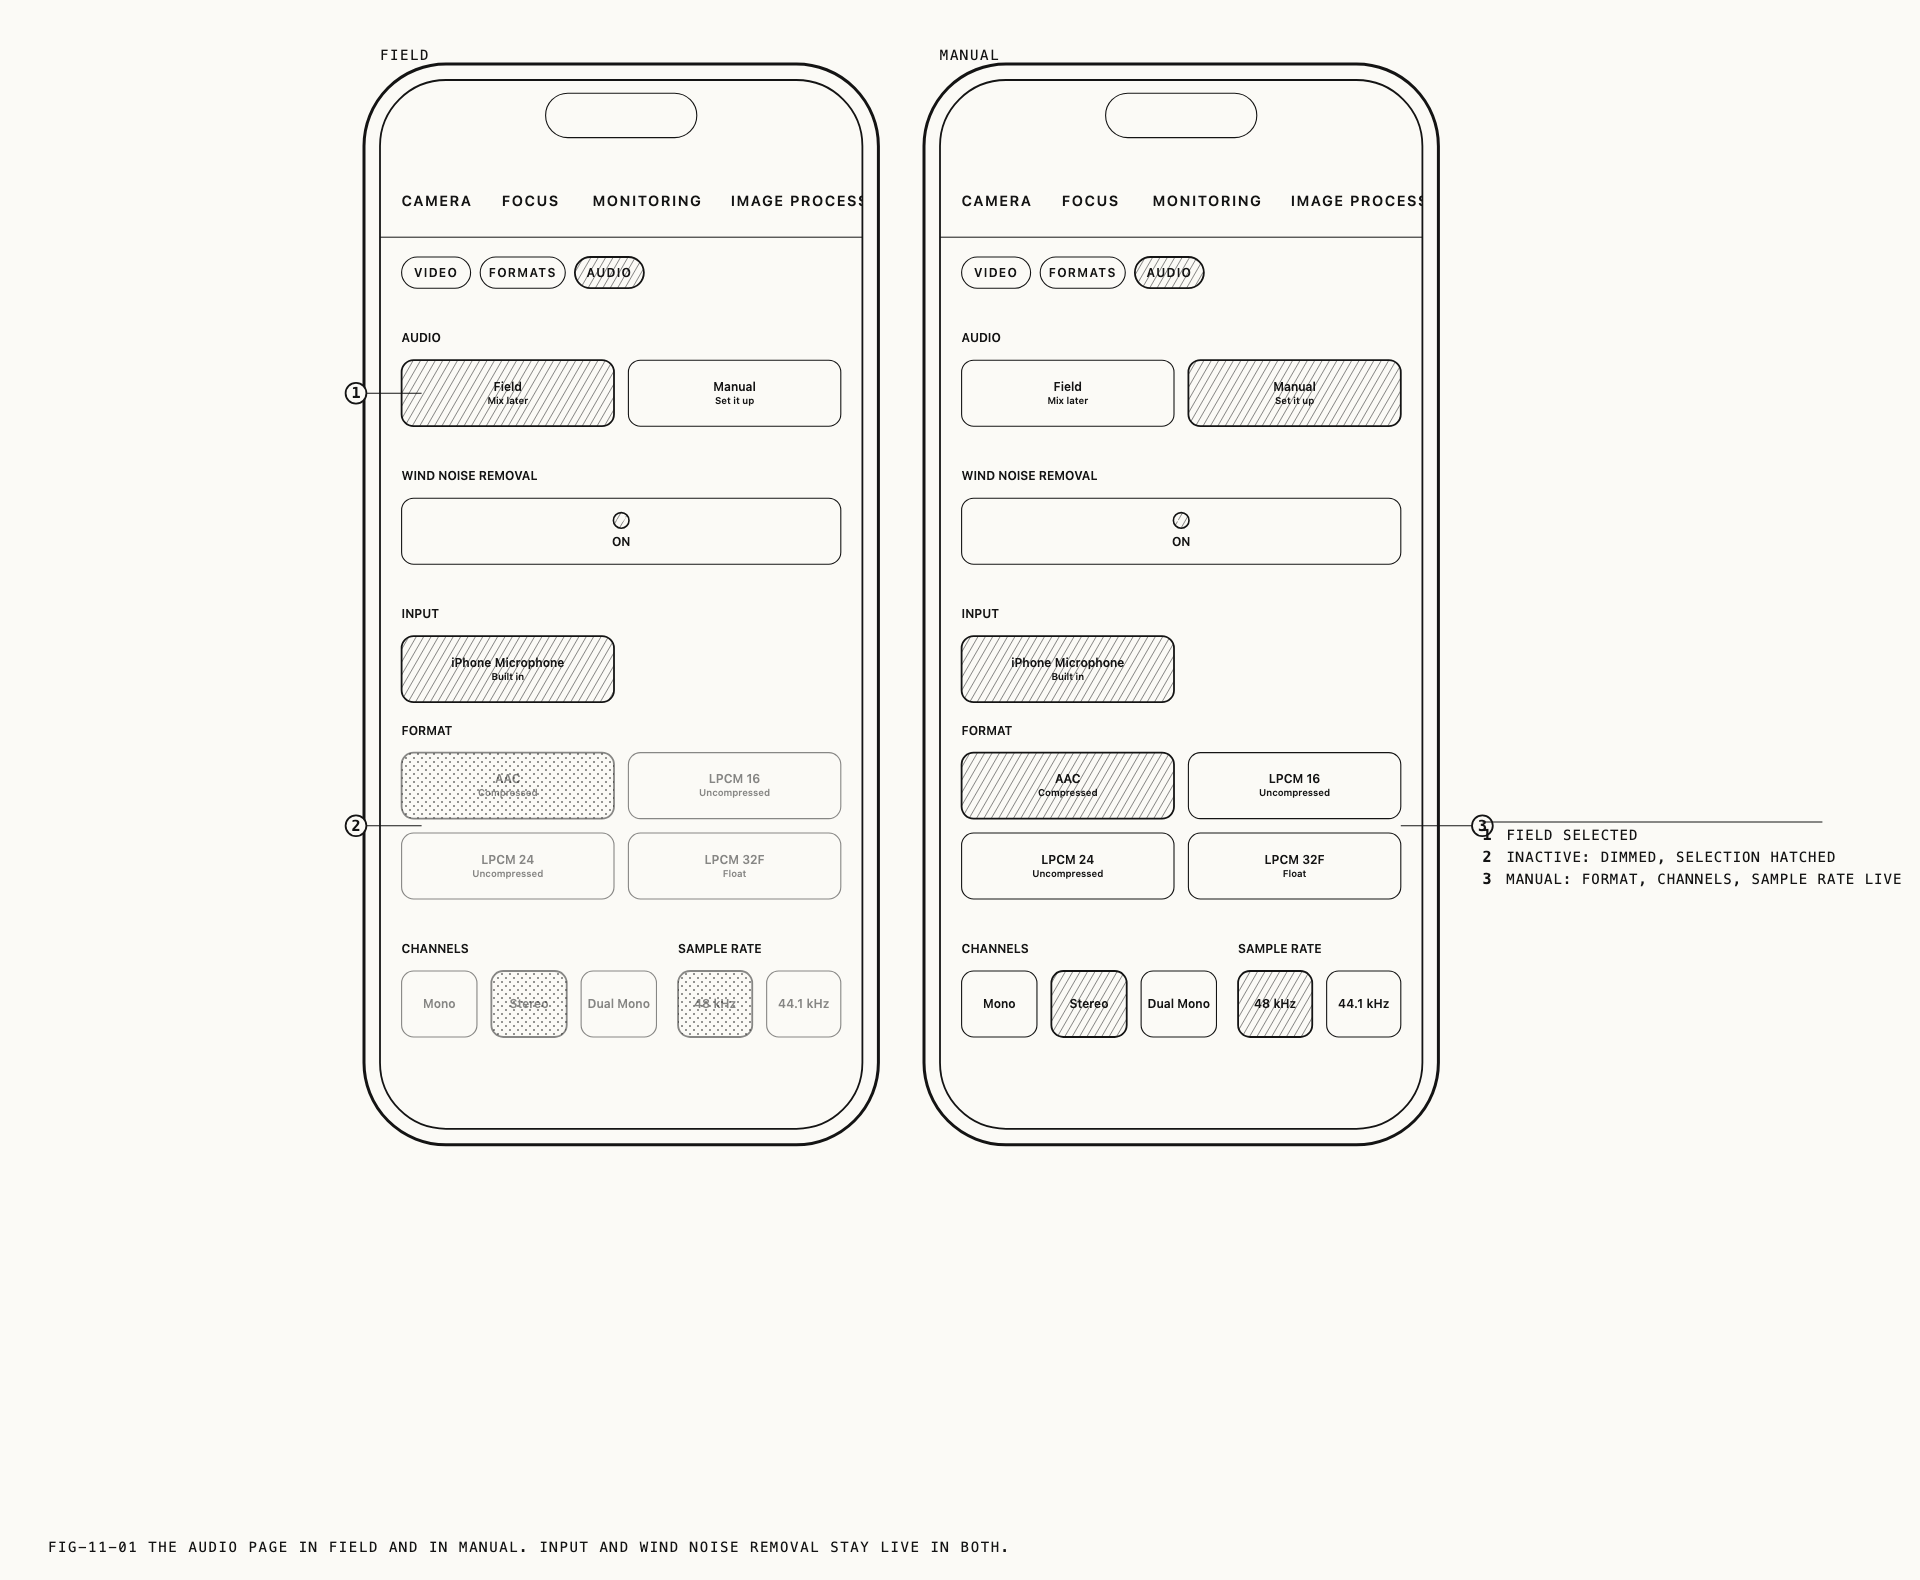
11.1 The Audio Page
The page opens with the Audio block, which selects Field or Manual. Everything
below it follows from that choice.
Where to change it: Settings → Camera → Audio.
| Value | Subtitle | What it means |
|---|---|---|
Field | Mix later | Pearla Field. The camera captures the sound field and the balance is set afterwards |
Manual | Set it up | You choose the microphone, the format, the channels and the sample rate |
Controls the current state does not allow stay on the page rather than disappearing. They are drawn inactive, and where the reason is not obvious from the screen a line underneath states what would bring them back.
11.2 Pearla Field
Pearla Field is Verana’s sound field recording mode. Rather than recording a fixed left and right pair, it captures the sound field around the camera, so the recording carries the direction sound arrived from as well as its level. Field recordings play back as a sound field on Apple devices.
The point of capturing that way is what it leaves open. The balance between the subject and the space around them is not committed at the moment of recording. It is set afterwards, on the clip, with the Field Mix tool in Revela Lite. Chapter 19 covers mixing a Field recording.
Pearla Field records in one fixed form and offers no format controls, because there are no choices to make: it runs the built-in microphones at 48 kHz. The two controls that still apply beneath it are the microphone itself and wind noise removal. Field is the default on devices that support it.
Field needs a recent iPhone on iOS 26. On a device that does not meet the requirement
the option remains selectable and the page says why it is not running. Verana records in
Manual form until the condition is met, so nothing is lost while the setting stands.
Pearla Field runs from the built-in microphones and from nothing else. Connecting any other microphone ends it for as long as that microphone is in use, which is covered in section 11.4.
11.3 Manual
Manual restores the decisions a Field recording defers. Three controls become live:
Format, Channels and Sample Rate. Input is available in both modes and is
covered in section 11.4.
| Control | Values |
|---|---|
Format | AAC, LPCM 16, LPCM 24, LPCM 32F |
Channels | Mono, Stereo, Dual Mono |
Sample Rate | 48 kHz, 44.1 kHz |
AAC is compressed and is the default. The three LPCM values are uncompressed, at 16,
24 and 32 bits, the last of them floating point. Uncompressed audio costs file size and
gives a post house the headroom it expects.
Dual Mono takes a single microphone signal and copies it to both channels, with no
level offset between them. It is the setting for a single external microphone that
should arrive in an edit as a centered two-channel track rather than as a track with one
silent side. Stereo asks the microphone itself for two channels, and on a microphone
that cannot deliver them Verana records Dual Mono instead, so the take still arrives
with the two channels you asked for.
While Field is selected these three controls are inactive and display your stored
Manual settings. They are held for you rather than discarded, and selecting Manual
returns them.
11.4 Input and Microphones
Input lists every microphone Verana can currently record from, each with a short
description beneath its name: Built in, External, Bluetooth, Bluetooth HQ, or a
channel count. The list follows what is connected, so plugging a microphone in adds it
while it is attached.
Choosing anything other than the built-in microphones turns Pearla Field off, because
the spatial capture cannot be assembled from a single external source. The demotion is
never silent. The camera screen reports PEARLA FIELD OFF followed by the microphone’s
name, and reports PEARLA FIELD ON when the microphone is removed and Field resumes.
Both notices appear only at the moment the state changes.
A wired or USB microphone connected while the camera is idle takes the input on arrival.
11.5 Bluetooth Microphones
A connected Bluetooth headset never takes over the input by itself. It is offered in
Input, and it records only once you select it there.
Bluetooth microphones are listed while Manual is selected. Pearla Field never records
through a Bluetooth route, so to record from AirPods or another Bluetooth microphone,
select Manual first and then pick it in Input.
Bluetooth microphones normally record at reduced bandwidth. Some models support full-bandwidth recording, and when one is connected and running that way the page says so: “High-quality Bluetooth recording is active: this microphone records at full bandwidth.”
11.6 Wind Noise Removal
Wind Noise Removal reduces the low, broad noise wind makes across a microphone. It is
on by default.
It works while the microphone is running more than one channel, which means in Pearla
Field and in Manual with Channels set to Stereo. In Mono and Dual Mono the
microphone runs a single channel and the control is inactive. It also depends on the
device, and is inactive on models whose microphones do not offer it.
The toggle reports the state actually in effect rather than the preference you last set,
so a reading of Off on an inactive control means wind noise removal is not being
applied to this take.
11.7 Recording PearlaRAW Video
A PearlaRAW video recording writes its own audio track, at the quality the microphone
delivers it. The Audio block and the format controls are inactive for the duration of
that codec selection, and the page states why: “Audio format is not available when
recording PearlaRAW video.”
The inactive controls show what is being written rather than your stored Manual
settings, so the page still answers the question of what is actually being recorded.
Input and Wind Noise Removal both remain live. Codecs are covered in Chapter 10.
11.8 The Audio Meter
The audio meter sits at the trailing edge of the viewfinder, level with the shutter button, in the position the drive mode selector occupies in photo mode. Chapter 2 places it on the screen.
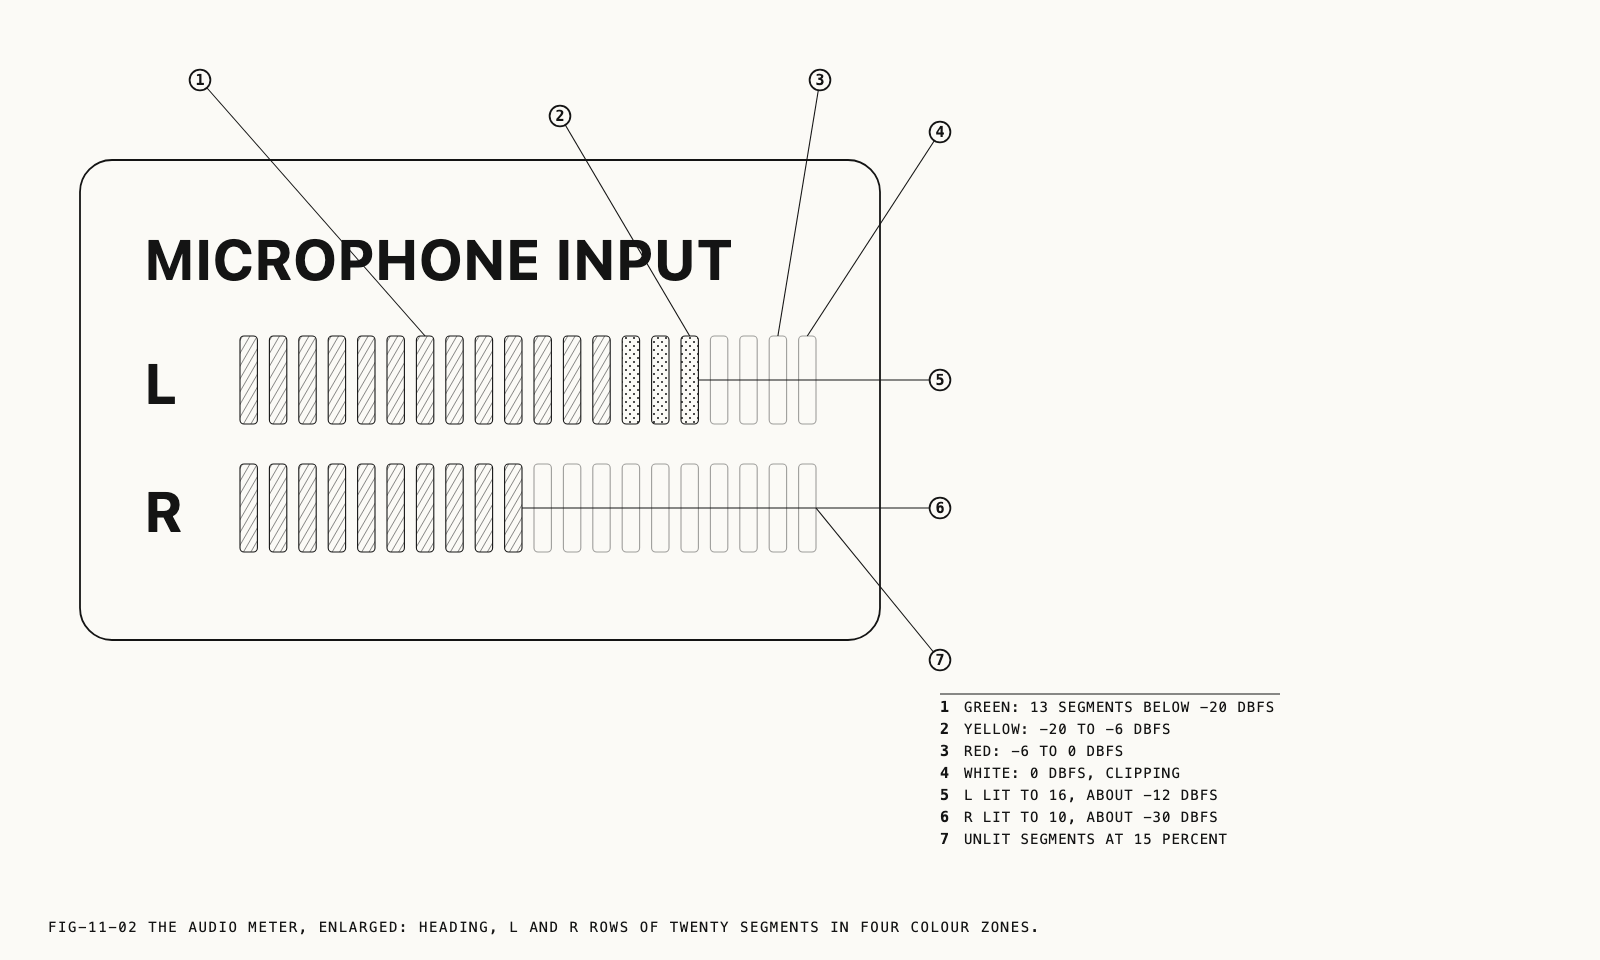
It is headed MICROPHONE INPUT and carries two rows, labeled L and R, each of
twenty segments. The scale runs from silence at the left to the top of the digital range
at the right, and is read in dBFS.
| Zone | Range | Reading |
|---|---|---|
| Green | Below -20 dBFS | Quiet. Headroom in hand |
| Yellow | -20 to -6 dBFS | The working range for dialogue and most sources |
| Red | -6 dBFS and above | Approaching the limit |
| White | The final segment, at 0 dBFS | Clipping |
The white segment is the one to avoid. Digital audio has nothing above it, so a signal that reaches it is distorted in the file and cannot be recovered afterwards, however quiet the rest of the take is. Set the source so that peaks live in the yellow and leave the red for the loudest moments you did not plan for.
The meter is live whenever the camera screen is in video mode, not only while recording, so levels can be set before the take rather than discovered during it.
Both rows carry the same signal whenever the microphone is running a single channel,
which is the case in Mono, in Dual Mono, and on any microphone that delivers one
channel. Two rows moving independently is the confirmation that a stereo source is
reaching the camera.
The meter follows the viewfinder display modes: where it sits over the image it is hidden by the modes that clear the image. Display modes are covered in Chapter 2.
11.9 When Changes Take Effect
Note: Audio settings are fixed at the moment a take starts. Changing the mode, the format, the channels, the sample rate or the microphone during a recording does not affect the take in progress. Make audio changes before you roll.