Verana opens directly on the camera screen. There is no intermediate menu, and every other part of the app is reached from here.
The camera screen is built around the viewfinder. Controls are arranged so that the live image remains visible and unobstructed wherever possible, and the layout adapts to the capture mode, the aspect ratio of the recorded image, the orientation of the device, and the size of the screen. This section describes the elements of the interface and how their arrangement changes.
2.1 Interface Elements
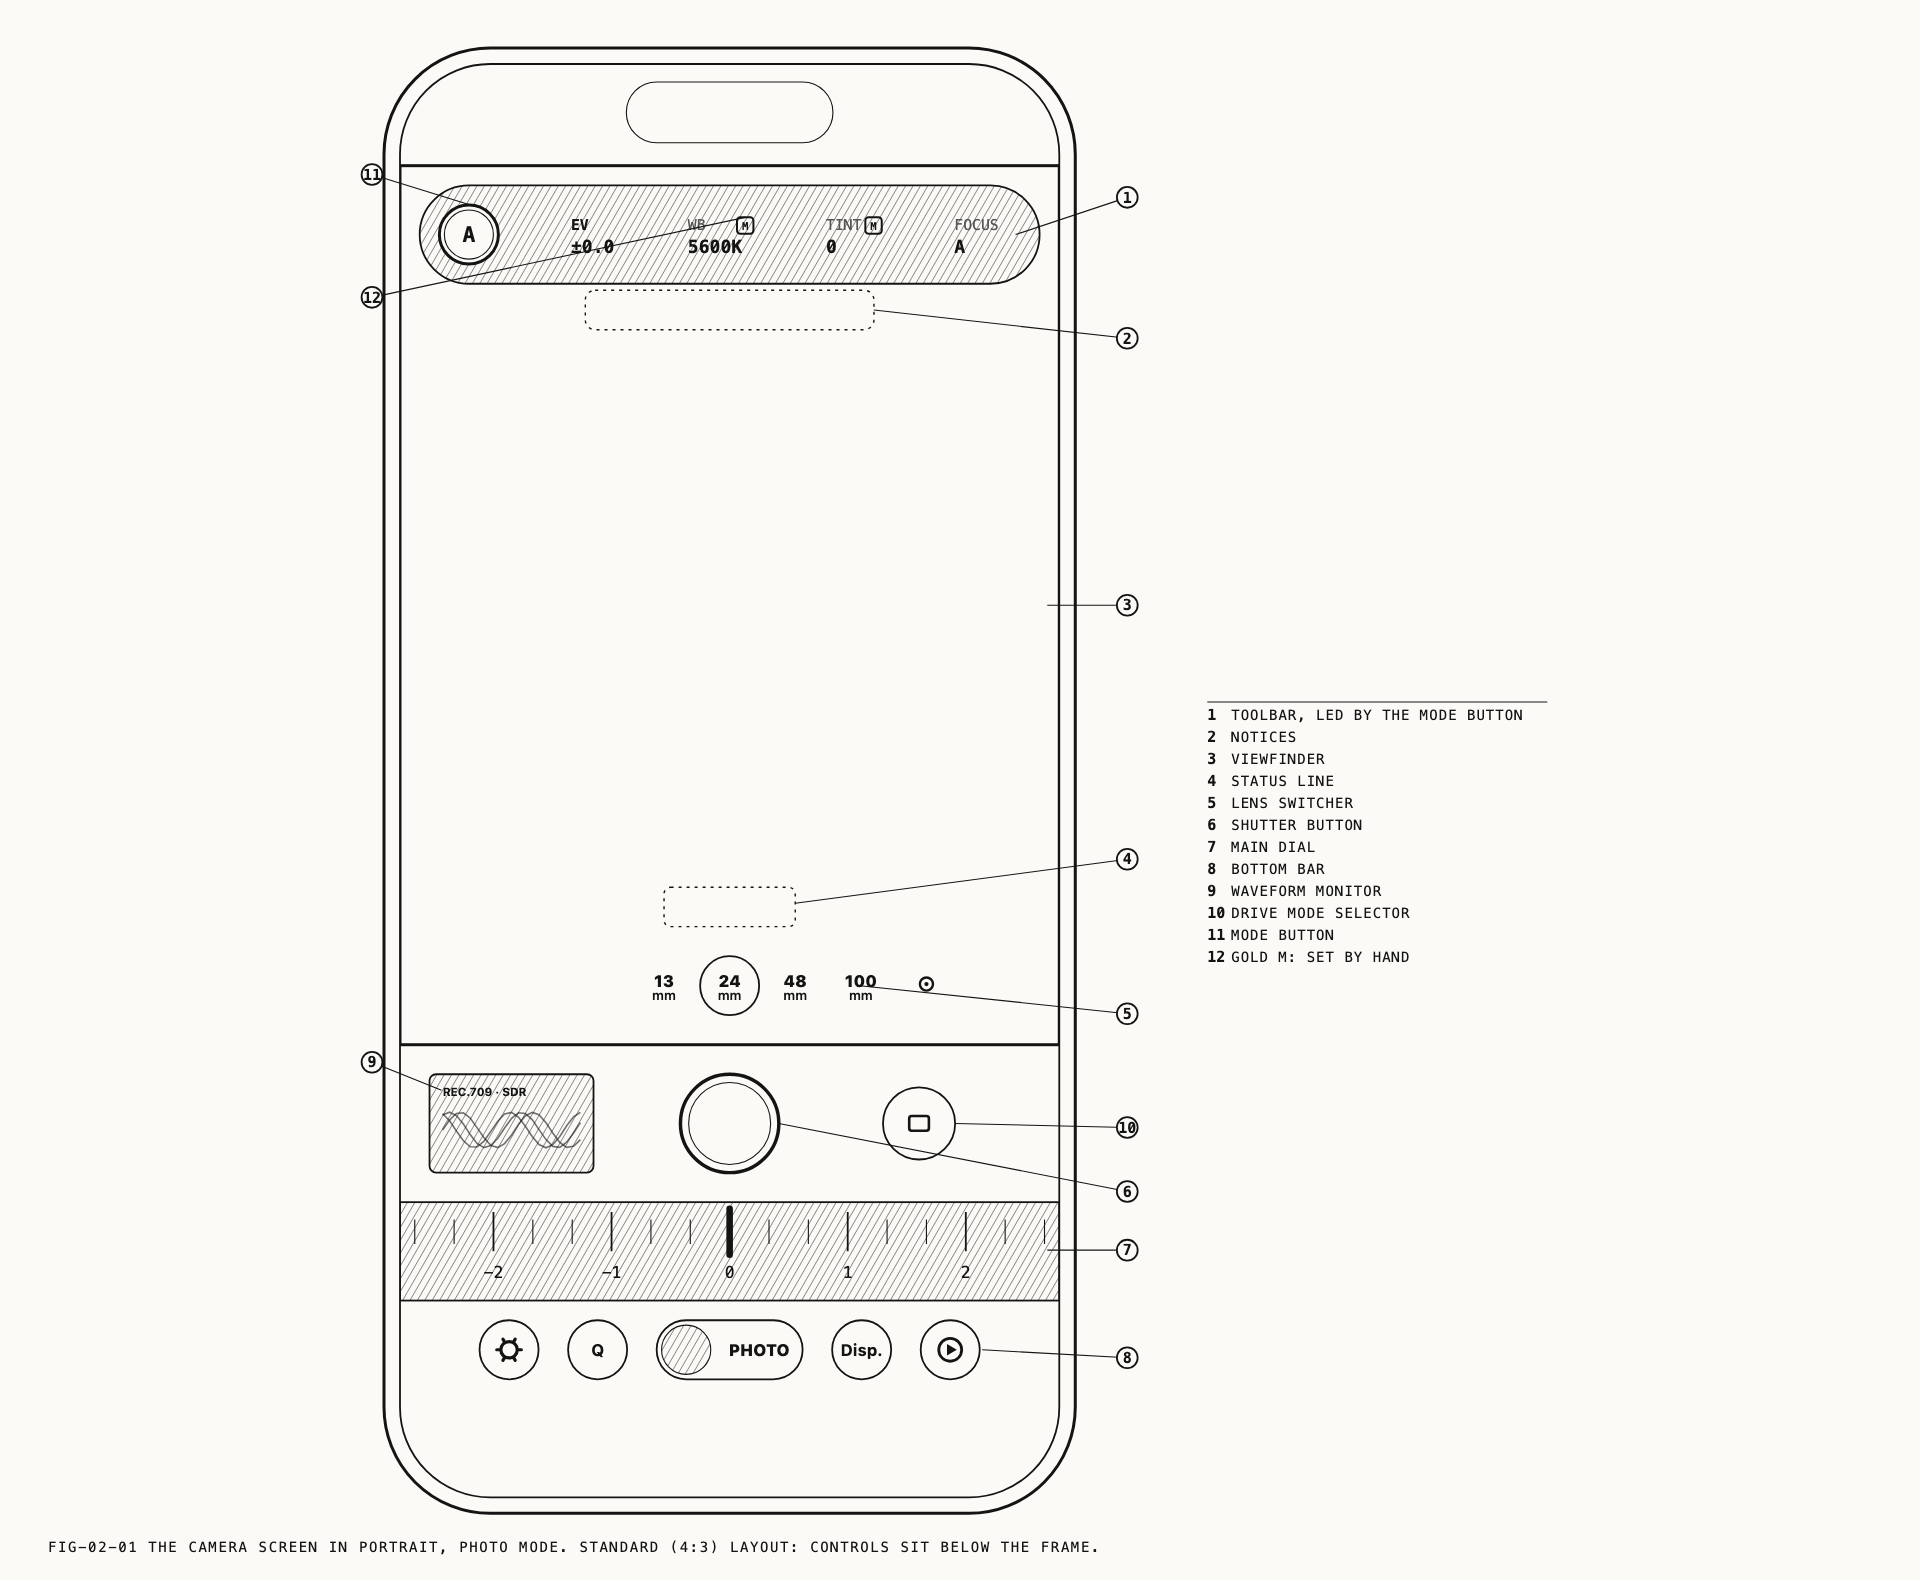
In portrait orientation, the camera screen consists of the following elements:
- Toolbar – A row of exposure and imaging tools across the top of the screen, led by the Mode button.
- Notices – Messages below the toolbar reporting conditions that affect capture.
- Viewfinder – The live preview of the scene.
- Status Line – A single line reporting the current capture activity.
- Lens Switcher – The available lenses on your device.
- Shutter Button – Captures a photo or starts and stops recording.
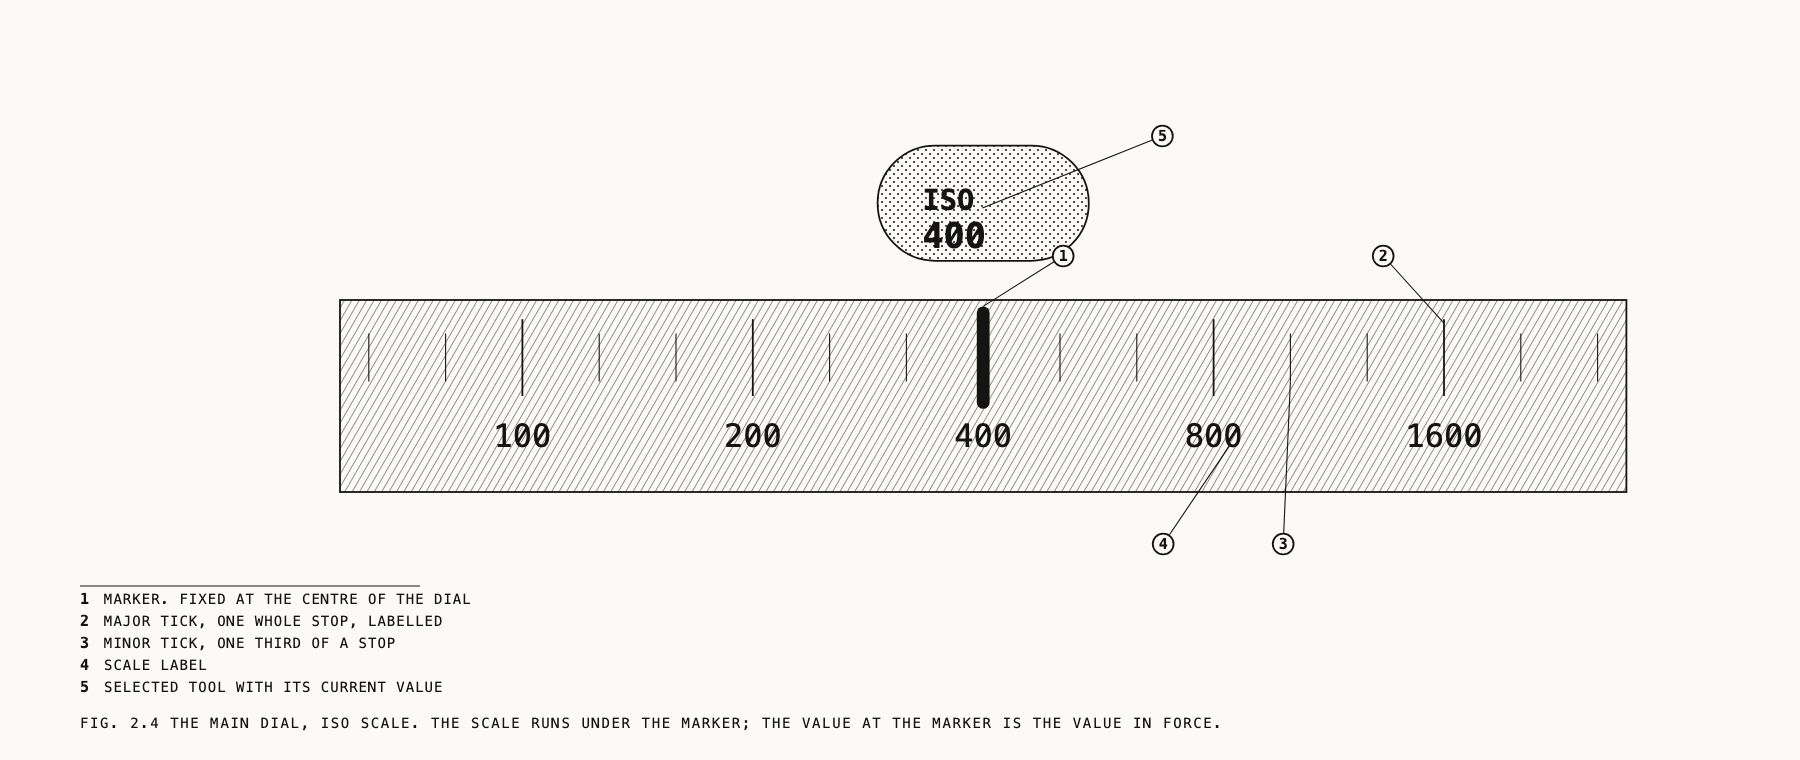
- Main Dial – The primary adjustment control for the selected tool.
- Bottom Bar – Settings, the quick menu, the capture mode switcher, the display cycle, and the media library.
The order of these elements is fixed. Their positions relative to the viewfinder are not, and depend on the aspect ratio being recorded.
2.2 Layout and Aspect Ratio
Verana records in two frame shapes, and the interface is arranged differently for each.
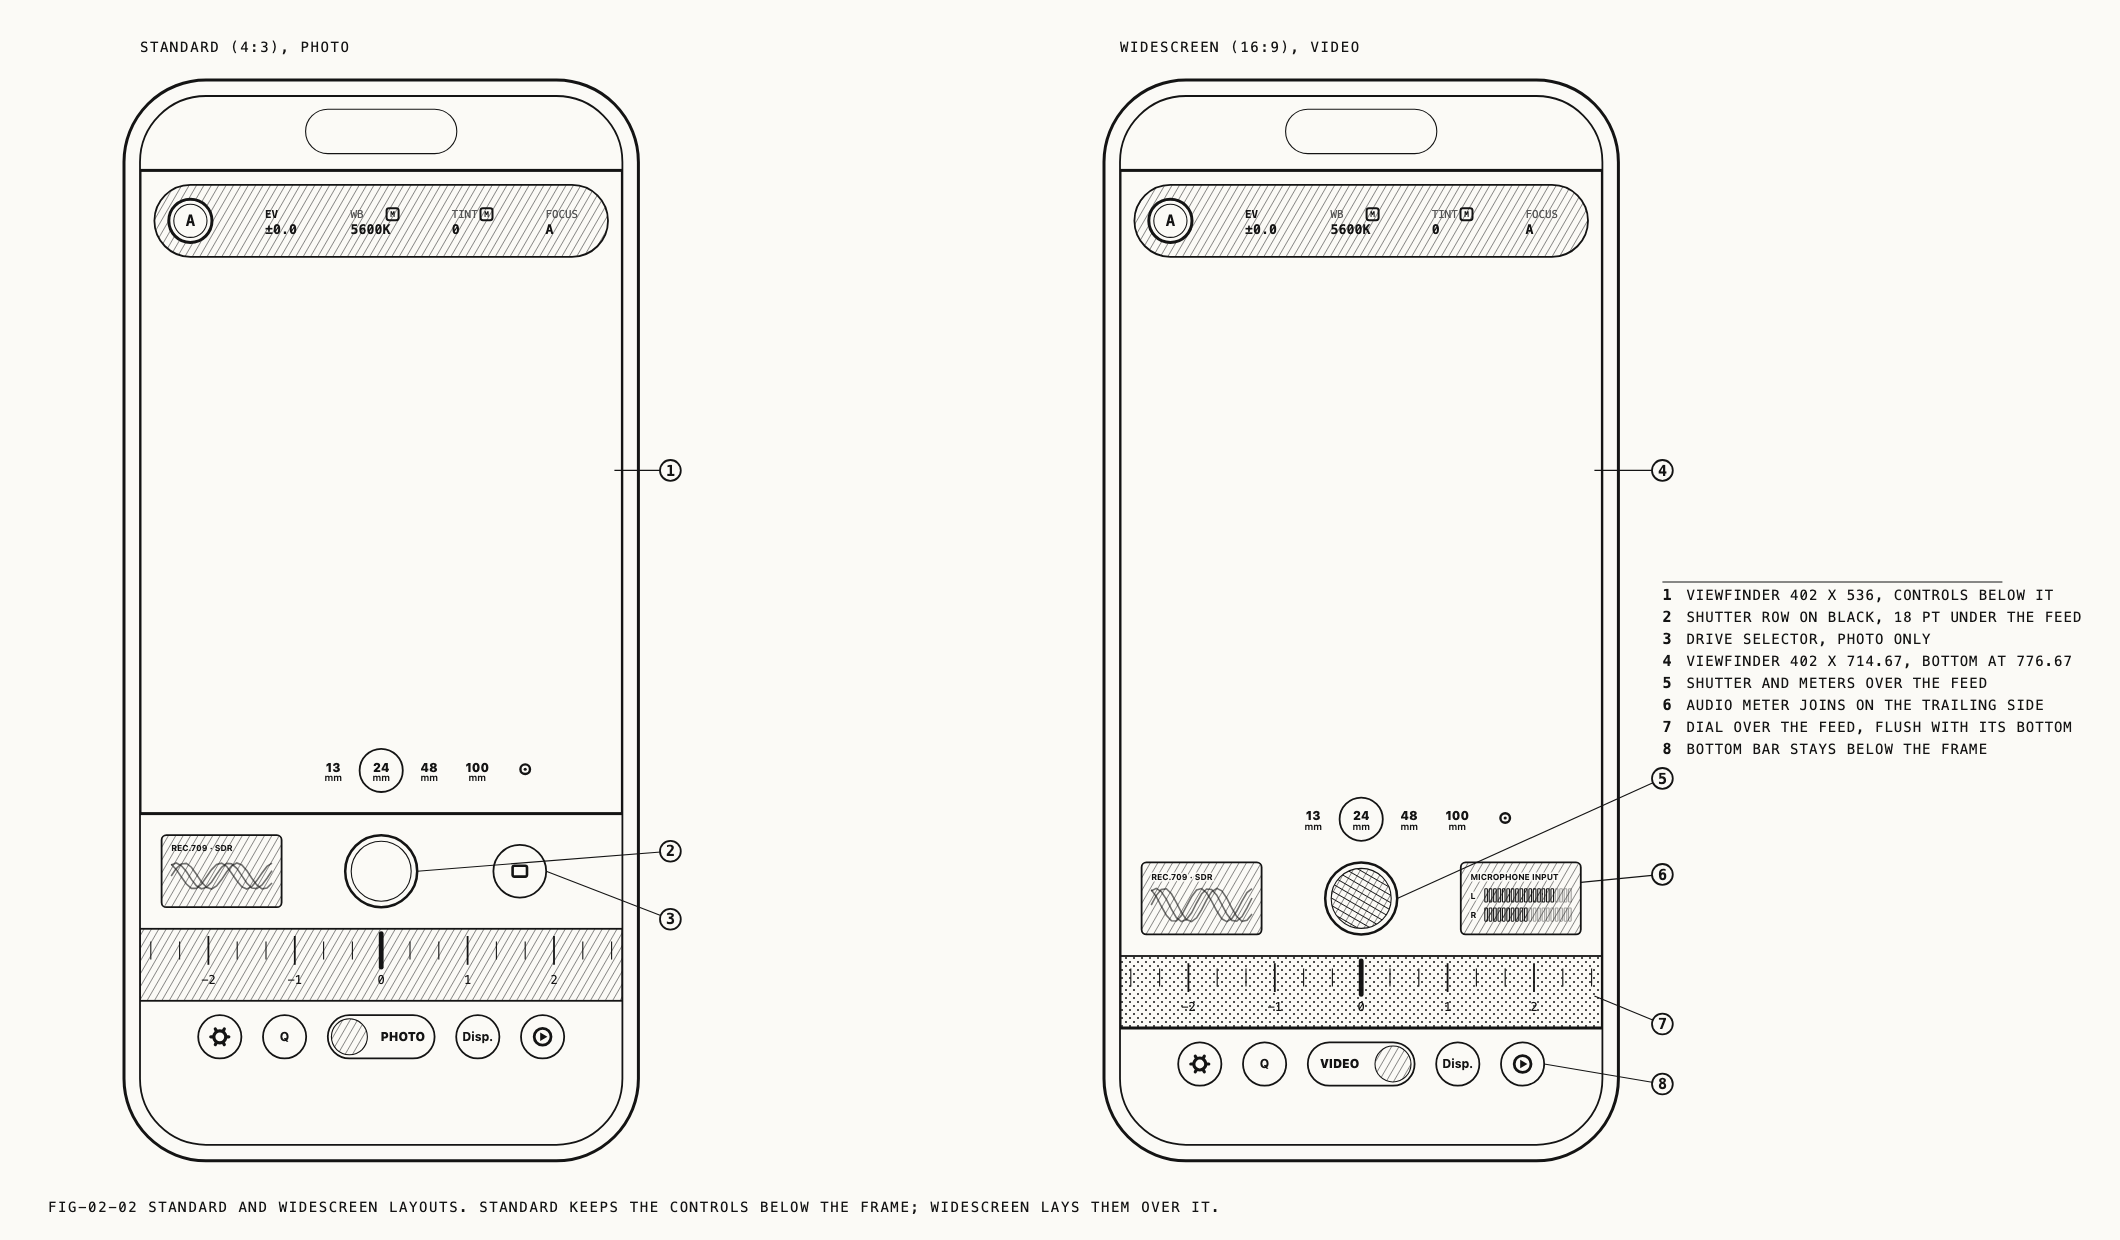
Standard (4:3). Used for all photo capture, and for video recorded at Open Gate. The viewfinder occupies the upper portion of the screen. The lens switcher sits inside the frame, aligned to the bottom of the viewfinder, with the status line directly above it. The shutter button sits below the viewfinder, and the main dial below the shutter button. The bottom bar occupies the foot of the screen.
Widescreen (16:9). Used for video at all resolutions other than Open Gate. The viewfinder is taller, so the controls move onto the image rather than sitting beneath it. The main dial is aligned to the bottom edge of the viewfinder, the shutter button sits above the dial, and the lens switcher above the shutter button. All three overlay the lower part of the frame. The bottom bar again occupies the foot of the screen.
Open Gate is a video resolution that records the sensor’s full 4:3 frame rather than a widescreen one. Because the frame shape rather than the capture mode determines the layout, selecting Open Gate produces the same arrangement as photo mode.
Where to change it: Settings → Camera → Formats, under Resolution.
Within these two arrangements, exact positions are adjusted for the screen size of the device. On smaller iPhones the shutter button and dial sit closer to the frame, and in Standard they may overlay the lower edge of the image rather than clear it. The relationships between elements do not change: the shutter button is always above the main dial, and the lens switcher is always above the shutter button.
2.3 Toolbar
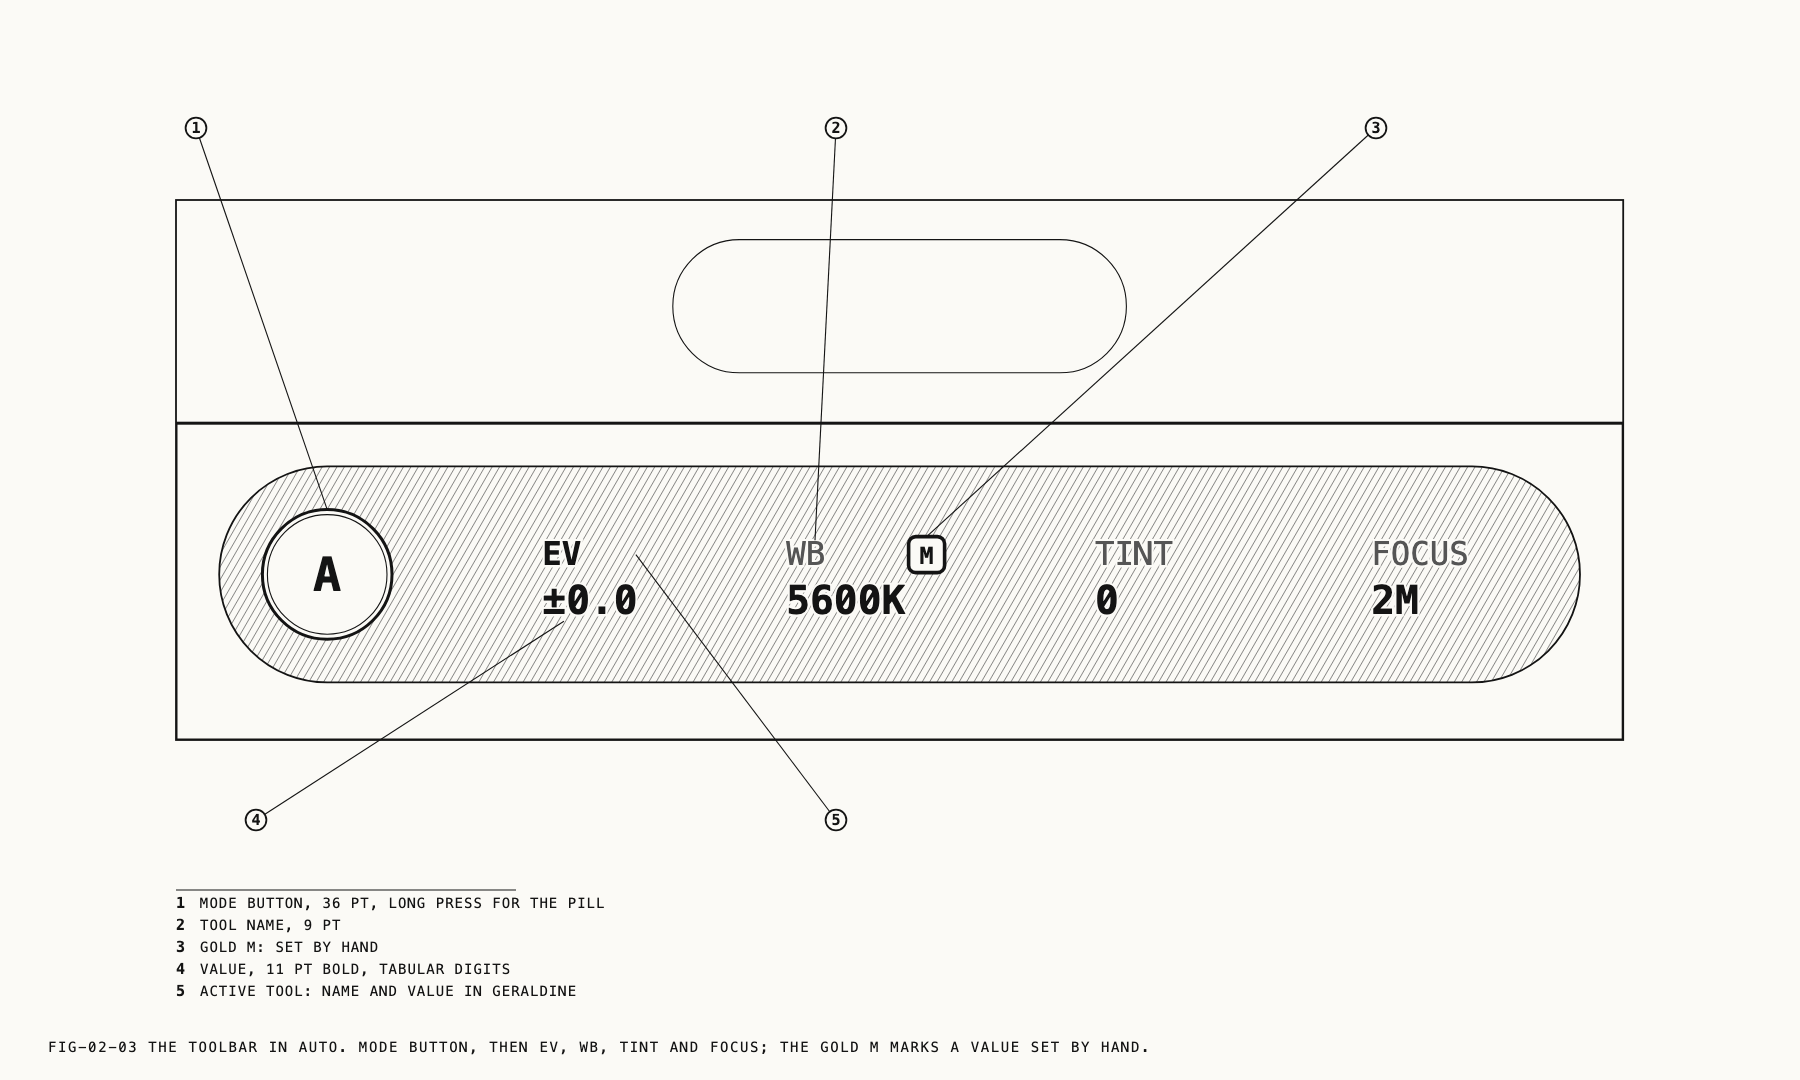
The toolbar provides access to Verana’s exposure and imaging tools. Each tool displays its name in uppercase with its current value beneath it.
The Mode button sits at the leading end of the toolbar, before the tools. It reports the active exposure mode as a single letter and cycles through the modes when tapped. Exposure modes are covered in Chapter 3.
A gold M beside a tool’s name indicates that the value has been set manually. A tool with no badge is being set by the camera. This provides an immediate reading of which parts of the exposure are under your control and which are automatic.
Tapping a tool selects it. The selected tool is the one controlled by the main dial.
Tools that the active exposure mode does not control are hidden while that mode is in use, so fewer tools are shown in Auto than in Manual. Exposure modes and the tools belonging to each are covered in Chapter 3.
2.4 Notices
Notices appear below the toolbar and report conditions that affect capture. They fall into two groups.
Status and error notices report a problem or an interruption. These include dropped frames during recording, recording stopped because frames were being dropped, storage full, and a failed burst or interval sequence.
Informational notices report a change of state rather than a fault, such as a control being locked for the duration of a capture.
Notices clear themselves. They are not affected by the viewfinder display mode and remain visible in every mode, including Clean, since a condition that can cost you a take should not be concealed by a display setting.
2.5 Viewfinder
The viewfinder displays the live preview, including the color treatment currently selected under Settings → Image Processing. What is shown is what will be recorded.
Two monitoring tools sit at the edges of the frame, level with the shutter button. The waveform monitor appears at the leading edge and the audio meter at the trailing edge. In photo mode the drive mode selector occupies the position used by the audio meter in video. The waveform monitor is covered in Chapter 6 and the audio meter in Chapter 11.
2.6 Status Line
A single line above the lens switcher reports the current capture activity. It shows the recording timer while recording, the frame count during a burst, and the run readout during an interval sequence.
Only one of these appears at a time. The line is a single slot rather than a row that grows, so the information relevant to the current activity always appears in the same position. When no capture is in progress, the line is empty.
2.7 Lens Switcher and Zoom
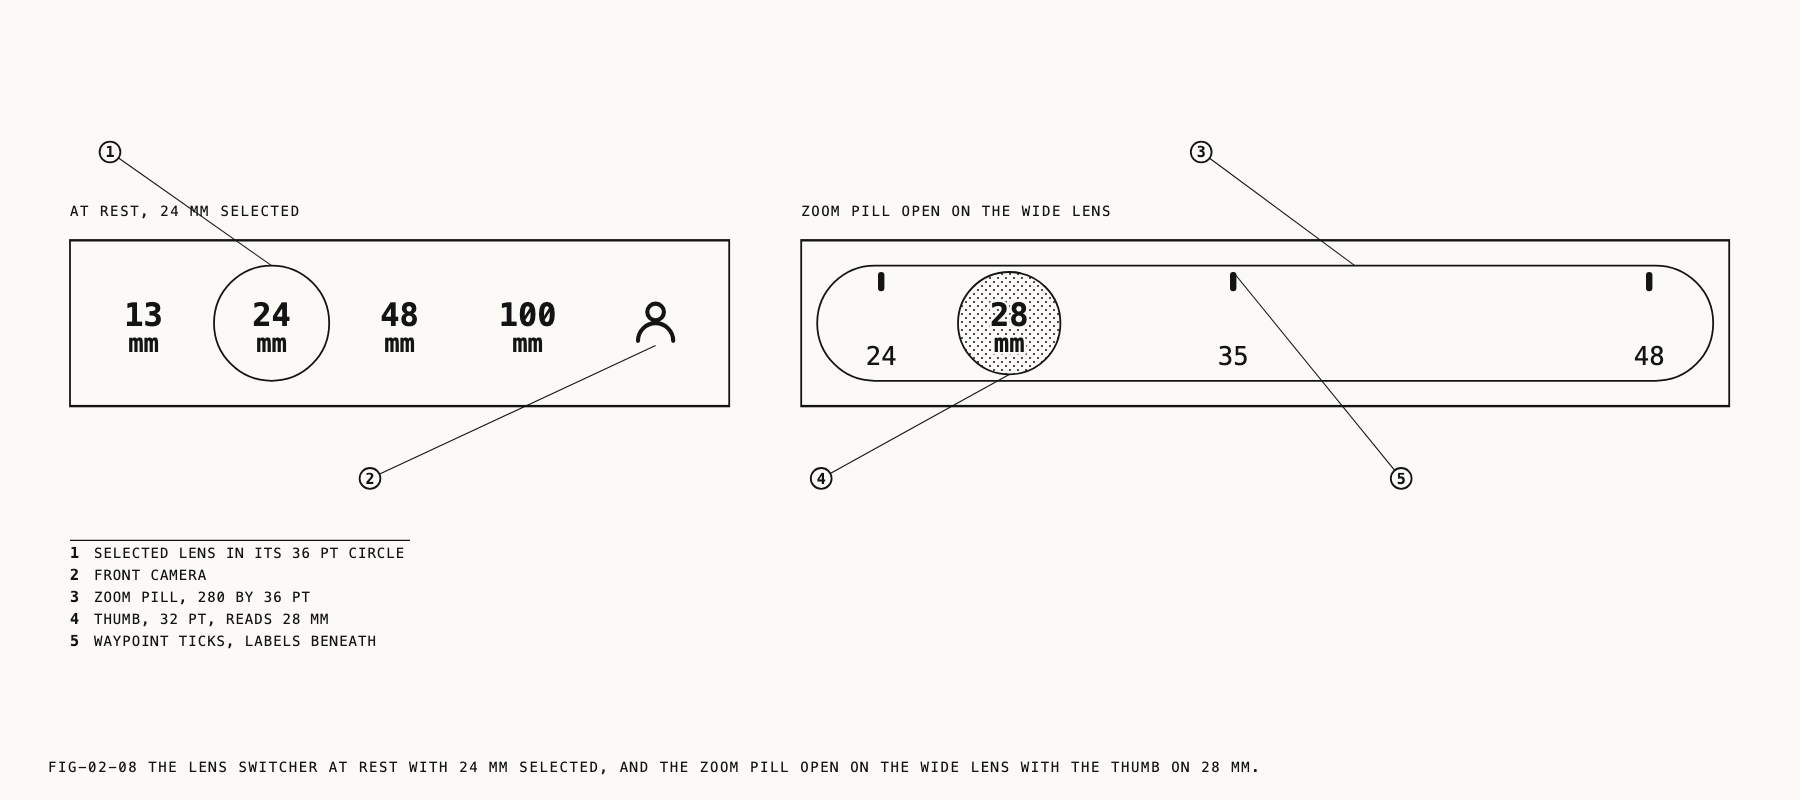
The lens switcher displays the lenses available on your device, labeled by focal length in millimeters. Tapping a lens switches to it.
Some positions carry more than one focal length. Tapping the lens that is already active advances through the options available at that position, for example 24, 28, 35 and back to 24 on the main camera, or 100 and 200 on the telephoto. Which options appear depends on your device.
Focal lengths between the marked positions are set with the zoom slider. Press and hold the lens switcher to open it. The slider appears as a capsule containing a marked track and a thumb showing the current focal length in millimeters. Drag to set the value, then release and tap to commit it.
Each lens remembers its own zoom setting. Tapping the active lens while it is zoomed returns it to its base focal length.
Note: Zoom behaves differently depending on the capture format in use. Some formats record the full frame and keep your framing with it, so the wider frame stays available to you afterwards. During some recordings, zoom and lens changes are unavailable for the duration of the take, and a notice appears if you attempt one. Still formats are covered in Chapter 7 and video formats in Chapter 10.
2.8 Shutter Button
The shutter button captures a photo or starts and stops recording, depending on the capture mode.
In photo mode, the drive mode selector sits alongside the shutter button. In burst, an additional pre-capture control appears beside the shutter button. Burst capture is covered in Chapter 8.
2.9 Main Dial
The main dial adjusts the value of the currently selected toolbar tool. It is context-sensitive and its scale changes with the tool: stops for exposure compensation, sensitivity values for ISO, fractions of a second for shutter speed, degrees for shutter angle, and kelvin for white balance.
The dial is marked with numbered ticks, so values are read directly from the scale rather than estimated.
Six tools are controlled by the dial on the camera screen.
| Toolbar | Function |
|---|---|
ISO | Sensitivity |
SHUTTER | Shutter speed, or shutter angle |
EV | Exposure compensation |
WB | White balance |
TINT | Tint |
FOCUS | Manual focus |
The shutter tool covers both ways of setting the exposure time. Its label follows the
shutter measurement in use: SHUTTER for shutter speed, or SA when shutter angle is
selected. On smaller screens the speed label is abbreviated to SHTR. Choosing between
the two measurements is covered in Chapter 10.
FOCUS is disabled on lenses with fixed focus. Several iPhone ultra wide and front
cameras focus at a fixed distance and cannot be adjusted, so Verana grays the control
out rather than presenting a dial that has no effect.
2.10 Bottom Bar
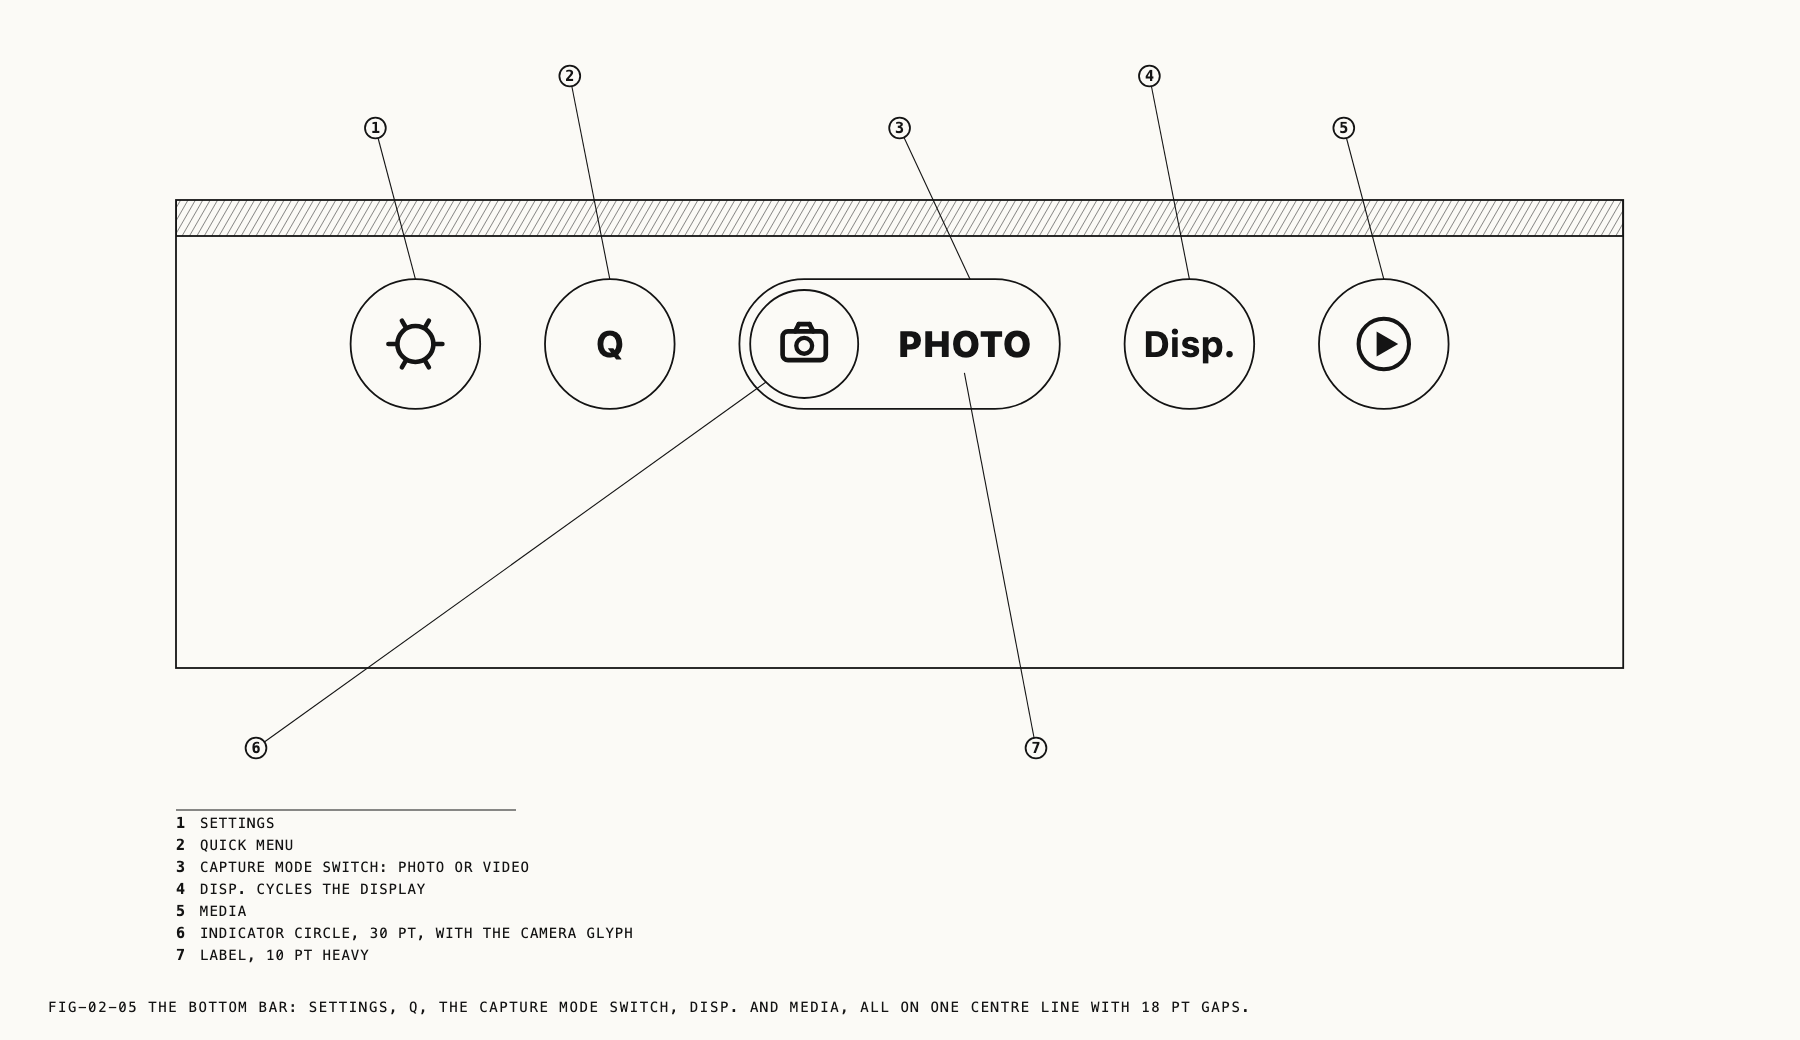
The bottom bar contains five elements, with the capture mode switcher at the center.
| Position | Element | Function |
|---|---|---|
| 1 | Settings | Opens settings for the active capture mode |
| 2 | Q | Opens the quick menu |
| 3 | Capture Mode Switcher | Switches between photo and video |
| 4 | Disp. | Cycles the viewfinder display mode |
| 5 | Media | Opens the media library |
Settings and the quick menu serve different purposes. Settings contains the full set of controls, organized into tabs and pages, and is where the camera is configured. The quick menu behind the Q button is a smaller panel holding the controls you reach for while shooting, arranged by you. Building it is covered in Chapter 22.
The settings screen is context-sensitive and its contents change with the active capture mode.
Reaching settings and the library by gesture
Settings and the media library can also be opened by dragging across the camera screen. Dragging to the right opens settings. Dragging to the left opens the media library. The same gesture in reverse returns you to the camera.
The drag is continuous rather than a flick, so the panel follows your finger and settles open or closed when you release, depending on how far you have travelled and how quickly. Releasing before the halfway point returns to the camera.
Both routes reach the same screens. The drag is the faster one when you are already shooting.
2.11 Viewfinder Indicators
A small number of indicators are drawn on the image itself rather than in the surrounding interface. Each holds a fixed position, so a change in one value does not displace another.
The thermal state indicator appears at the top left when the device temperature rises.
The image flip badge appears at the top right when the viewfinder image has been flipped horizontally or vertically. These flips affect the preview only and are never applied to the recording, so the badge is shown to distinguish an intentional flip from a fault.
Where to change it: Settings → Monitoring → Tools.
The false color key appears at the bottom left of the frame when false color is active, identifying the exposure value each color represents. Reading the key is covered in Chapter 6.
Indicator positions are relative to the operator rather than to the device. The top left position remains at the top left from behind the camera regardless of how the phone is held.
2.12 Viewfinder Display Modes
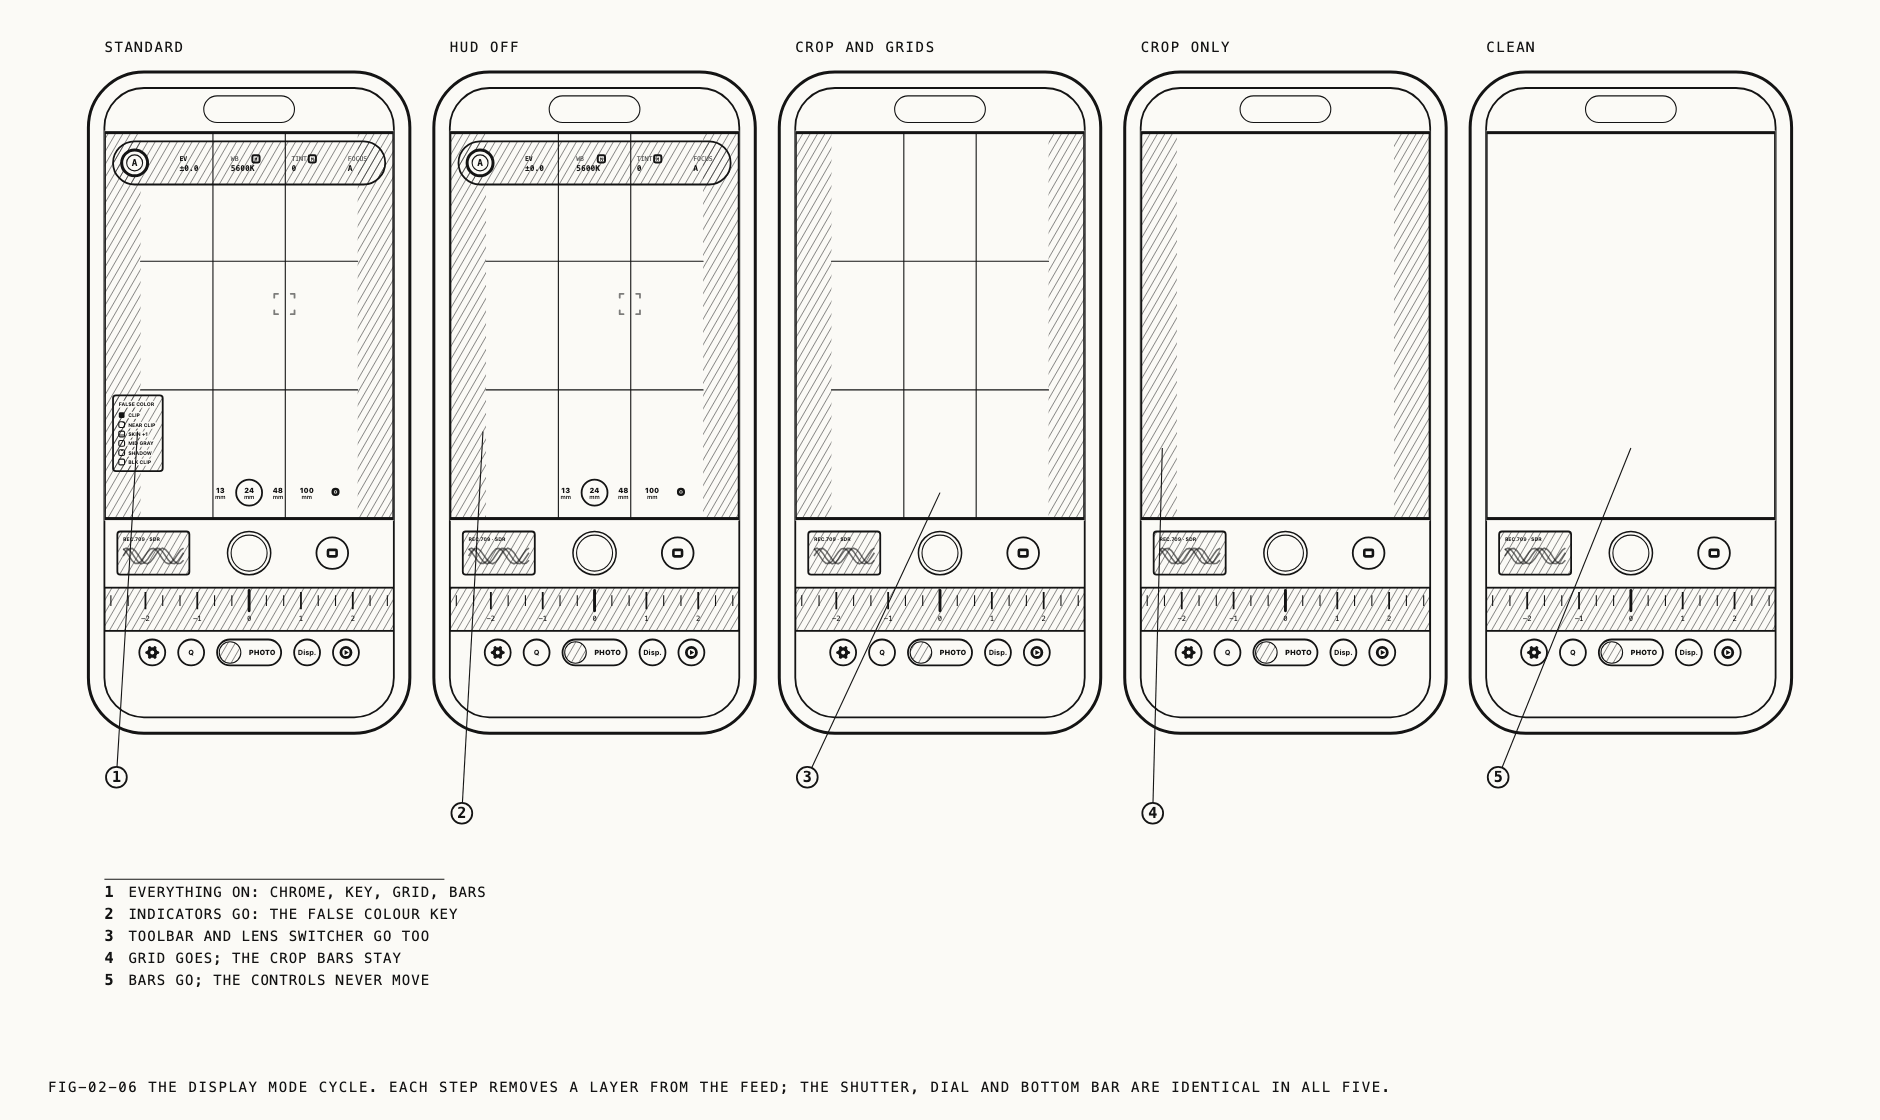
The Disp. button cycles how much information is drawn over the image.
| Mode | Displayed over the image |
|---|---|
| Standard | All enabled overlays |
| HUD off | Interface chrome only; viewfinder indicators hidden |
| Crop and grids | Crop bars and composition grids only |
| Crop only | Crop bars only |
| Clean | Nothing |
Controls do not move between display modes. The shutter button, main dial, bottom bar, and capture mode switcher remain in position in every mode, including Clean. Only informational overlays are affected.
The cycle skips any mode that would produce no visible change. If composition grids are disabled, or the selected aspect ratio does not crop the frame, the modes that differ only in those elements are passed over, so each press of the button alters the display.
The display mode is not retained between sessions. Verana returns to Standard on every launch.
Notices, recording indicators, the thermal warning, and the capture countdown are not affected by the display mode and remain visible in all modes, including Clean.
2.13 Capture Modes and Drive Modes
The capture mode switcher selects between photo and video. This determines the frame shape, the settings available, and the contents of the area beside the shutter button.
Photo capture offers three drive modes, selected on the drive mode selector: single frames, burst, and the intervalometer. Each maintains its own settings and its own quick menu arrangement.
Unlike most cameras, the self-timer is not a drive mode in Verana. It is a delay applied to single-frame capture, and it is covered in Chapter 7.
Photo, burst, interval, and video each keep their own settings and their own quick menu arrangement, and several parts of the interface follow the active one of the four rather than the capture mode alone.
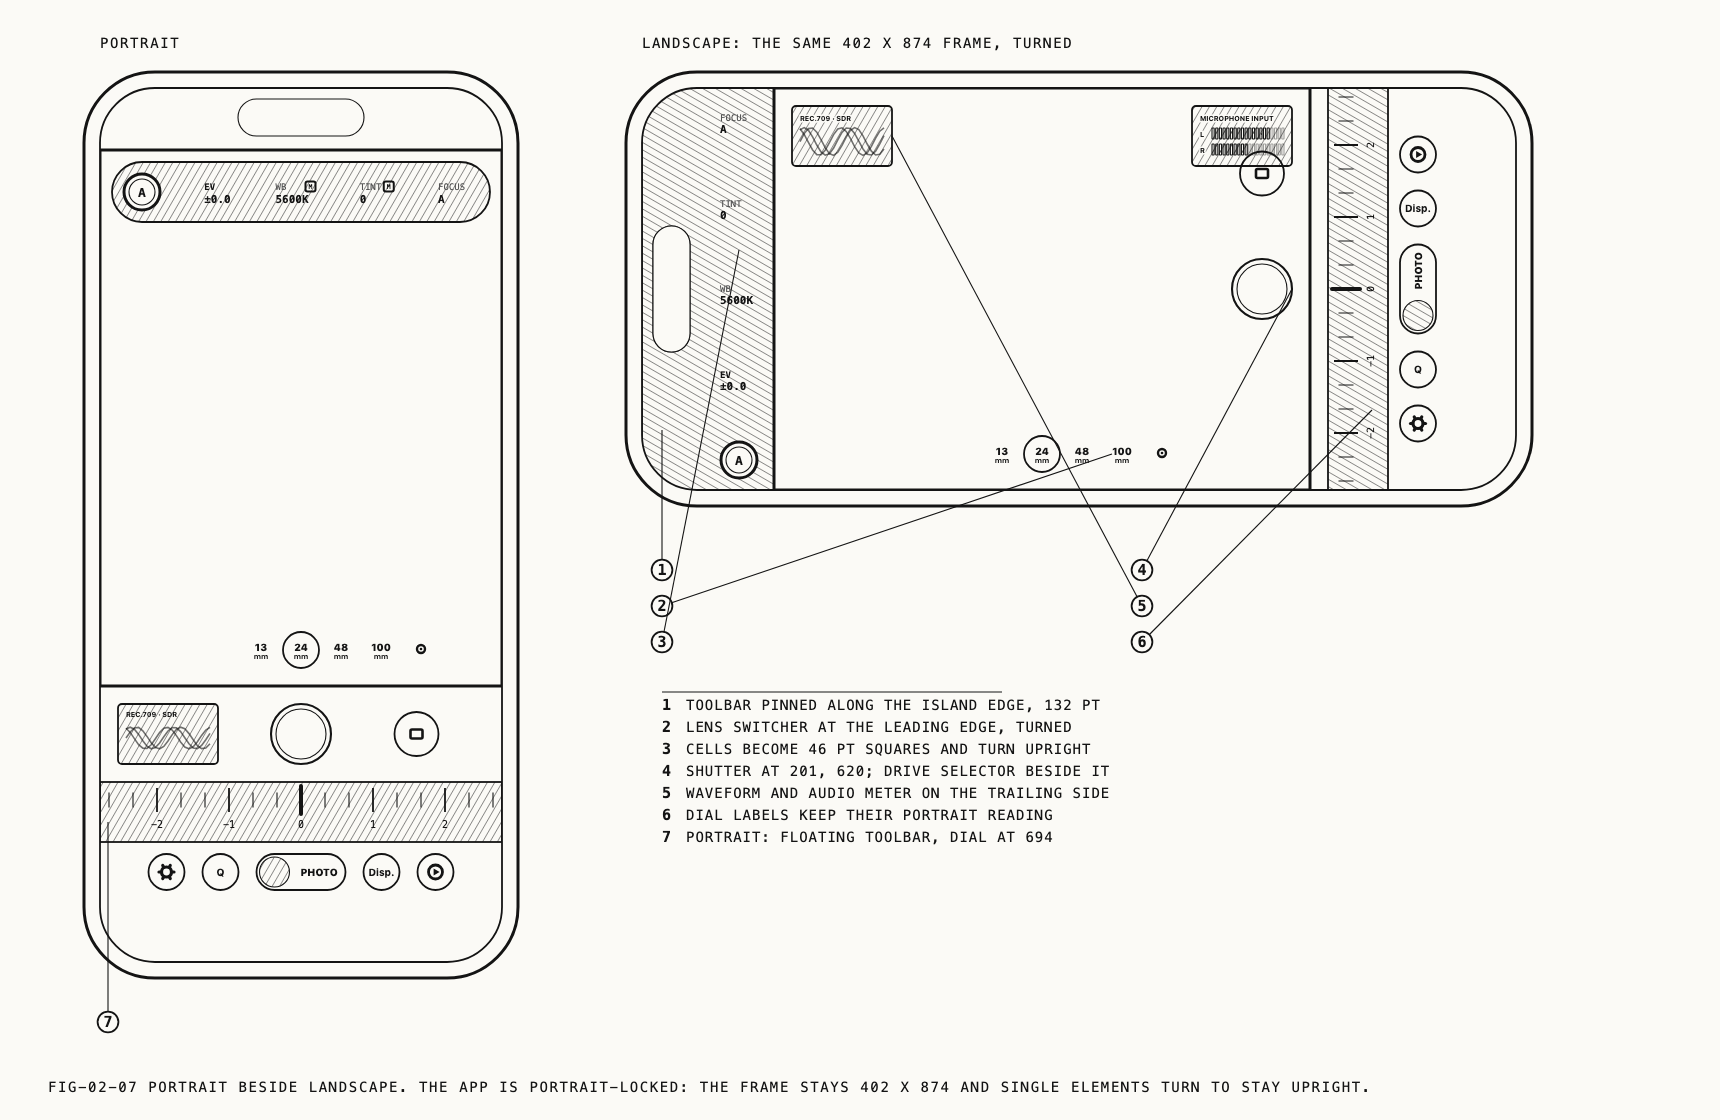
2.14 Landscape Orientation
Verana rearranges the camera screen in landscape rather than rotating it as a whole.
The lens switcher moves to the leading edge of the frame and rotates as a single unit. The shutter button, main dial, and capture mode switcher shift upward. Individual icons and values counter-rotate so that they remain upright and legible.
Viewfinder indicators retain their operator-relative positions, as described in section 2.11.