Verana sets exposure in one of three modes, and the mode decides which parts of the exposure belong to the camera and which belong to you. Everything else in this chapter follows from that choice: which tools the toolbar offers, what the main dial measures, and whether exposure compensation has any effect.
The camera screen and its parts are described in Chapter 2. This chapter covers the exposure mode itself and the four exposure tools.
3.1 The Mode Button
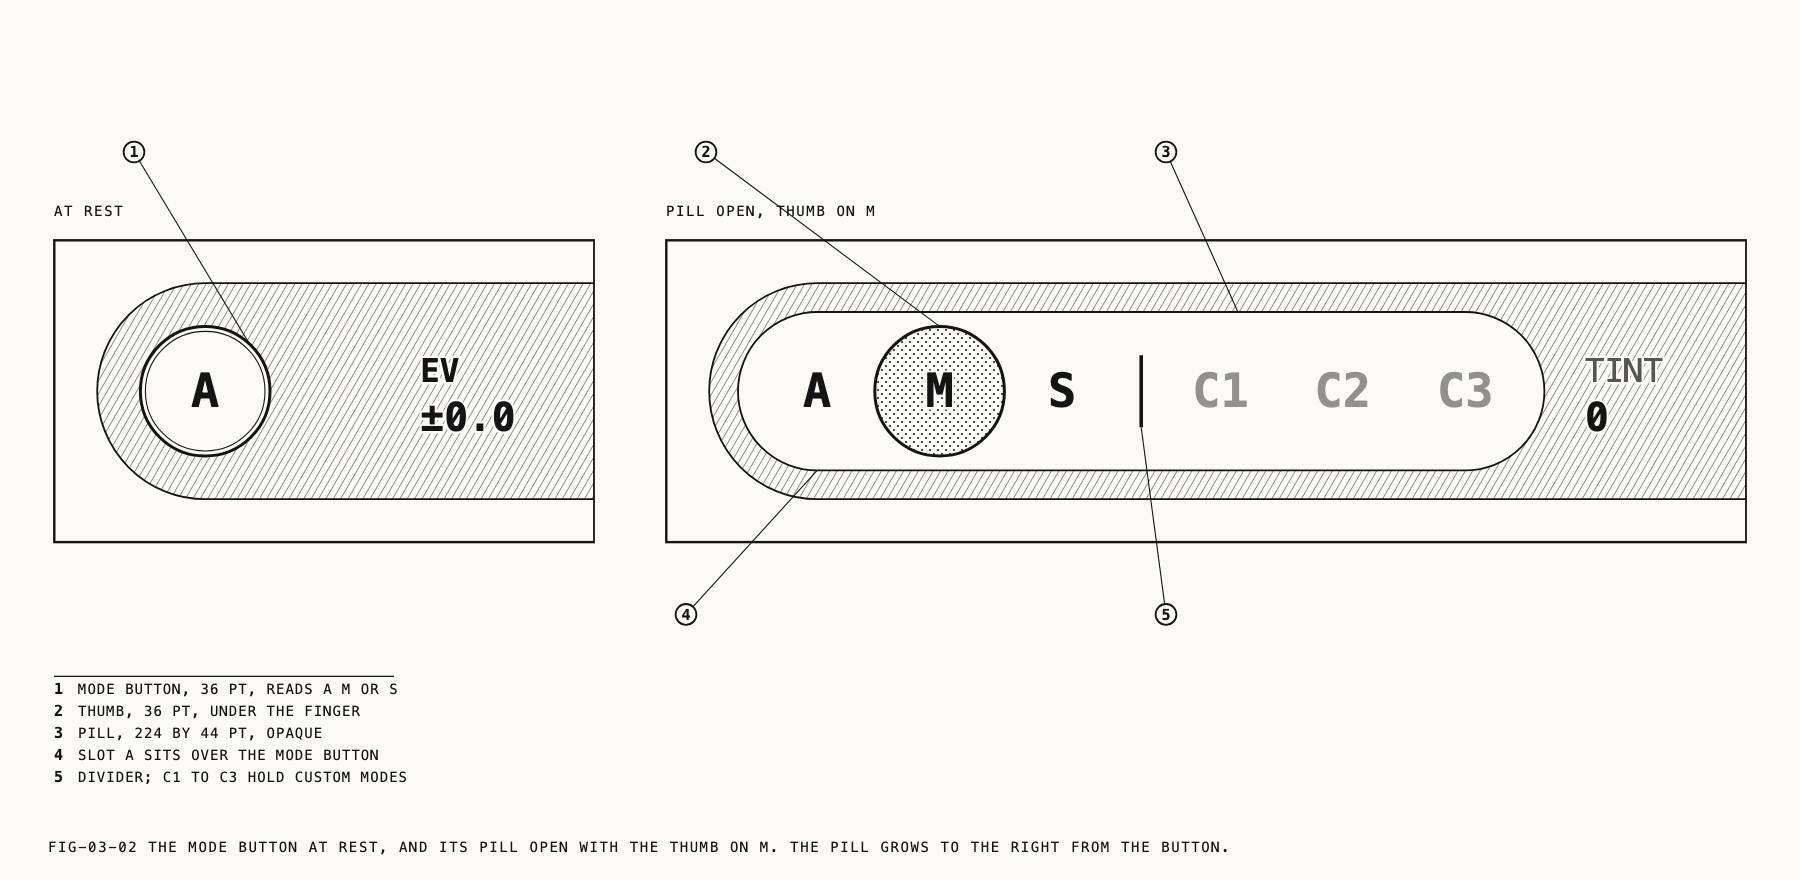
A round button sits at the leading end of the toolbar carrying a single letter: A, M
or S. It is the master exposure control, and it is on screen in every capture mode.
Tapping it advances to the next mode, cycling A, M, S and back to A. Press and
hold instead and a pill expands across the tool row with the three exposure modes laid
out as A, M and S, beside three custom mode positions, C1, C2 and C3. Drag
along the pill and release on the one you want. This reaches any mode directly, without
passing through the ones between it and the current one, and it is the only way to reach
the custom modes from the camera screen. Custom modes are covered in Chapter 23.
On devices with Camera Control, modes can also be changed there without touching the screen. Camera Control is covered in Chapter 24.
The exposure mode is held separately for photo and video, so switching capture mode returns to the mode that capture mode was last left in.
3.2 The Three Modes
| Letter | Mode | Who sets what |
|---|---|---|
A | Auto | The camera meters sensitivity and shutter |
M | Manual | You set sensitivity and shutter directly |
S | Shutter priority | You set the shutter, and sensitivity follows the meter |
Auto. The camera meters continuously and adjusts both ISO and shutter to hold the exposure it reads. Exposure compensation stays available, so the scene can be biased brighter or darker without taking either value over.
Manual. ISO and shutter are yours and the camera changes neither. The reading in the viewfinder is the exposure you have set, and it does not move when the scene does. Exposure compensation has nothing to bias in this mode, so the tool is not shown.
Shutter priority. You fix the shutter and the camera moves ISO to reach the metered exposure. The shutter stays exactly where you put it. Motion rendering is decided by the shutter, so in video this holds the look of movement steady while the light changes around it. The ISO tool remains on the toolbar as a live readout of what the camera has chosen, dimmed to show that it is not yours to set. Exposure compensation works here as well, shifting the exposure the camera works toward.
The first time you select M or S, Verana starts from the exposure the camera was
already metering, snapped to the nearest position on the dial, so the image does not jump
on the transition. After that each capture mode returns to the values you last set in it.
3.3 What Each Mode Shows
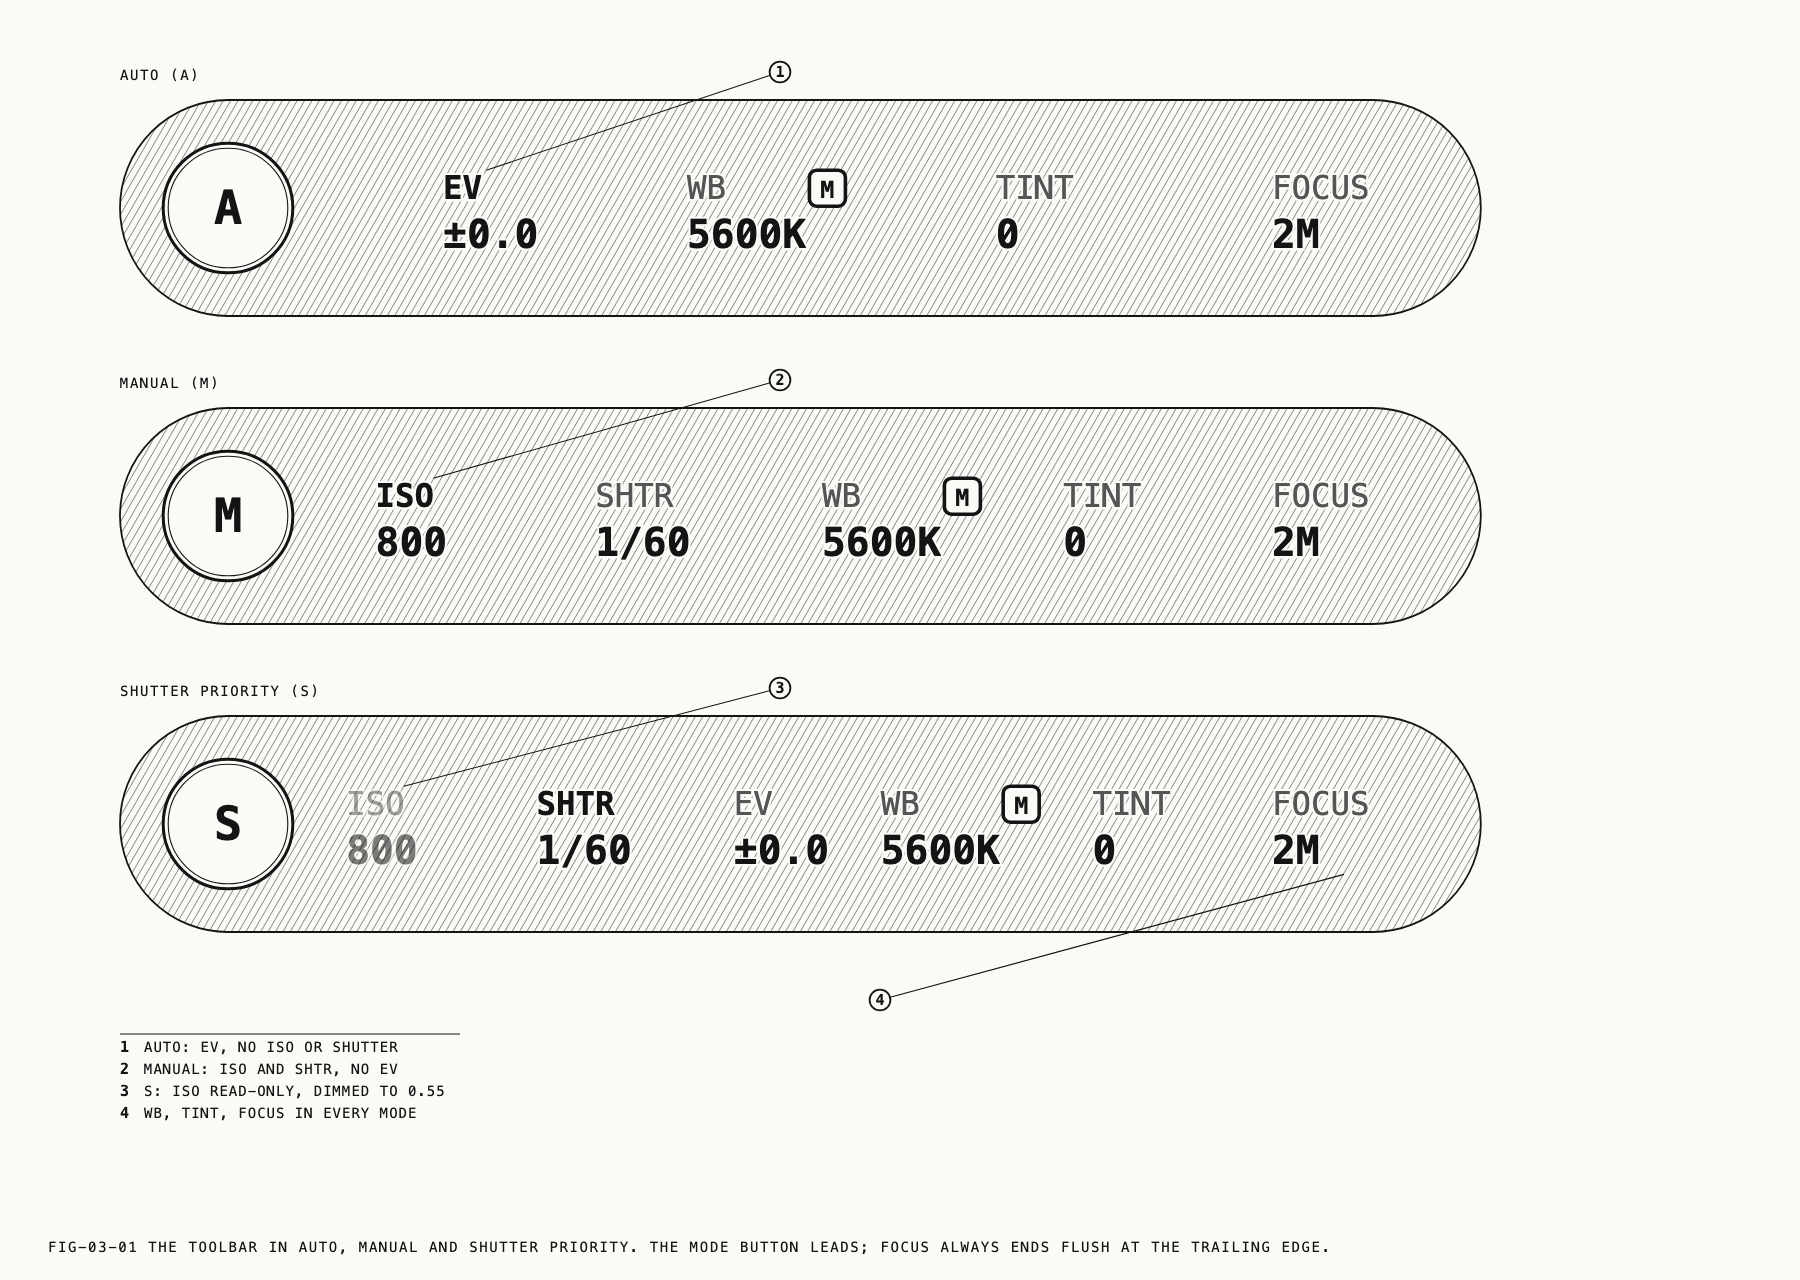
A mode hides the tools it does not control, which is why the toolbar is shorter in Auto than in Manual.
| Tool | Auto | Manual | Shutter priority |
|---|---|---|---|
EV | Adjustable | Hidden | Adjustable |
ISO | Hidden | Adjustable | Readout only |
| Shutter | Hidden | Adjustable | Adjustable |
White balance, tint and focus are not part of the exposure mode and are present in all three.
The exposure tools carry no gold M badge. The mode letter on the button already reports
which parts of the exposure are yours, so the badge would be repeating it. The badge
belongs to the tools that hold an automatic setting of their own, which are white
balance, tint and focus.
Changing mode can take away the tool the dial was pointed at. When that happens Verana
selects a tool the new mode does control: EV in Auto, ISO in Manual, and the shutter
in Shutter priority. A selection on white balance, tint or focus survives the change
untouched.
3.4 The Dial and Its Scales
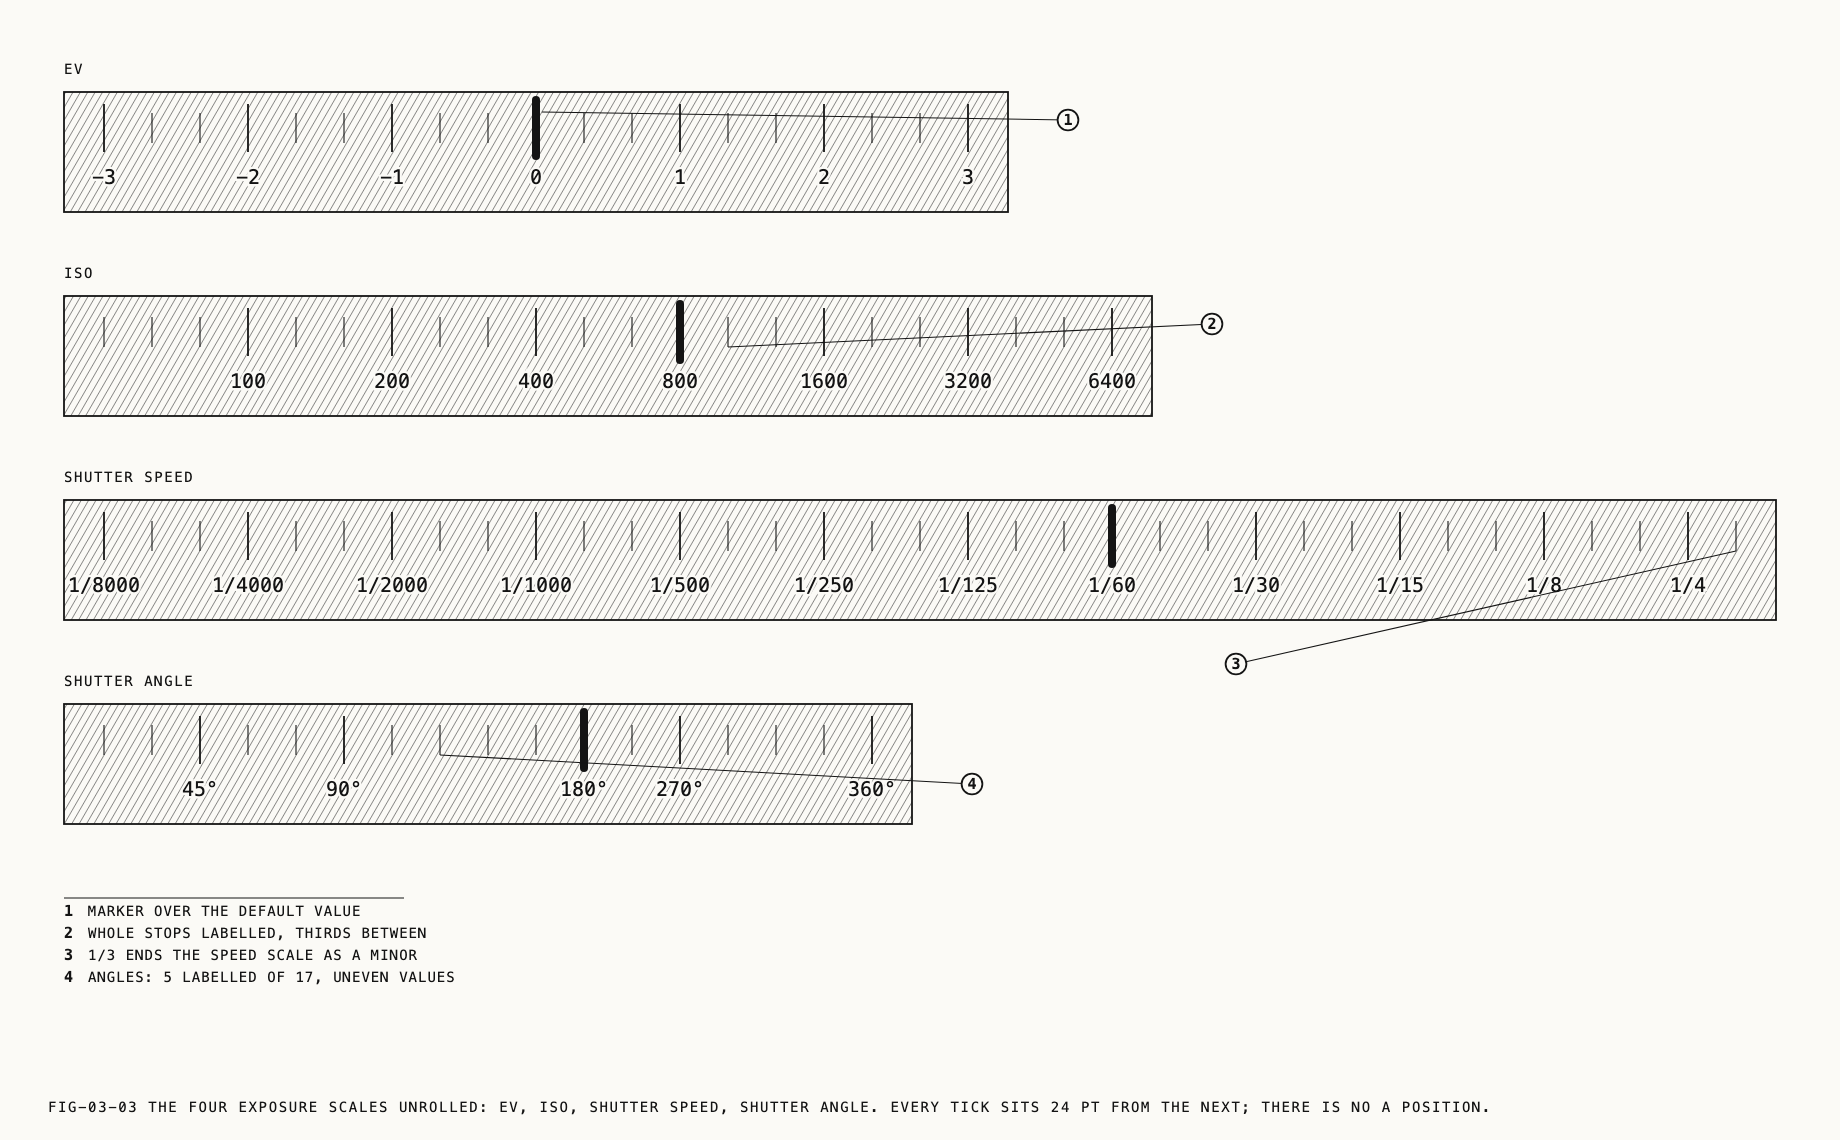
The main dial adjusts the selected tool, as described in Chapter 2. Four of its scales belong to exposure.
| Tool | Range | Steps | Labeled at |
|---|---|---|---|
EV | -3 to +3 stops | Third stops | Whole stops |
ISO | 50 to 6400 | Third stops | 100, 200, 400, 800, 1600, 3200, 6400 |
| Shutter speed | 1/8000 to 1/3 second | Third stops | 1/8000 down to 1/4 |
| Shutter angle | 11.25° to 360° | Standard angles | 45°, 90°, 180°, 270°, 360° |
Neither the ISO scale nor either shutter scale carries an A position. Automatic
exposure is a mode rather than a value on a ladder, and it is reached with the mode
button. The white balance, tint and focus scales do carry an A, because those controls
each hold their own automatic setting.
Note: These are the ranges Verana offers. The camera and the recording format in use may support a narrower range, in which case a value outside it settles at the nearest one the camera can hold, and the dial moves to match. The value you are shown is always the value in force.
3.5 Exposure Compensation
EV biases the exposure the camera meters, in thirds of a stop, three stops either way.
It applies in Auto and in Shutter priority. In Auto it shifts the exposure the camera
settles on. In Shutter priority it shifts the exposure the camera drives sensitivity
toward, so the shutter is untouched and only the brightness moves.
The setting is held separately for photo and video.
3.6 ISO
ISO sets sensitivity from 50 to 6400 in third stops. It is adjustable in Manual only.
In Shutter priority the tool stays on the toolbar and keeps updating, so the sensitivity the camera has settled on can be read at any moment, but it cannot be selected for adjustment. In Auto it is not shown.
The value is held separately for photo and video.
3.7 Shutter Speed and Shutter Angle
The shutter can be measured two ways. As a speed it reads as a fraction of a second, from 1/8000 to 1/3. As an angle it reads in degrees, from 11.25° to 360°, where the angle describes how much of each frame interval the shutter is open: 180° is half of it, and 360° is all of it. Angle is the measurement motion picture cameras use, because it describes the same fraction of every frame at any frame rate.
Where to change it: Settings → Camera → Video, under Shutter Measurement.
The choice applies to video. Photo capture always measures the shutter as a speed. The
toolbar tool follows the setting, reading SHUTTER on the largest screens and SHTR
elsewhere when the measurement is speed, and SA when it is angle. The dial changes
scale with it.
An angle you set is kept as an angle. Because an angle describes a fraction of every frame interval, changing the frame rate afterwards holds the angle and adjusts the duration underneath it: 180° is 1/48 second at 24 fps and becomes 1/60 second at 30 fps. A shutter set as a speed holds its duration regardless of frame rate.
Note: A PearlaRAW video recording that begins while the camera is metering automatically holds its exposure for the length of the clip, so brightness does not drift part way through a take. Values you set by hand are recorded exactly as set. PearlaRAW video is covered in Chapter 10. An interval run can be set to hold exposure from its first frame in the same way, covered in Chapter 9.
3.8 What Is Remembered
Photo and video keep their own exposure settings throughout. The exposure mode, the compensation, the sensitivity and the shutter are all stored per capture mode, so switching between photo and video restores what each was last set to rather than carrying one across to the other.
← 2. The Camera Screen · Contents · 4. White Balance and Tint →