Everything Verana has captured is reviewed from one screen. It is reached with the Media button at the trailing end of the bottom bar, or by swiping across the viewfinder from right to left. The library fills the screen, and a swipe in the opposite direction returns you to the camera. The bottom bar is covered in Chapter 2.
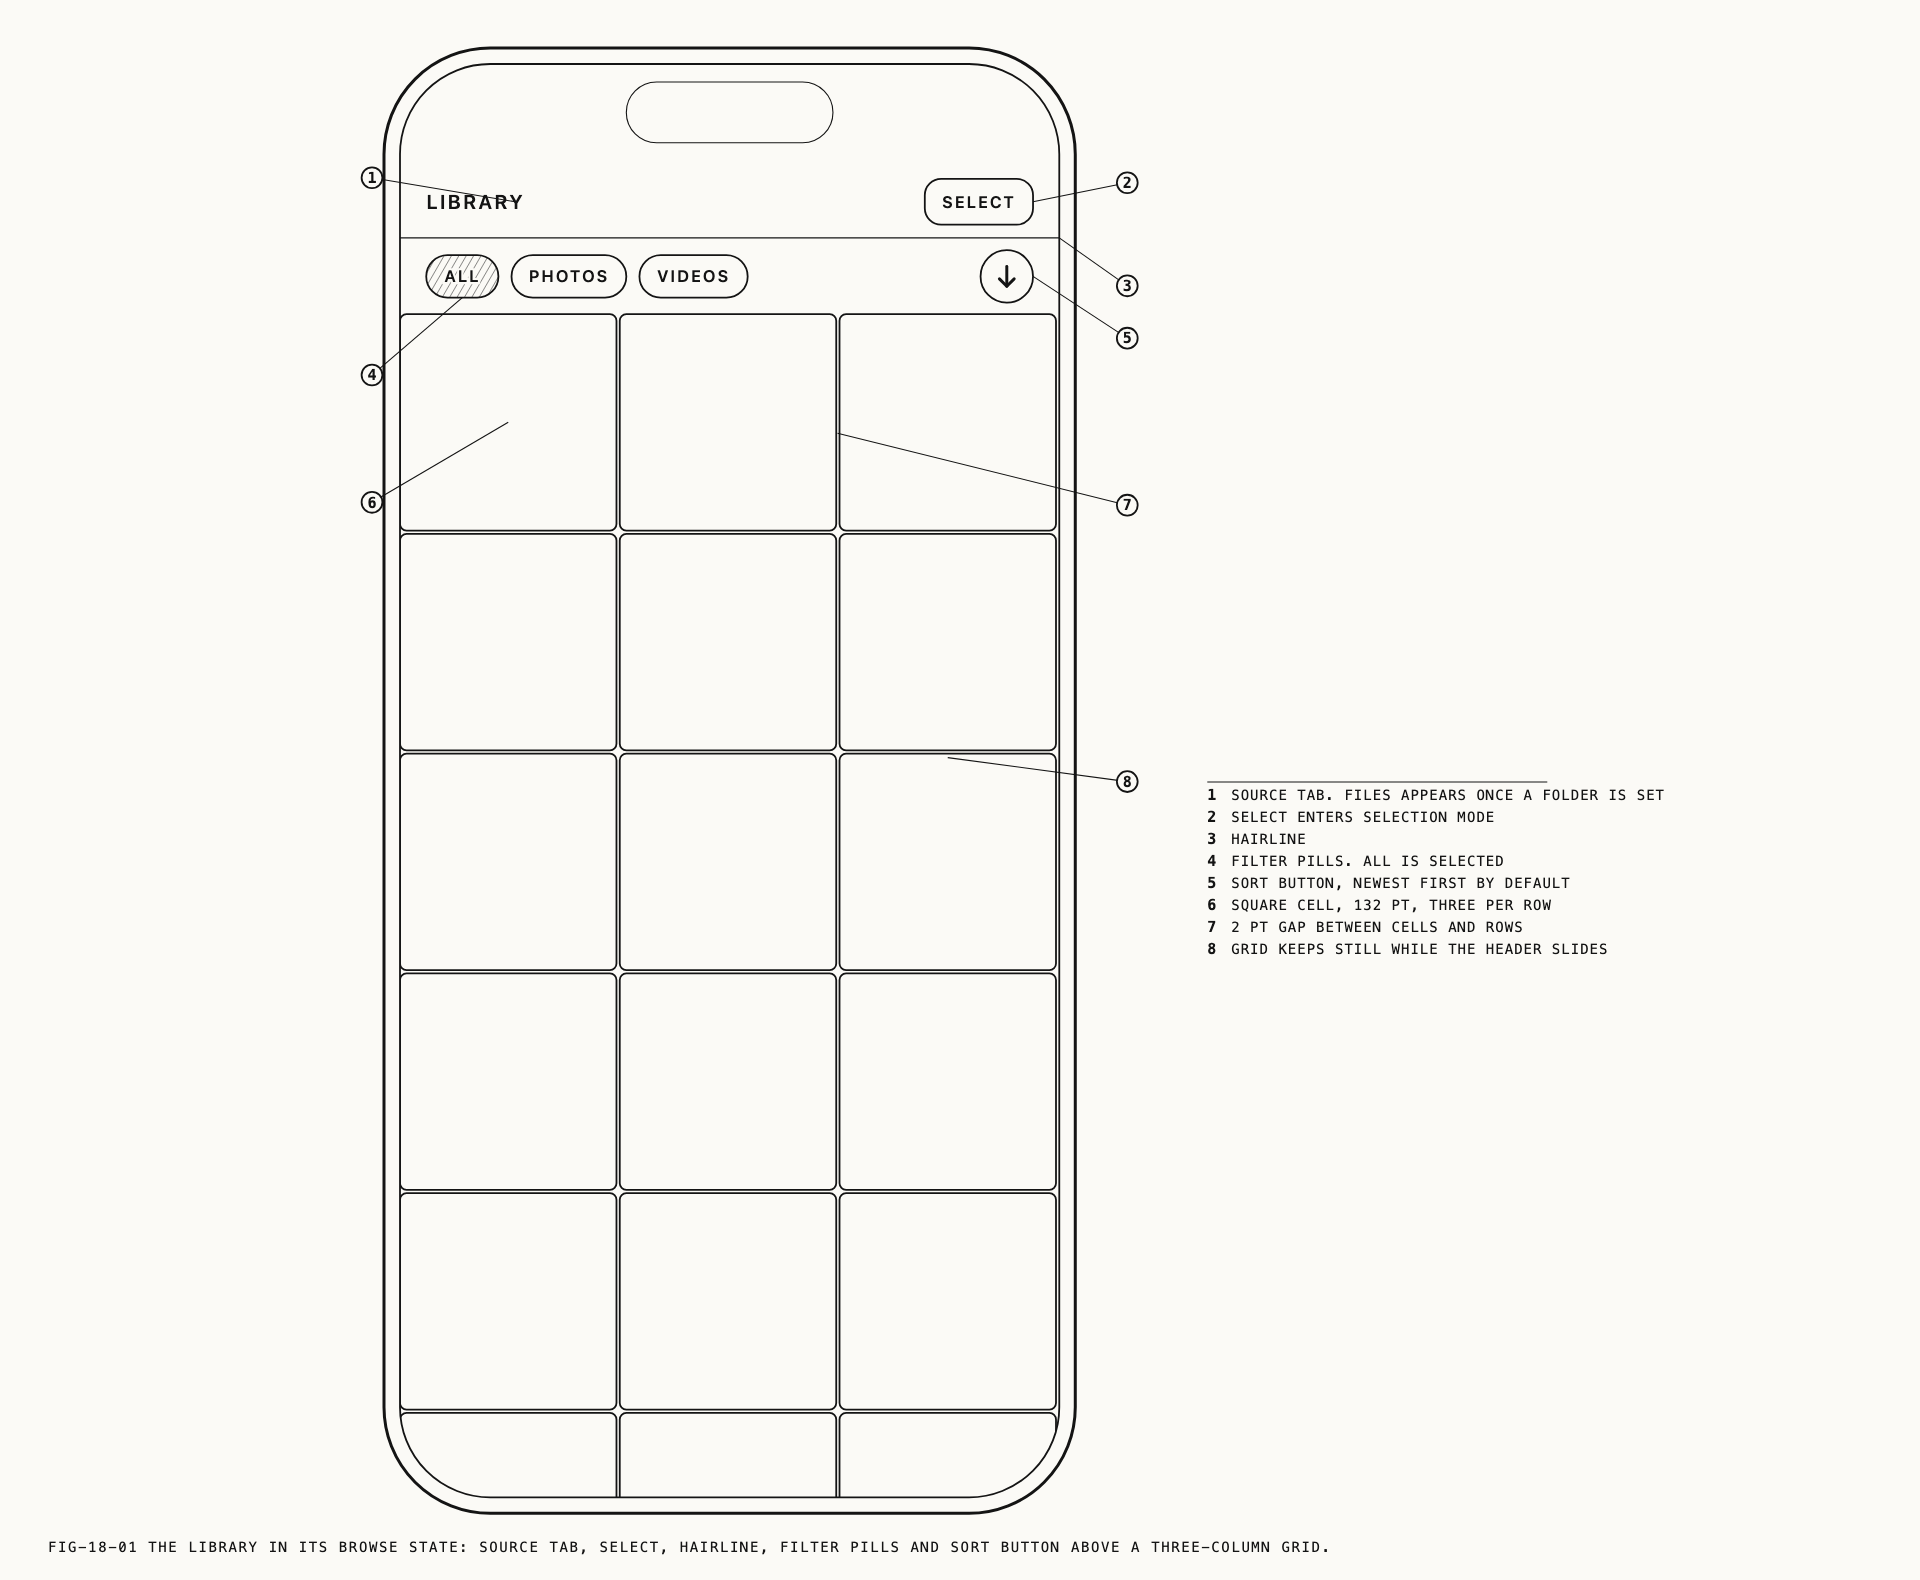
The screen is a grid of thumbnails, three to a row, newest first. Above the grid sits
the chrome that governs what the grid contains: a pair of source tabs, a Select
button, three filter pills, and a sort control. This chapter covers the grid and the
work done on it. What happens when a capture opens is covered in Chapter 19, and
export in Chapter 20.
18.1 The Two Sources
The grid draws from one of two sources, chosen with the tabs at the top left.
Library is Verana’s own storage inside the app. Every still lands here. So does every
video recording, unless the video save destination has been pointed elsewhere.
Files reads a folder you picked yourself, most often on an external drive connected
over USB-C. It is the same folder video recordings are written to when the save
destination is set to Files, and it shows whatever is in that folder, including material
put there by something other than Verana. Choosing the destination and the folder is
covered in Chapter 10.
Where to change it: Settings → Camera → Video, under Save To and Destination Folder.
The Files tab appears only once a folder has been picked. It stays in place when the
drive is disconnected rather than vanishing, and the grid then reports
Drive not connected. rather than presenting itself as an empty folder. Clearing the
folder while you are looking at it returns the grid to Library.
The two sources behave differently. The library opens immediately with its thumbnails ready. The Files folder is read each time you open it, so changes made on another machine appear, and a folder with many clips takes a moment to load.
Recordings written to the Files folder do not appear under Library. A capture belongs to
one source or the other.
18.2 Filters and Sorting
Three pills filter the grid: All, Photos and Videos. Burst and interval stacks are
filed under Photos, since a stack is a group of stills rather than a clip.
When nothing matches, the grid says so, and the wording follows both the source and the
filter. The library reports No captures yet., No photos yet. or No videos yet. The
Files source reports No media in this folder yet., No photos in this folder yet. or
No videos in this folder yet.
The circular button at the trailing end of the pill row opens the sort menu. Three keys
are offered, Date, Size and Duration, with a check mark against the one in use. A
fourth row reverses the order and names the order currently in force: Newest First or
Oldest First under date, Largest First or Smallest First under size, Longest First
or Shortest First under duration. Tapping it flips to the other. The arrow drawn on the
sort button carries the same reading, so the direction can be checked without opening the
menu. The grid opens sorted by date, newest first.
Stills have no running time, so under Duration they gather at the short end of the grid.
Captures that tie on the chosen key fall back to newest first, which keeps the order stable
rather than reshuffling from one visit to the next.
18.3 The Collapsing Header
The header does not hold its position. Scrolling down through the grid takes it away, and any upward scroll brings it back. At the top of the grid it is always present. Reaching the source tabs, the filters or the sort control therefore never requires scrolling back to the first row: a short upward drag is enough.
18.4 What a Thumbnail Shows
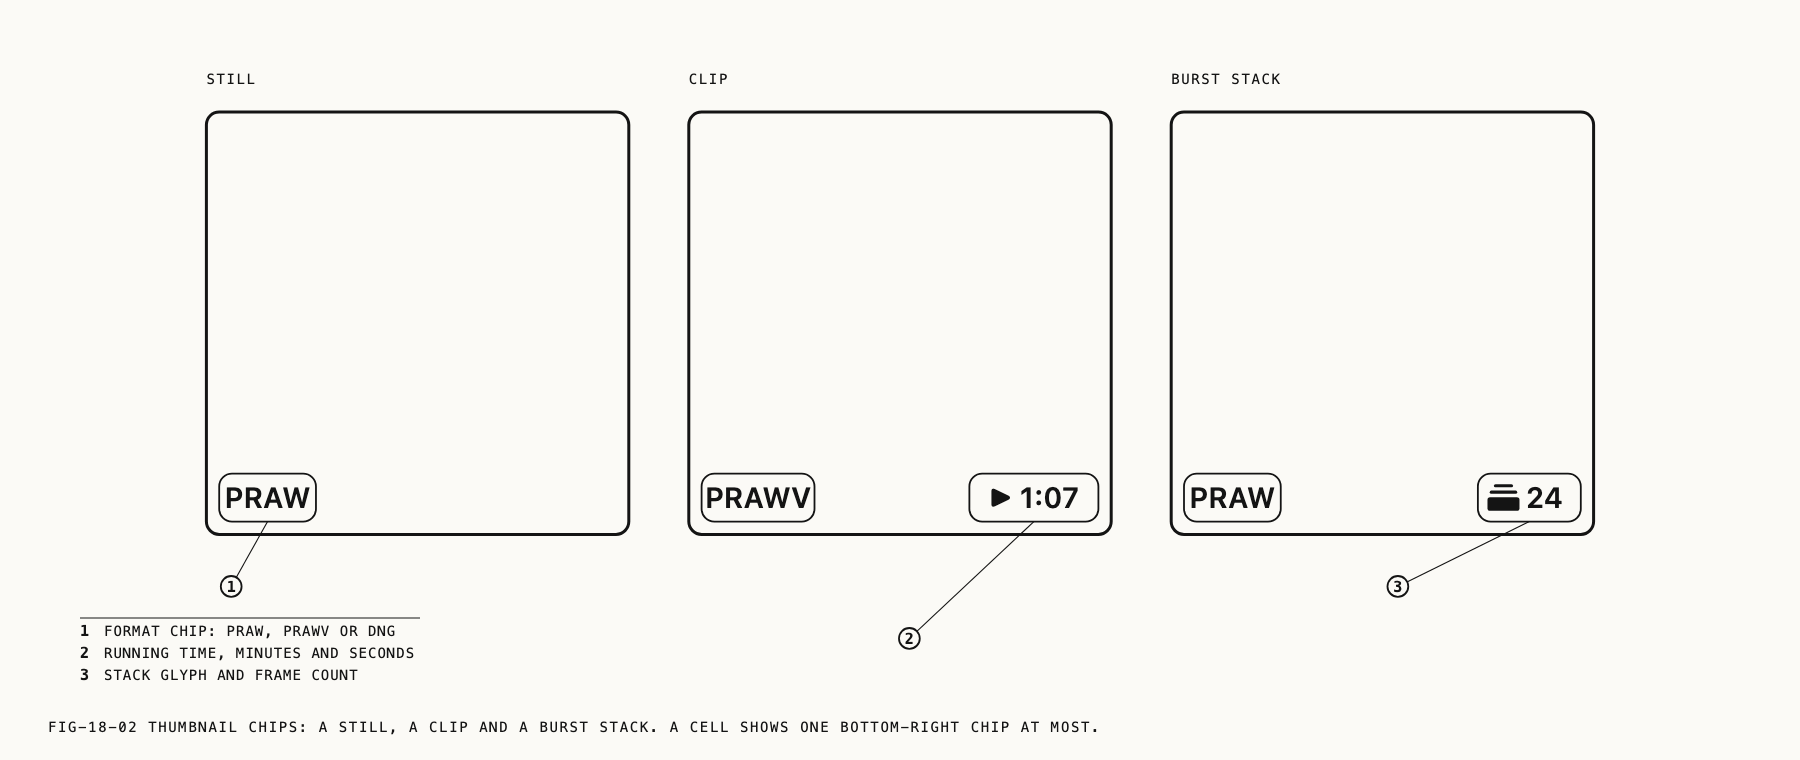
Each cell carries up to two small chips over the image.
The bottom left position holds a format chip naming the capture’s family: PRAW for
PearlaRAW stills and for burst and interval stacks, PRAWV for PearlaRAW video, and DNG
for other raw stills. A capture that exists only as a processed image carries no format
chip.
The bottom right position holds one chip or the other, never both. A video shows its running time. A burst or interval stack shows the capture mode’s own icon followed by the number of frames it holds, which distinguishes a burst from an interval run without opening either.
18.5 Selecting Captures
Select at the top right enters selection mode, and reads Cancel while selection is
active. It is unavailable while the grid is empty. A press and hold on any cell also enters
selection mode, selects the cell you pressed, and continues straight into the range
behavior described below without lifting your finger.
In selection mode a tap toggles one capture.
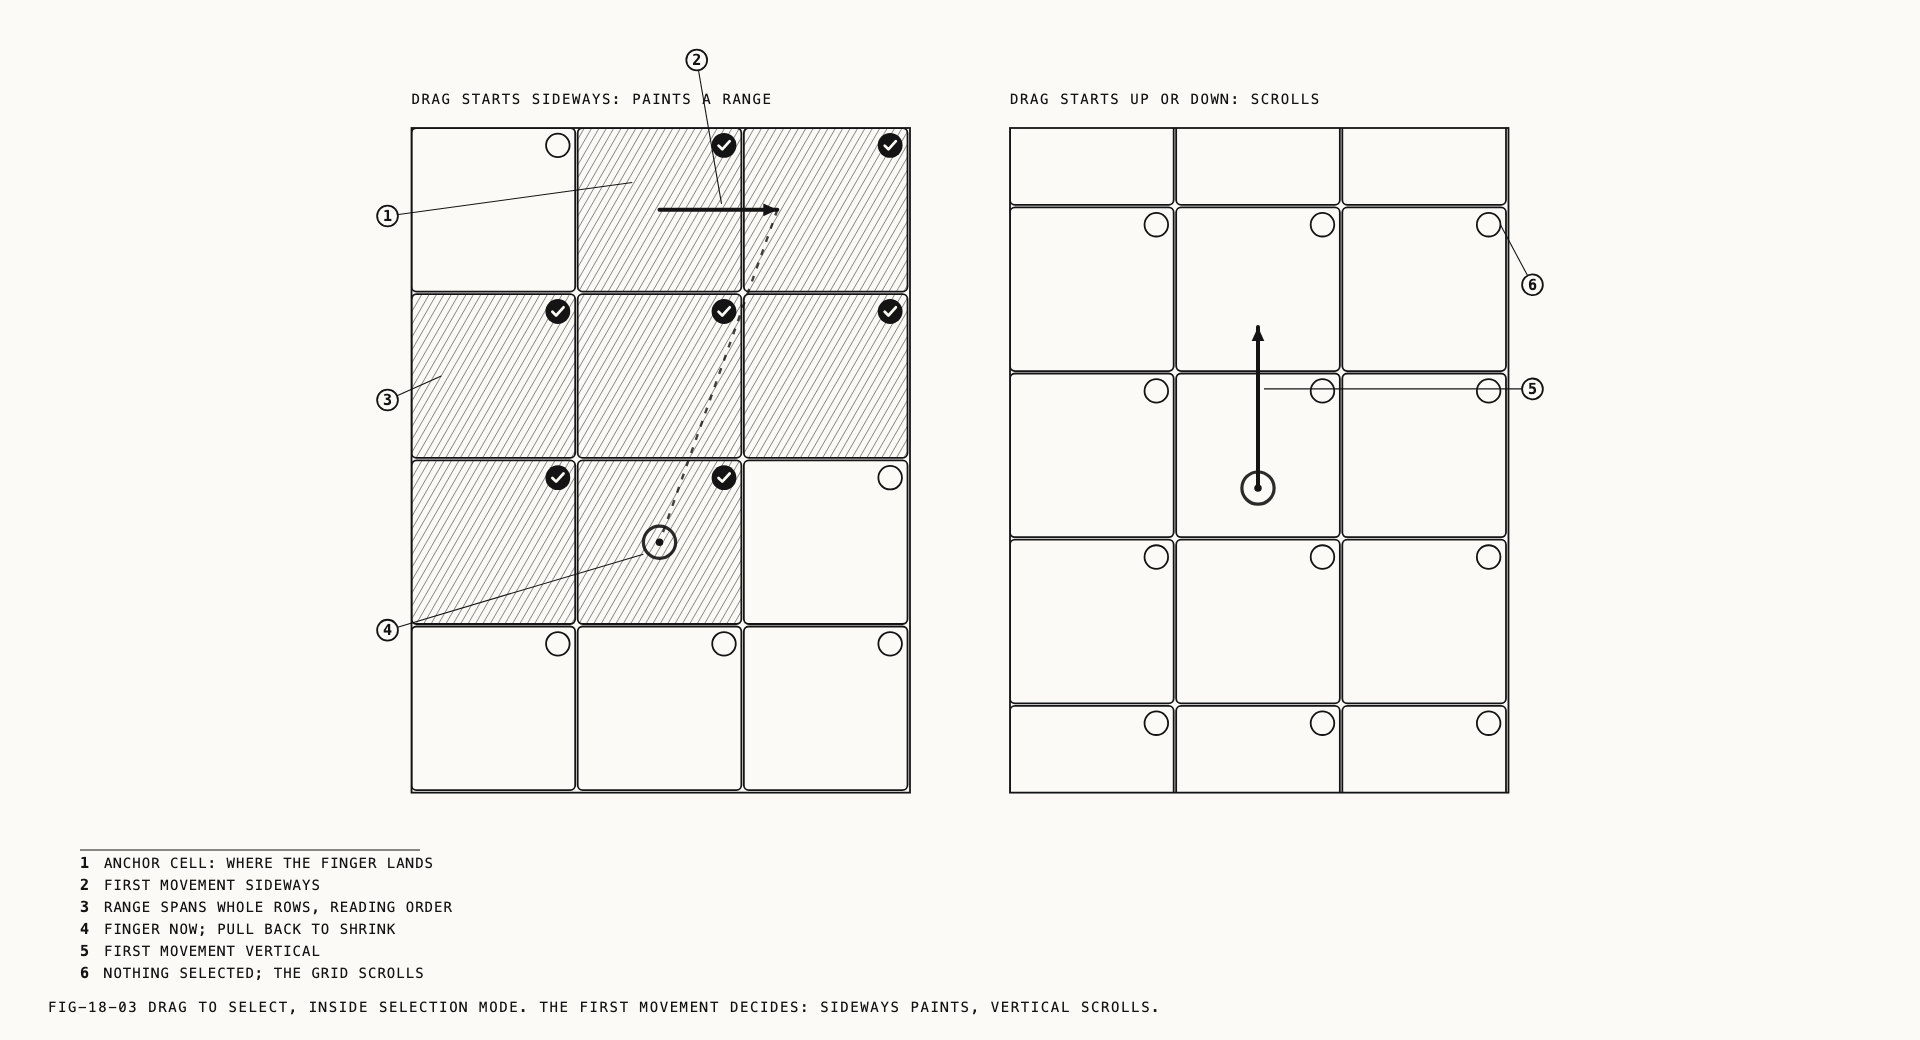
The direction in which a drag starts decides what the drag does. A drag that starts horizontally selects a range. A drag that starts vertically scrolls the grid as it normally would.
Once a range drag has begun it follows your finger in any direction. The range runs in reading order from the cell you started on to the cell currently under your finger, so it spans whole rows between the two. Dragging back over the range shrinks it again. If the cell you started on was already selected, the drag deselects rather than selects. Dragging to the top or bottom edge scrolls the grid and keeps selecting as it goes.
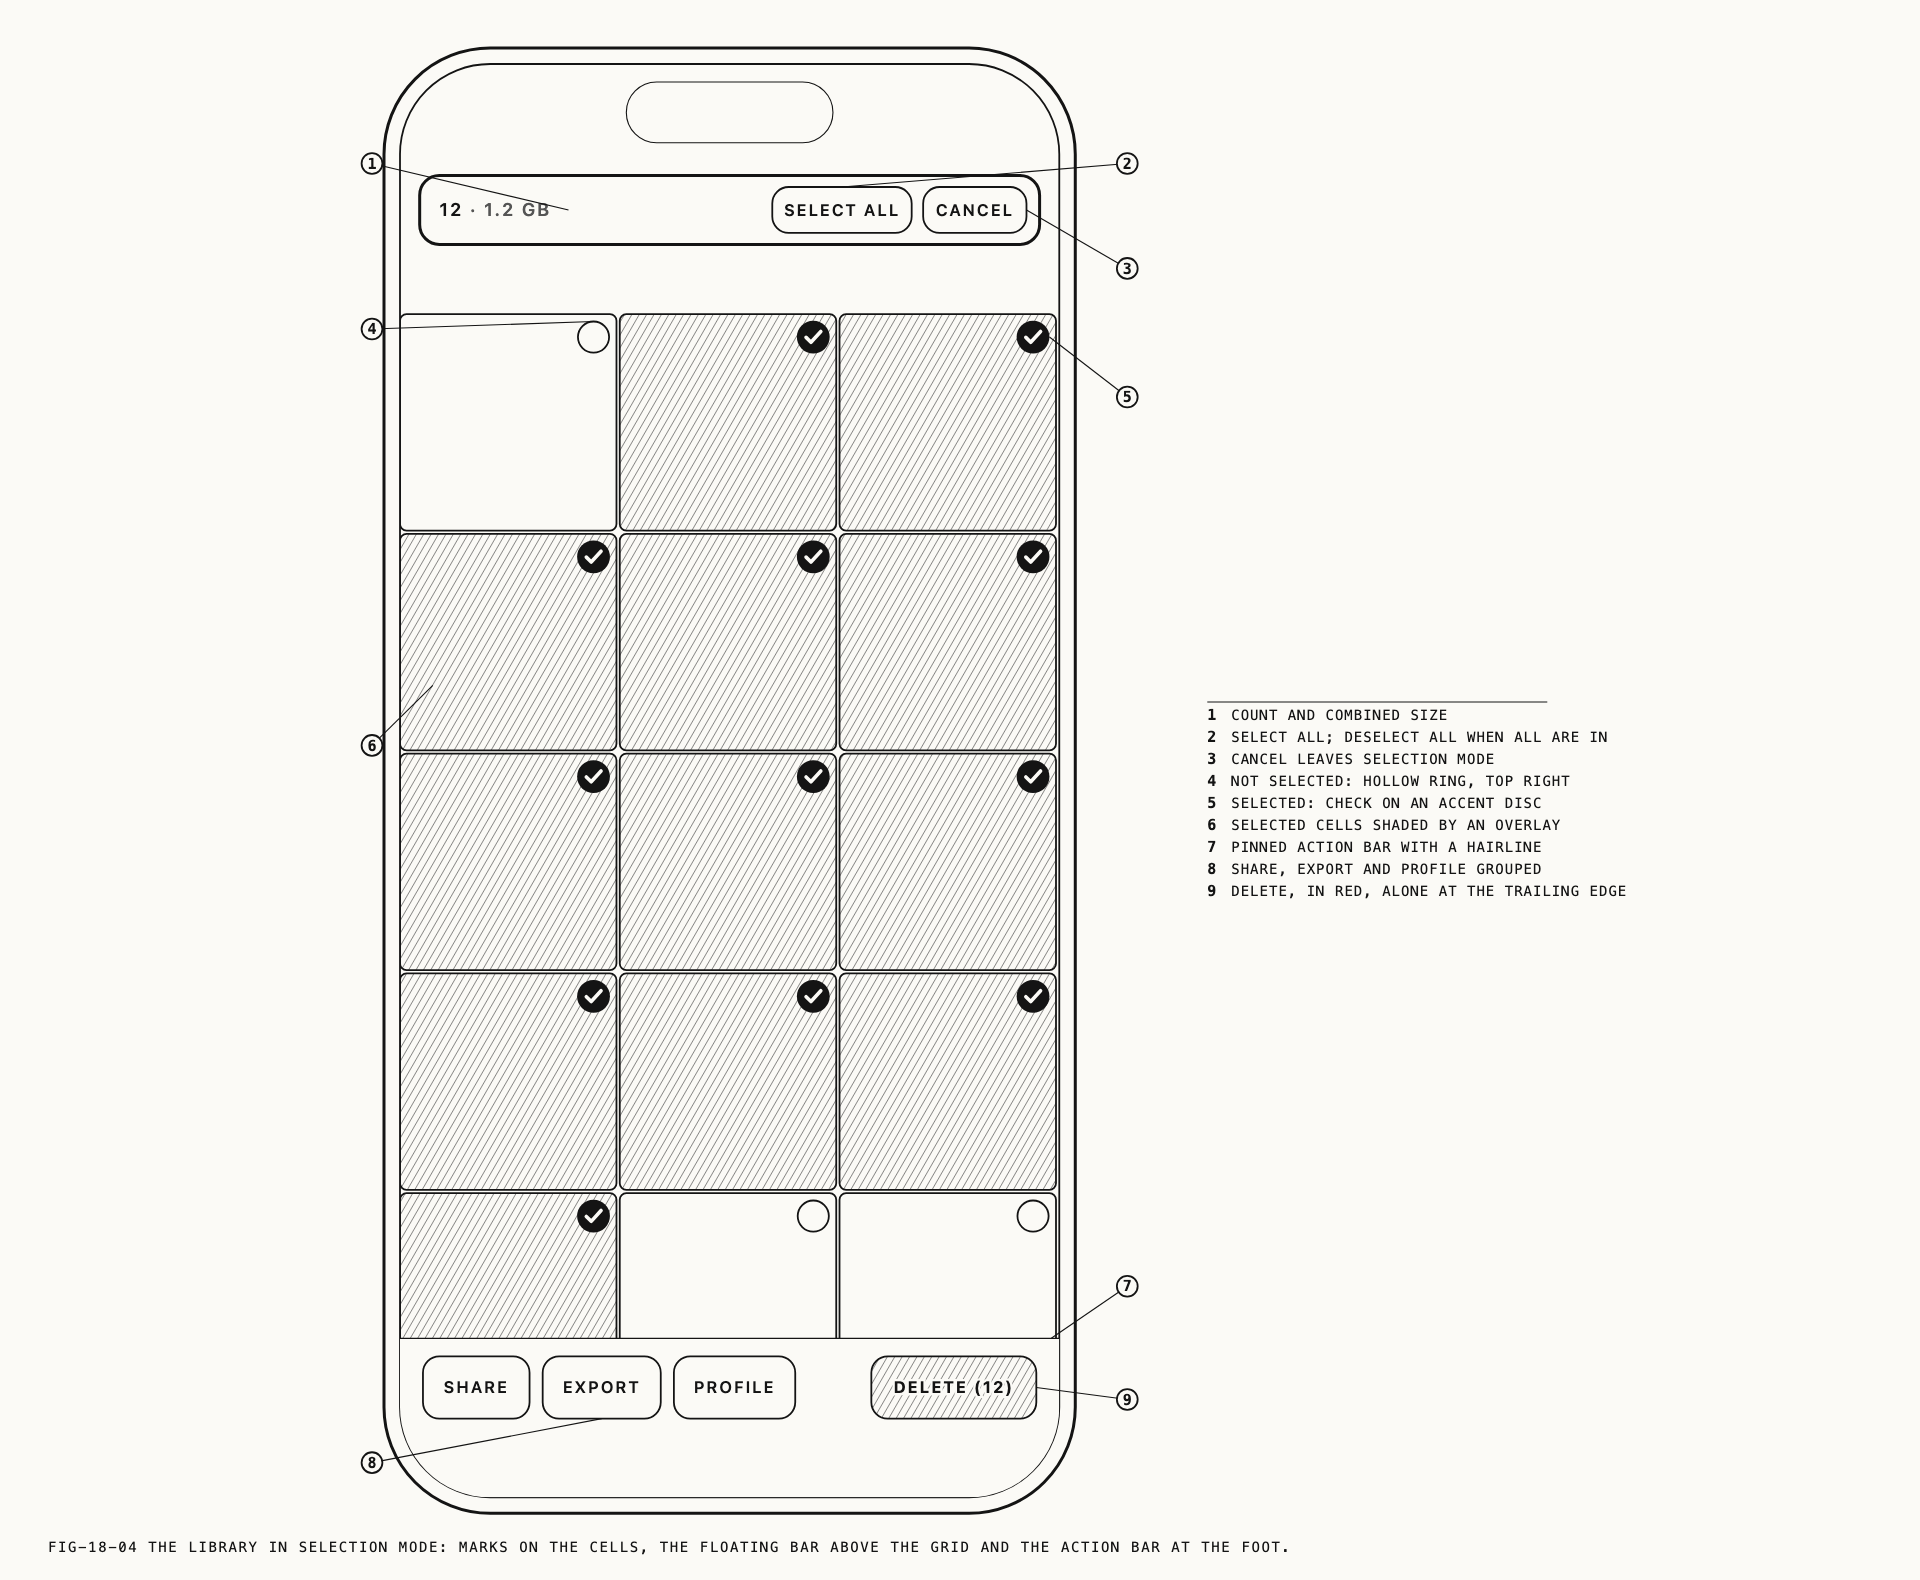
A floating bar above the grid reports the number of captures selected and their combined
size. Select All takes everything the current filter is showing, and reads Deselect All
once everything is taken. Cancel beside it leaves selection mode.
Entering selection collapses the header so the floating bar can take its place. A scroll up still brings the header back, so the source tabs and the filters remain reachable while a selection is held.
Note: entering or leaving selection mode clears the selection, and so does switching source. Changing the filter does not, but a capture the new filter hides leaves the selection along with it.
Note: the swipe back to the camera screen is unavailable while selection is active, because a horizontal drag is selecting. Leave selection first.
18.6 Batch Actions
A bar pinned to the foot of the screen carries the actions that operate on the selection.
Share, Export and Profile sit together at the leading edge and Delete stands alone
at the trailing edge, away from the rest. All four are unavailable until something is
selected, and Delete carries the count of what it will remove, as in DELETE (12).
Share passes the selection to the system share sheet. Export opens the export options.
Both are covered in Chapter 20.
Profile applies a custom profile across the whole selection, or removes the one already
applied. Captures in the selection that cannot carry a profile are passed over and counted,
and the result is reported when the run finishes. Custom profiles are covered in Chapter 17.
Delete asks for confirmation first, and the confirmation names where the captures are
being removed from, because that differs by source. In the library it reads
Delete 12 Captures? over They will be removed from the library. Under Files it asks the
same question over They will be removed from the drive folder. Read the second line
before confirming. A deletion under Files removes the files from the drive itself.
18.7 Opening a Capture
Outside selection mode, tapping a capture opens it. What opens depends on what Verana can do with the file.
| What you tapped | What opens |
|---|---|
| A burst or interval stack | The stack and its frames |
| A raw still, a PearlaRAW clip, or a movie recorded in Verana | The capture with its adjustment tools |
| Any other video | Playback |
| Any other still | The image, for viewing only |
Captures made in Verana carry their own record of how they were shot, and that record is what the adjustment tools work from. A still that exists only as a processed image, and any file brought in from another camera or another app, opens for viewing or playback and nothing more. This applies to both sources: a foreign clip sitting in the Files folder behaves the same way there as it would in the library.
Everything past the tap is covered in Chapter 19, including deleting a single capture, which is done there rather than here.
← 17. LUTs and Custom Profiles · Contents · 19. Revela Lite →