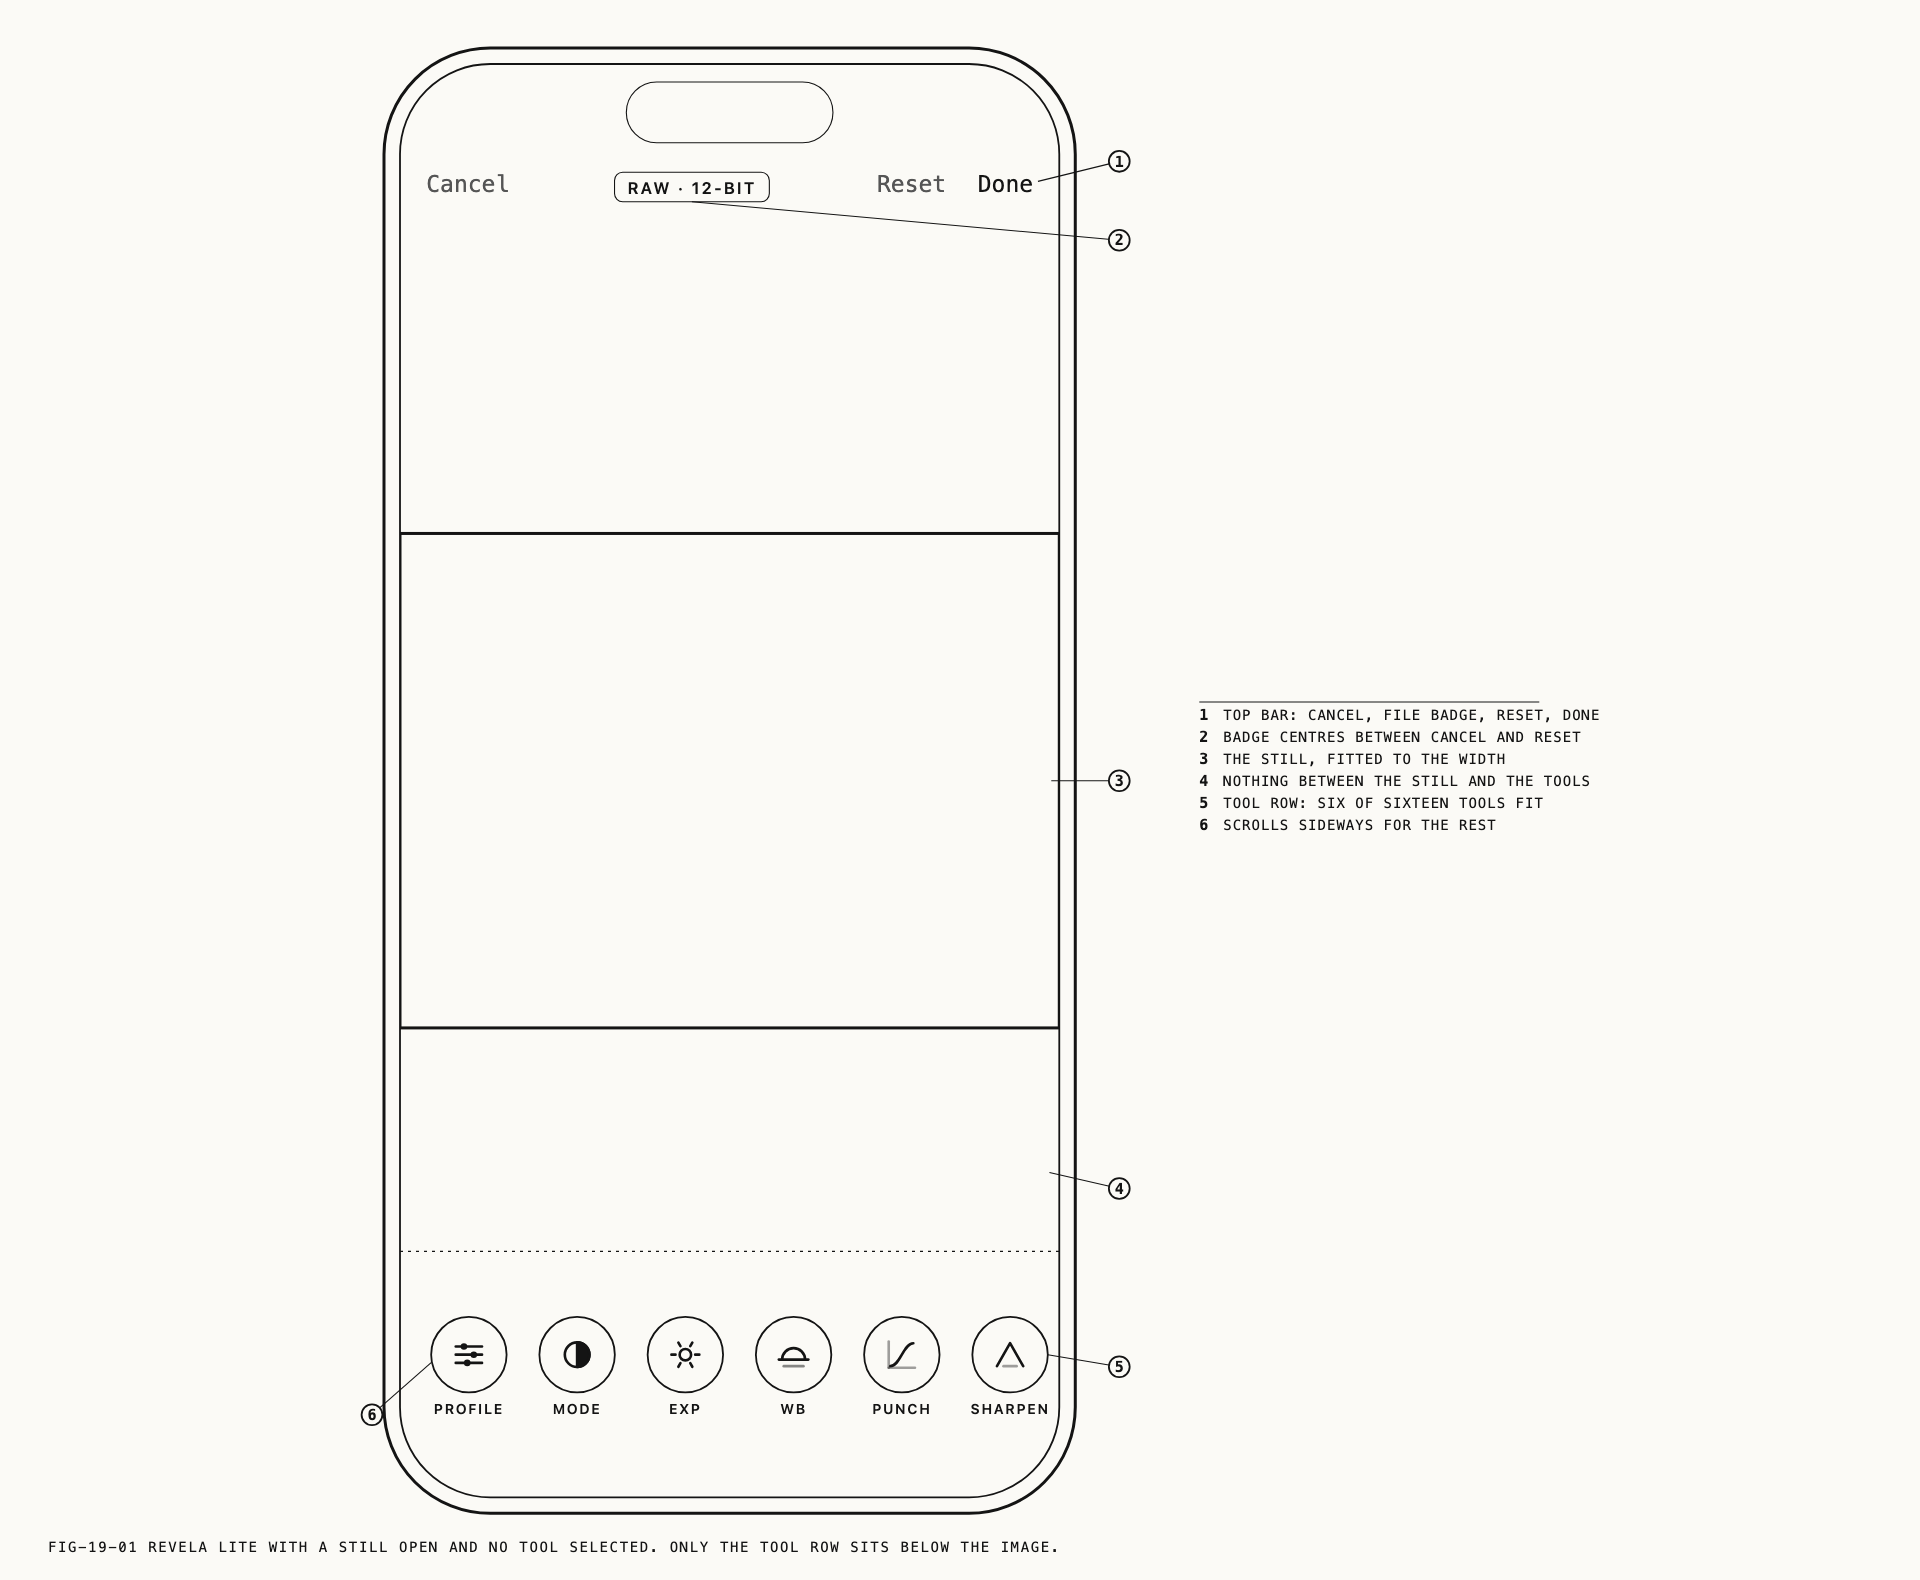
Tapping a capture in the media library opens Revela Lite. The image fills the screen, a slim bar sits above it and a row of tools sits below it, and nothing else is in the way. It is named for Pearla Revela, of which it is a lighter form.
Revela Lite is one place, not two. There is no separate viewing screen and no separate editing screen to travel between: with no tool selected you are simply looking at the picture, and selecting a tool puts a control under your thumb without taking the picture away. Everything in this chapter happens on that one screen.
Where to find it: the media library, then tap a capture.
Which captures open here is decided by the file, and is covered in Chapter 18. Stills and clips shot in Verana open with their tools; material from another camera or another app opens for viewing or playback only, and section 19.14 covers what that looks like.
19.1 The Image
The picture is shown at the size of the screen. Pinch to magnify it, up to four times, and drag to move around the enlarged frame. The preview resolves to finer detail as you zoom in, so noise reduction, sharpening and moiré can be judged at magnification rather than guessed at.
Press and hold anywhere on the image to see the capture without your adjustments. The
badge in the top bar reads BEFORE while the hold lasts, and everything returns the
moment you lift your finger. The comparison is against the file as it was shot, not
against the state you last saved, so a capture that already carried grain or a lens
correction from the shoot shows those in the before image too.
Four controls share the top bar. Cancel leaves without saving. Reset returns every
control on the capture to its own defaults, after asking first. Done saves and closes.
Between Cancel and Reset sits a badge naming what the file is, such as RAW · 12-BIT
for a PearlaRAW still, DNG for a raw still from another format, or the color space or
log profile of a clip. The badge describes the file, not the adjustments, so it does not
change as you work.
Adjustments never overwrite the capture. The original stays intact and every control
remains reversible, which is why Reset can always take a capture back to the way it
came off the camera.
19.2 One Tool, One Dial
Every tool in Revela Lite works the same way, and learning it once is enough for all of them.
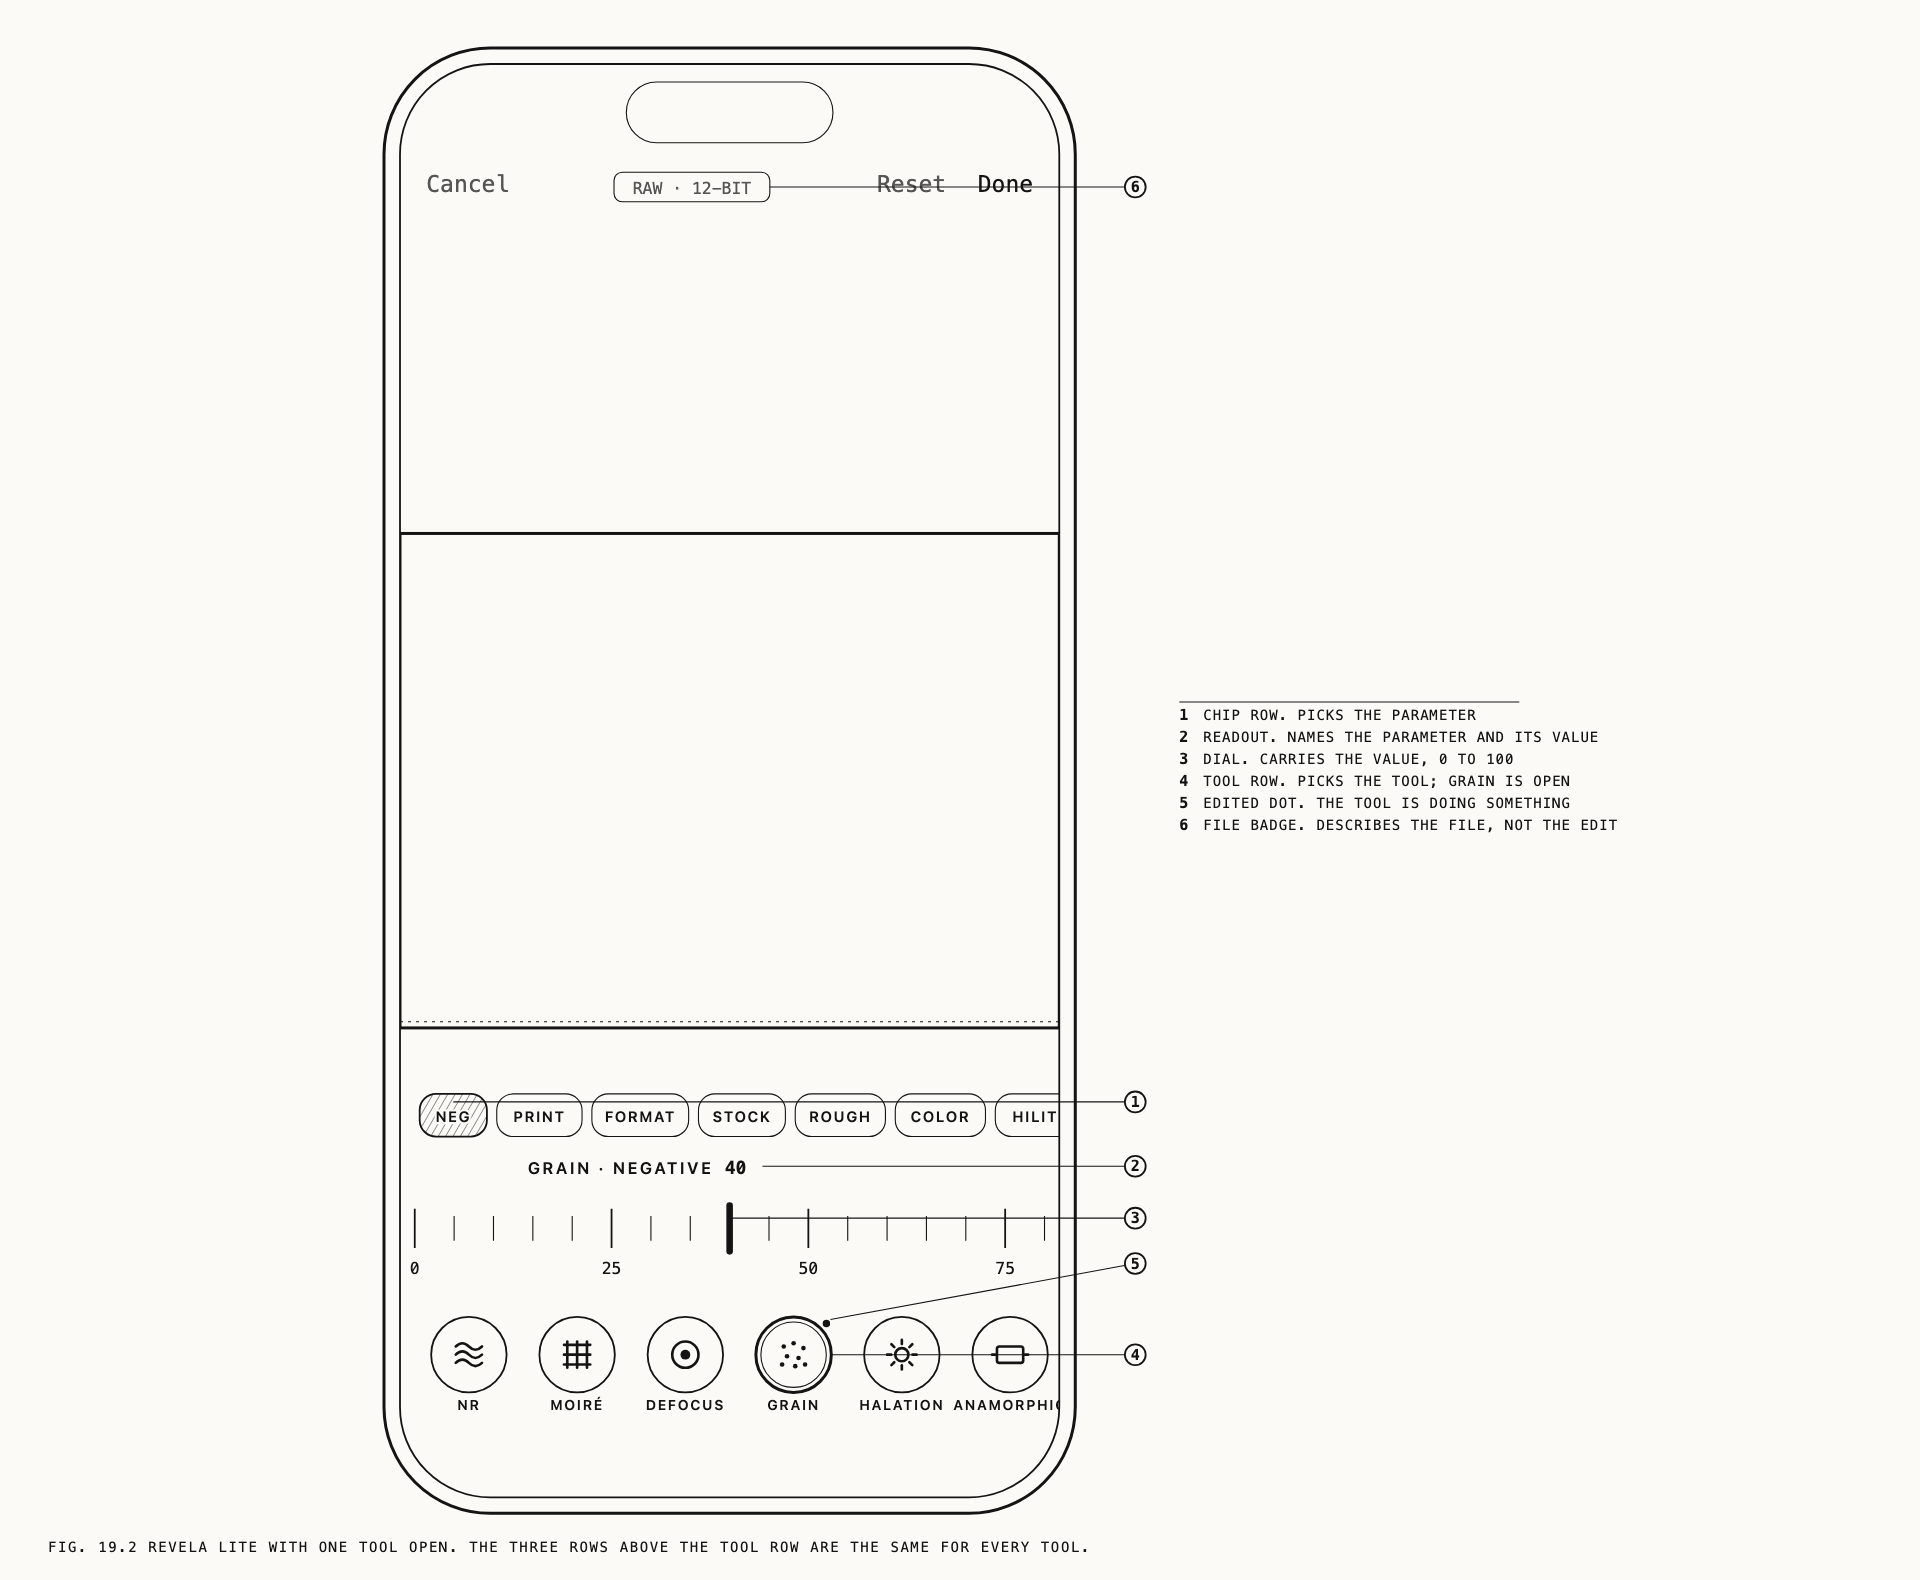
The tool row runs along the bottom of the screen and scrolls sideways. Each tool is a circle with its name beneath it. Tapping a tool selects it and opens its controls immediately above the row; tapping it again closes them and returns you to the plain image. Only one tool is open at a time.
An open tool presents up to three things, always in the same order and always in the same places:
- A chip row, when the tool has more than one thing to set. The chips choose which parameter the dial is driving.
- The readout, a single centered line naming what is being adjusted and its current value.
- The dial, the same marked dial used on the camera screen, carrying the value.
Every tool works this way. GRAIN, HALATION and DEFOCUS each hold several parameters,
and none of them needs a panel of sliders: the chips pick one, the readout names it, the
dial sets it.
The dial changes its scale to suit the parameter it is driving.
| Dial mode | Driven by | Scale |
|---|---|---|
EV | EXP | Four stops either side of zero, in thirds |
WB | WB with TEMP selected | Color temperature in kelvin |
TINT | WB with TINT selected | Tint, 150 either side of neutral |
AMOUNT | PUNCH, SHARPEN, DETAIL, NR, MOIRÉ, FIELD MIX, GRAIN, HALATION, and the FOCUS and SOFTNESS parameters of DEFOCUS | 0 to 100 |
APERTURE | The BLUR parameter of DEFOCUS | OFF, then whole and half stops from f/1.2 to f/22 |
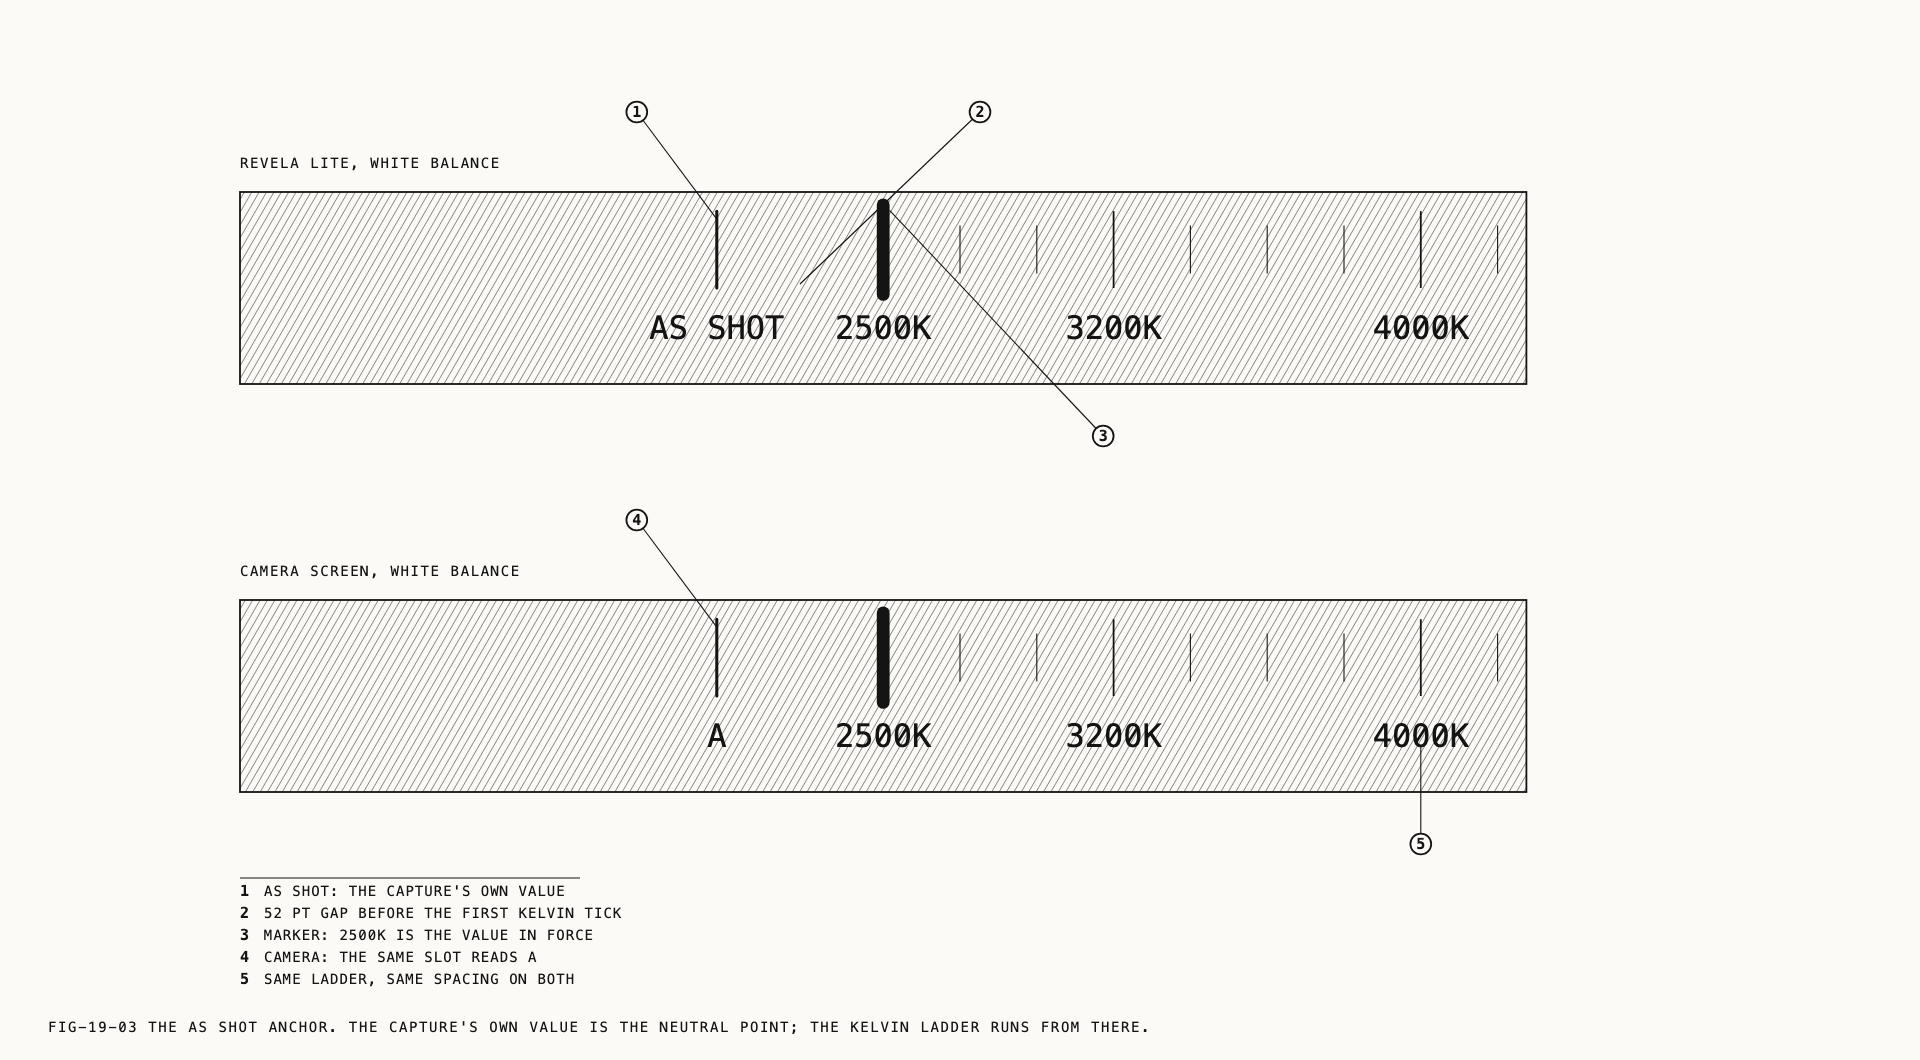
AS SHOT
On the camera screen the dial’s leftmost anchor tick reads A, for automatic. Here it
reads AS SHOT. A capture already carries the values it was made with, and every
adjustment starts from those values. Turning the white balance dial back to AS SHOT does not mean automatic
white balance; it means the white balance the file was recorded with. The same reading
applies to every tool. An untouched control is showing you the capture, and a touched one
is showing you a departure from it.
This is also why the amount tools read Default rather than a number until you touch
them. The file’s own value is the starting point, and it differs from capture to capture.
The edited dot
A small dot on a tool’s circle means that tool is doing something. For the adjustment
tools the dot marks a change you made. For LUT, GRAIN, HALATION and
ANAMORPHIC it marks an active setting whether you made it or not, so a clip shot through
an anamorphic lens or under a monitoring LUT shows the dot from the moment it opens. The
image really does carry those, and the row says so.
Resets
Press and hold a tool to return that tool alone to the capture’s own state. The dial snaps back and the dot clears. This is per tool and needs no confirmation.
Reset in the top bar clears everything at once and asks first, with
Reset All Edits? over Every control returns to the photo's own defaults. A capture
reset back to its original state and saved is left exactly as it was shot.
MODE and OUTPUT are not the same tool
Two tools in the row have names that read alike, and they sit at opposite ends of the work.
MODE is the color treatment the capture is rendered with: RealHUE, a film profile, or a
log profile. It is the same choice made on the camera under Settings → Image Processing,
made again after the fact.
OUTPUT is delivery. It sets the color space the file is written in when it leaves
Verana, and it changes nothing about the treatment.
MODE decides what the picture looks like. OUTPUT decides what a viewing device is told
about the picture. They are covered in sections 19.5 and 19.10.
19.3 Which Tools a Capture Offers
The tool row is built for the capture in front of it, so two captures rarely show the same set. A tool that has nothing to act on is not shown.
| Capture | What the row offers |
|---|---|
| A PearlaRAW still | The full set, less the video tools |
| A raw still Verana shot in another format | The same, less PROFILE, plus an APPLE mode |
| A PearlaRAW clip | The full set, less DEFOCUS, plus SCRUB and the video tools |
| A log clip recorded in Verana | SCRUB, MODE, LUT, GRAIN, HALATION, ANAMORPHIC, OUTPUT, FIELD MIX, and the file tools |
| Any other clip recorded in Verana | SCRUB, ANAMORPHIC, FIELD MIX, and the file tools |
A recording that is not raw and not log has its look already in its pixels, so the color
tools have nothing to work on and do not appear. ANAMORPHIC survives on every recording,
because a lens correction is geometry rather than color and Verana never bakes one in at
capture. SCRUB, EXPORT and DELETE address the file itself and are always present.
Some of the detail tools are not offered on 48MP stills.
FIELD MIX is the one tool that stays on screen while inert. On a clip with no Field audio
it appears dimmed and does not respond, which tells you the feature exists and that this
particular clip has nothing for it.
Note: selecting APPLE on a raw still shot in another format shows the file as
Apple’s own software would render it, with nothing of Verana’s applied, and the
adjustment tools disappear while it is selected. Leaving APPLE brings the tools back.
19.4 Exposure, White Balance and Punch
EXP sets exposure, four stops either way in third stops. The readout gives the figure in
stops, 0 EV at the capture’s own exposure.
WB sets white balance. A row of chips offers AS SHOT, DAYLIGHT, CLOUDY, SHADE,
TUNGSTEN, FLASH and CUSTOM, and beneath them a TEMP and TINT toggle decides which
of the two axes the dial drives. Choosing a preset chip sets both axes at once; turning the
dial moves whichever axis is selected and switches the chip row to CUSTOM, since a hand
value is no longer a preset. AS SHOT on either the chip row or the dial returns both axes
to the file’s recorded neutral. White balance at capture is covered in Chapter 4.
PUNCH adds tone and contrast. It starts at zero on every capture, whatever the mode, so
the look you have chosen is the baseline and Punch is added on top of it.
19.5 MODE and LUT
MODE selects the color treatment. Chips offer REALHUE, FILM and LOG, with a fourth
APPLE chip on raw stills shot in another format. Choosing FILM adds a scroller of film
profiles below the chips, and choosing LOG adds a scroller of log profiles, each card
naming the profile and the color space it carries. The readout names the result, such as MODE RealHUE or MODE Log · Pearl-Log / Pearla Wide Gamut.
A capture opens on the mode it was shot in, and returning to that mode clears the change rather than recording it. Color foundations are covered in Chapter 13, film profiles in Chapter 16 and log profiles in Chapter 15.
LUT appears only while the mode is LOG, since a LUT expects a log signal to work on.
It lists the LUTs in your library, each card naming the LUT and the color space it was
authored for, with a None card first. On a clip recorded under a monitoring LUT, leaving
the tool untouched keeps that LUT, and None explicitly removes it. Importing and managing
LUTs is covered in Chapter 17.
What the preview shows is what an export writes, in every mode.
19.6 PROFILE
PROFILE applies one of your saved custom profiles across the whole capture in a single
step. A scroller lists your profiles, with None first, and each card names the profile
and the color it is built on. The readout reports the profile in force, or None.
Applying a profile copies its look into the tools rather than locking them. Every control
stays live afterwards, and adjusting any of them releases the association: the profile got
you to a starting point and you are now working from it, so the name is no longer an honest
description of the picture. A long press on PROFILE removes an applied profile outright.
Custom profiles, including building them and saving one from a capture you have adjusted, are covered in Chapter 17.
19.7 Detail: SHARPEN, DETAIL, NR and MOIRÉ
Four tools work on rendering rather than on tone or color, and all four use the plain 0 to 100 dial.
| Tool | What it sets |
|---|---|
SHARPEN | Sharpening |
DETAIL | Fine detail retention |
NR | Noise reduction |
MOIRÉ | Moiré suppression |
NR carries two parameters and uses a LUMA and CHROMA toggle to choose between them,
the readout following as LUMA NR or CHROMA NR. Luminance noise is the grain-like
speckle in the tone; chroma noise is the colored blotching. They are worth setting
separately, because the amount of one a picture tolerates is rarely the amount of the
other.
Judge all four zoomed in. At screen size a change of ten either way is usually invisible.
19.8 DEFOCUS
DEFOCUS simulates a shallower lens on a still after the fact. It has three controls and
only three, chosen on the chip row.
| Chip | What it sets | Scale |
|---|---|---|
FOCUS | Where in the scene the plane of focus sits | 0 to 100, from the background to the foreground |
BLUR | How much blur, as an aperture | OFF, then f/1.2 to f/22 |
SOFTNESS | How abruptly the blur arrives at the edge of the focus plane | 0 to 100 |
BLUR is the one control in Revela Lite that reads in real f-stops rather than as an
amount from 0 to 100. It is an aperture, and a photographer reads an aperture in stops, so
the dial is marked in stops and the readout says f/2.8 rather than a number out of a
hundred. OFF at the near end of the ladder is a real state and not a very small aperture:
it is how the effect is turned off. The other two controls read – until there is a blur
for them to act on.
Opening DEFOCUS on a still that has none engages it rather than presenting an inert
control you would have to dial past. Dialing BLUR to OFF, or long-pressing the tool,
takes it back off.
Left alone, focus follows the subject, and the readout says so by adding Auto after the
value. It also names where the plane has landed, as Background, Middle or Foreground,
so the figure has a meaning without needing a second look at the picture.
An IMAGE and DEPTH MAP toggle switches the viewer between the picture and a map of the
scene’s depth, with whatever is currently held in focus shown bright. The map makes the
focus plane visible traveling through the scene as you turn the dial. It is a way of
looking, not a setting: closing DEFOCUS, or moving to any other tool, always returns the
viewer to the picture.
DEFOCUS is available on stills.
19.9 GRAIN, HALATION and ANAMORPHIC
GRAIN and HALATION are the same two effects offered at capture and covered in Chapter
16. Applied here they behave identically, with the advantage that a capture made without
them can be given them, and one made with them can have them taken away.
Both work like every other tool. The chips pick the parameter, the readout names it in full, and the dial carries every one of them on the 0 to 100 scale.
| Tool | Chips | Readout name |
|---|---|---|
GRAIN | NEG | GRAIN · NEGATIVE |
PRINT | GRAIN · PRINT | |
SIZE | GRAIN · SIZE | |
ROUGH | GRAIN · ROUGHNESS | |
COLOR | GRAIN · COLOR SENSITIVITY | |
HILITE | GRAIN · HIGHLIGHT DENSITY | |
HALATION | AMOUNT | HALATION · INTENSITY |
RADIUS | HALATION · RADIUS | |
THRESH | HALATION · THRESHOLD | |
SOFT | HALATION · SOFTNESS | |
DYE | HALATION · DYE TRANSMISSION |
A capture opens on the grain and halation it was shot under, so what you see on entry is what the viewfinder showed. Every control here is absolute rather than relative: setting an amount to zero is how grain the capture asked for is removed, and a long press on the tool returns the whole effect to the capture’s own settings rather than to nothing.
ANAMORPHIC corrects the squeeze of an anamorphic lens. A scroller offers Off and eight
lens factors from 1.25× to 2.00×, each card giving the horizontal squeeze and the
equivalent vertical figure. A HORIZONTAL and VERTICAL toggle above it decides which
axis the correction resamples: horizontal restores the intended width, vertical keeps the
recorded width and reduces the height. The toggle is dimmed while Off is selected, having
nothing to act on.
A capture shot through an anamorphic lens opens already corrected, and a long press returns
it to the lens it was shot with rather than to Off. Desqueeze at capture is covered in
Chapter 6.
19.10 OUTPUT
OUTPUT is the last decision before a file leaves Verana: the color space it is delivered
in. It changes the encode, not the look.
For a still the chips read SRGB, P3, HLG and GAIN MAP, and the readout names the
result as sRGB, Display P3, HLG BT.2020 or HDR Gain Map. For a clip they read
REC.709-A and HLG, reading out as Rec.709-A or HLG BT.2020.
A choice that cannot apply in the current state stays on screen and goes dim rather than disappearing, and tapping it explains itself in the readout. A flat log master with no LUT is the usual case: it carries no display rendition, so the HDR deliveries have nothing to deliver.
OUTPUT is unavailable while MODE is APPLE, which is a rendering with its own fixed
output. Color spaces are covered in Chapter 14.
19.11 Working with a Clip
A clip adds four things to the screen: a transport, a scrub tool, marks, and the field audio mix.
Playback
With no tool selected, a clip shows a transport in the controls slot: play and pause, a position slider, and the elapsed and total running time. Tap play and the clip runs. Playback shows the recording as shot. Pause, and the frame you are on is shown with your adjustments. Dragging the slider behaves the same way, showing the recording as you drag and the adjusted frame when you let go.
Selecting any tool pauses playback first. The tool’s controls take the transport’s place, which is why the transport belongs to the state where nothing is selected.
SCRUB
SCRUB puts the dial on frames, one detent per frame, with the timecode marked at each
second. The readout gives the frame number, the last frame, and the position in minutes,
seconds and frames, as in FRAME 184 / 719 · 0:06.04.
On long clips the dial reads as one continuous ladder however far you travel.
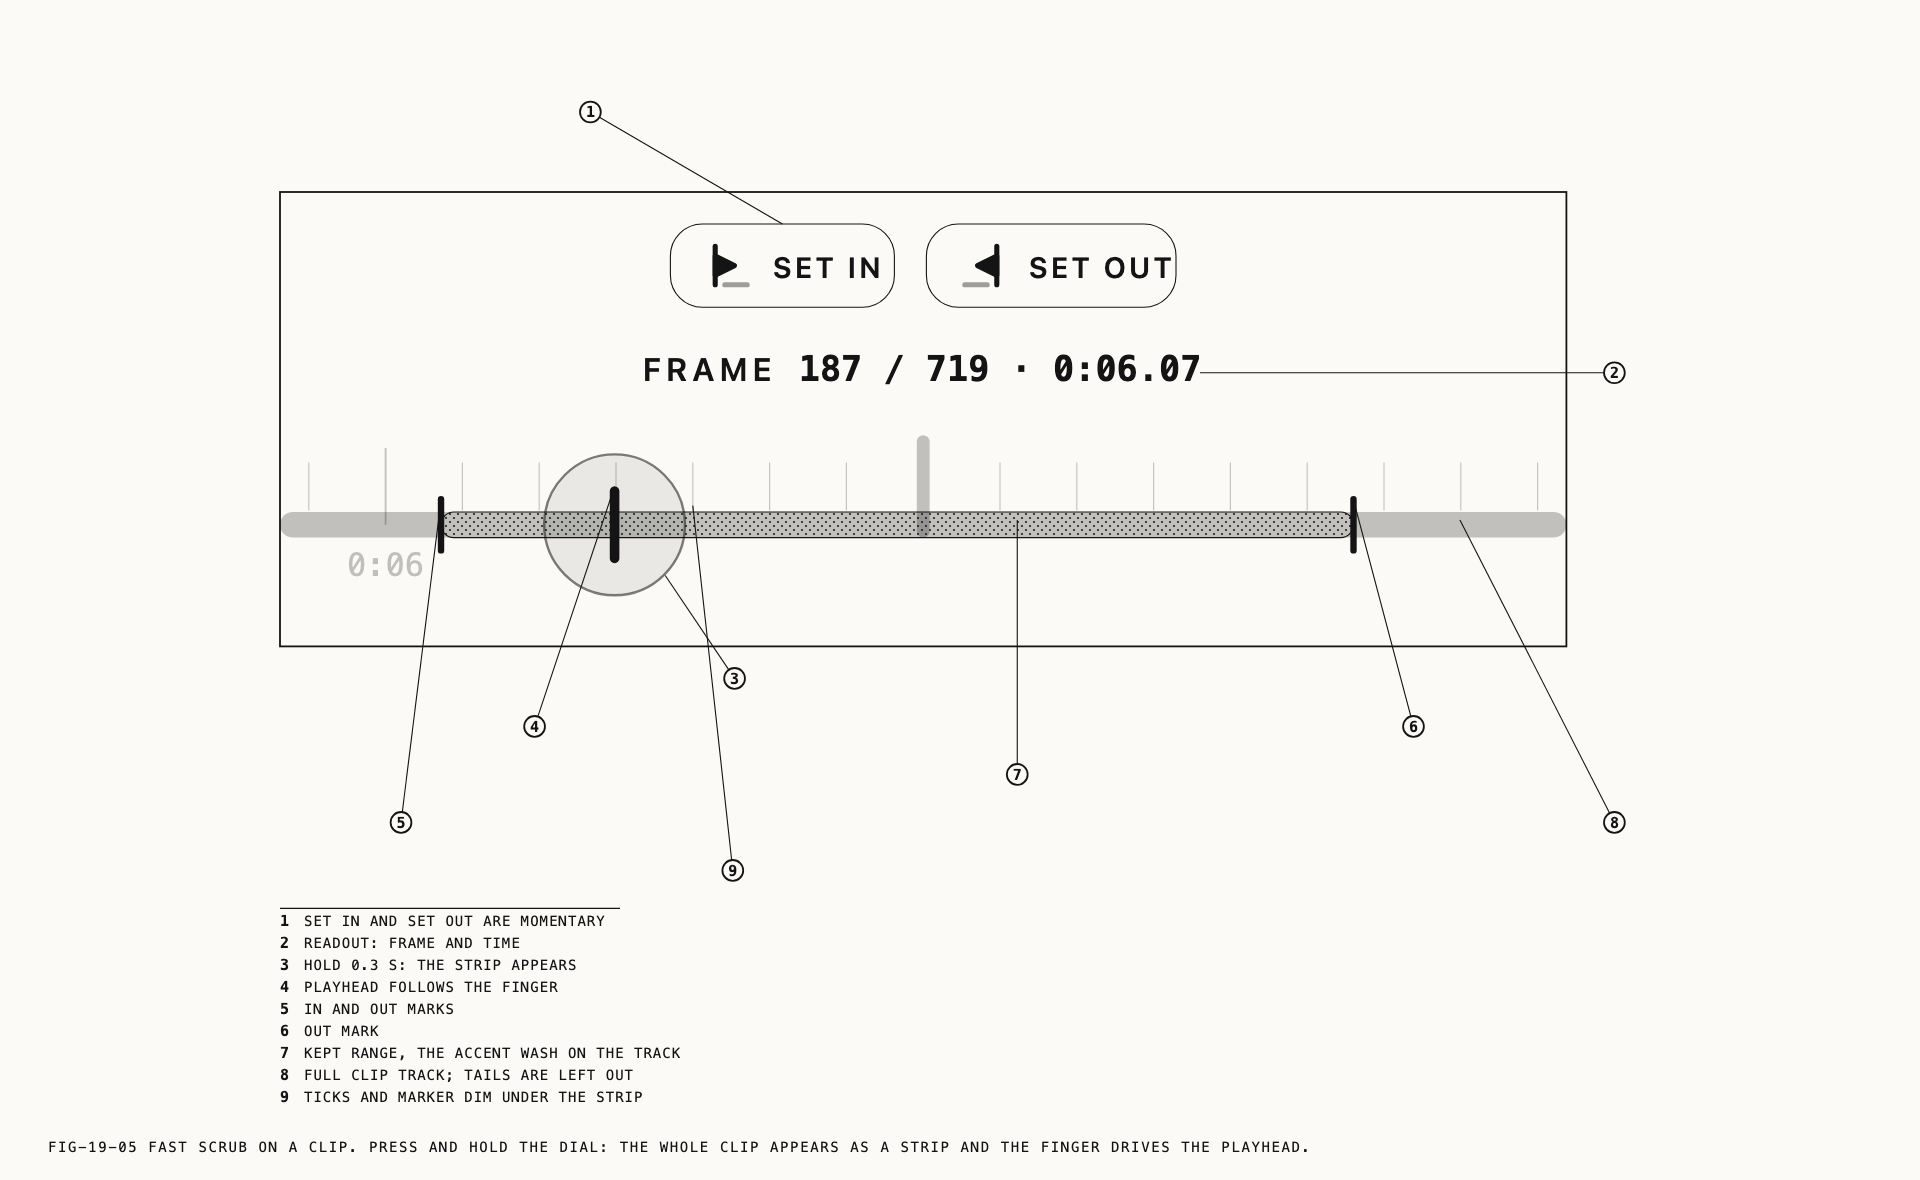
To cross a clip quickly, press and hold on the dial. A strip appears over it representing the whole clip end to end, with the marked range brighter than the trimmed tails and the playhead moving across it as you drag. Release and the frame dial rebuilds around where you landed. It ticks once per second crossed rather than once per frame.
Mark in and mark out
Above the scrub dial sit two chips, SET IN and SET OUT. Each sets its point at the
current frame. Marks show as indicators on the dial and on the fast-scrub strip.
The point you are setting always wins. Setting an in point past the existing out point moves the out point to meet it rather than swapping the two, which keeps repeated marking predictable. Setting a point back to the very start or the very end of the clip clears that mark rather than recording it.
A long press on SCRUB clears both marks and nothing else.
FIELD MIX
FIELD MIX sets the balance of a Pearla Field recording after the fact. Four chips choose
the style, and the dial sets how strongly it is applied.
| Chip | Readout |
|---|---|
AS RECORDED | As Recorded |
SUBJECT ISOLATION | Subject Isolation |
POLISHED | Polished |
STORYTELLING | Storytelling |
The readout carries both, as in AUDIO MIX Subject Isolation · 60%, and reads Default
for the intensity until you set one. The mix is heard on playback here as well as in what
you export, so it can be judged against the picture. A long press on the tool returns the
clip to the sound as recorded. Recording a Field clip is covered in Chapter 11.
FIELD MIX is dimmed on a clip that carries no Field audio, and absent from stills.
19.12 EXPORT and DELETE
EXPORT opens a row of destination cards, and what is offered follows the capture.
| Capture | Cards |
|---|---|
| PearlaRAW clip | Video, DNG Sequence, Current Frame, Log Video, Share |
| Other clip recorded in Verana | Video, Share |
| PearlaRAW still | Share, Custom Profile |
| Raw still in another format | Share |
Each card is an action rather than a state, so it does not stay selected. Everything that
leaves carries the adjustments as they stand on screen, saved or not, so what you export
always matches what you were looking at. Current Frame takes the frame you are parked on
and saves it into the library as a still. Custom Profile saves the look you have built as
a profile you can apply elsewhere, and is covered in Chapter 17. Export options, codecs and
bit rates are covered in Chapter 20.
DELETE closes the tool row, drawn in red, and never becomes the selected tool. It asks
first, with Delete Capture? over a line naming the file, and removes the
capture and closes the screen. Deleting a single capture is done here rather than in the
library.
19.13 Burst and Interval Stacks
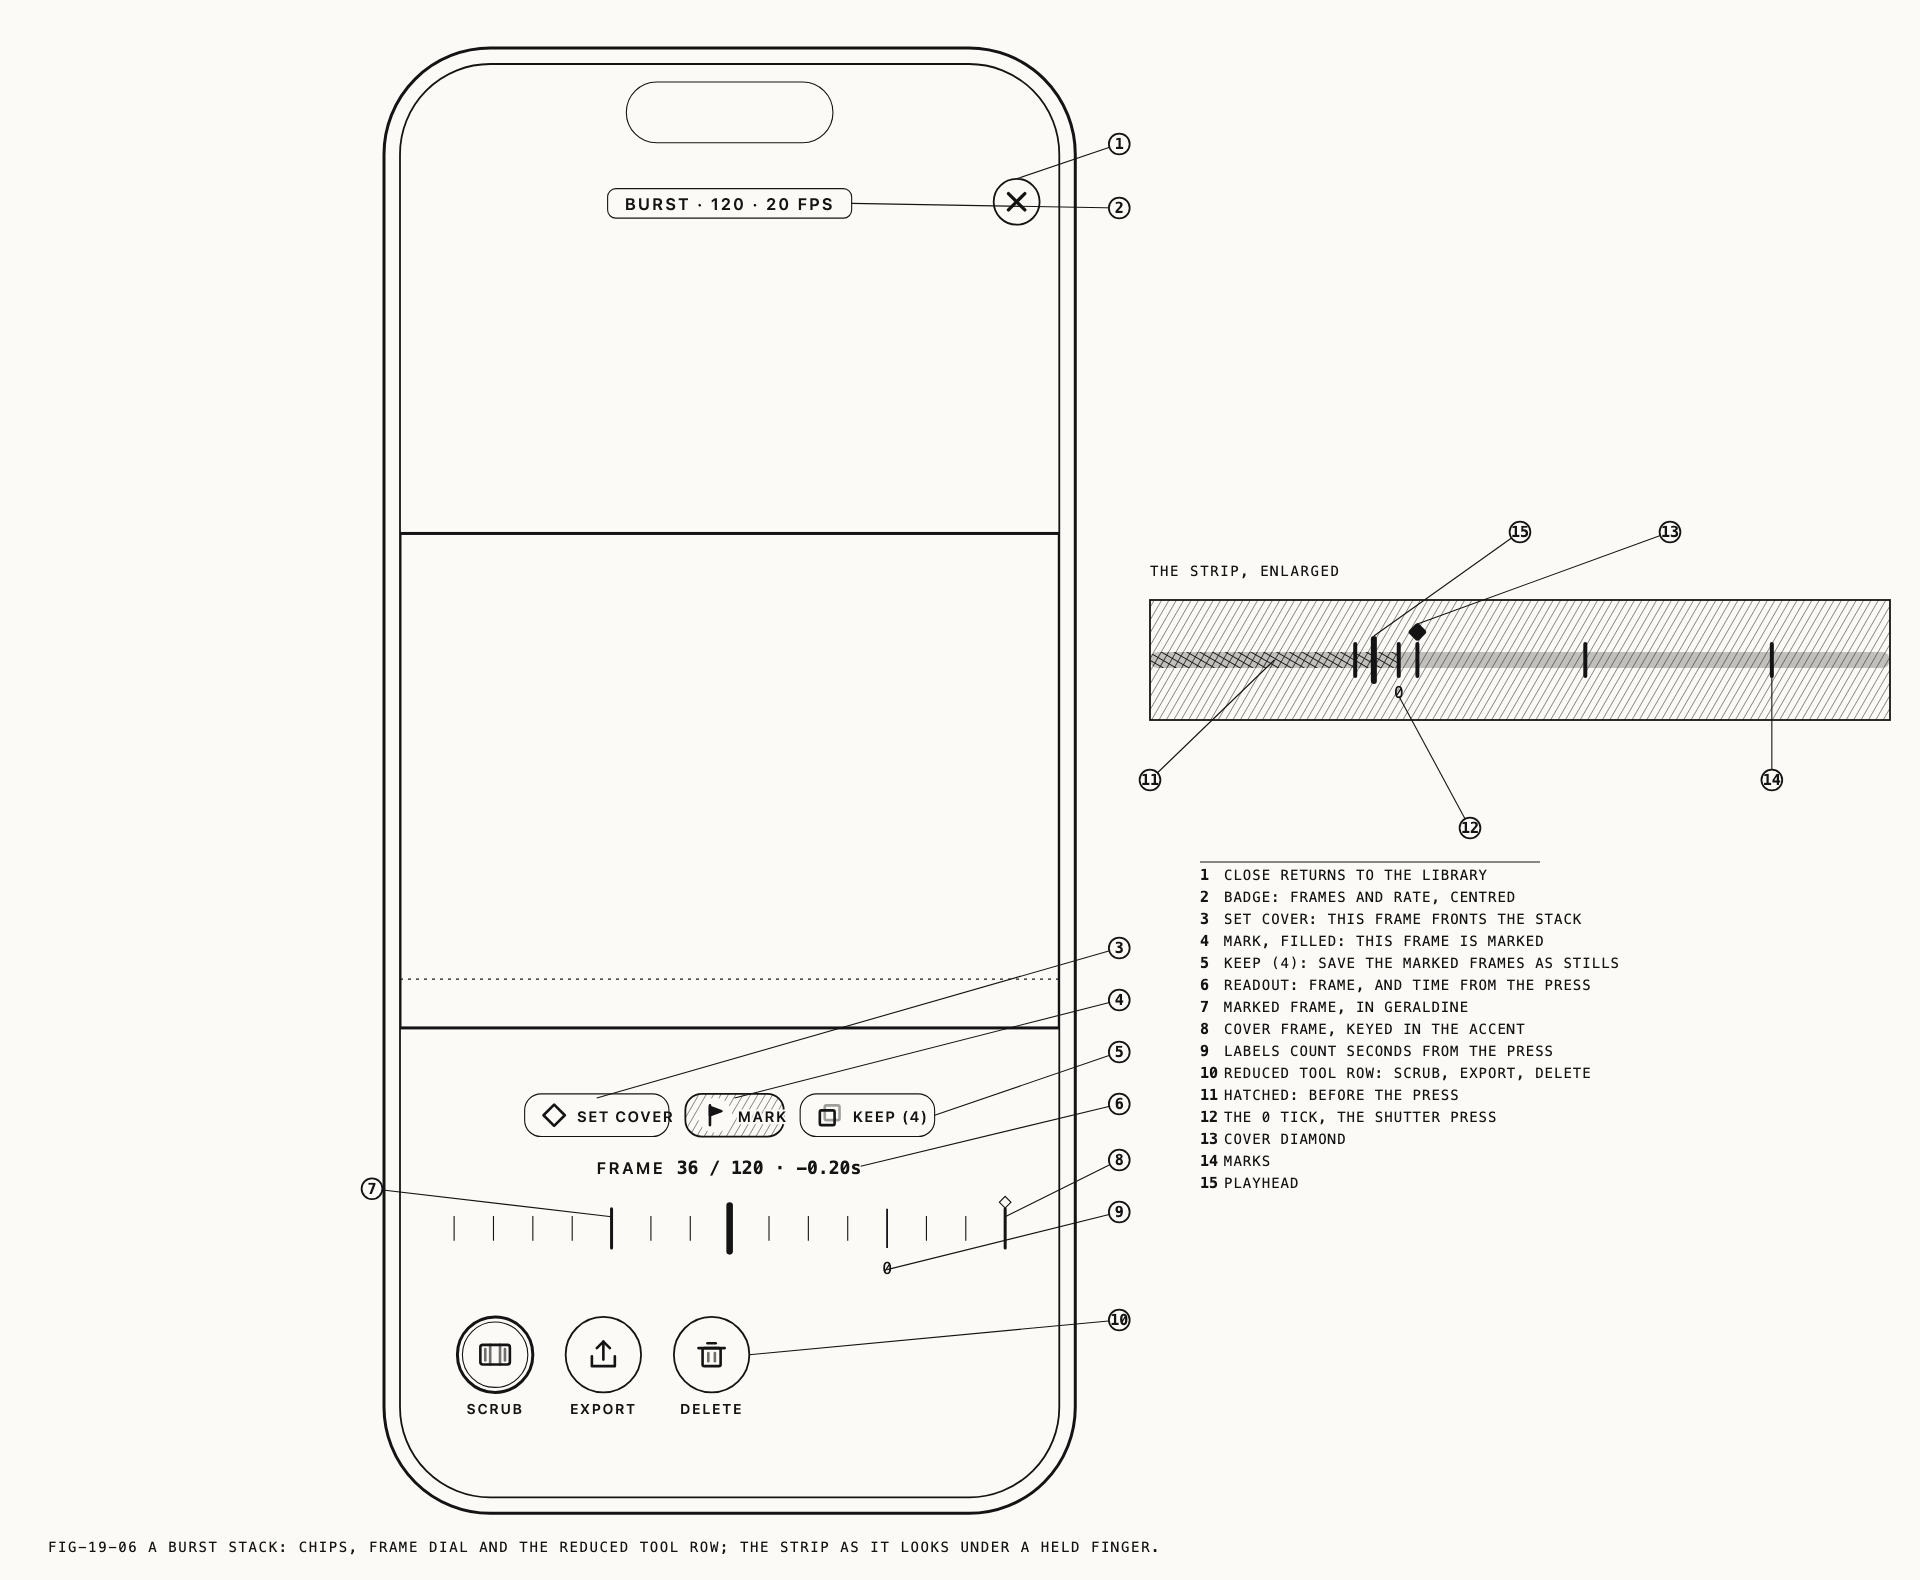
A burst or an interval run is a stack of frames rather than a clip, so tapping one opens a screen built for choosing among stills. There is no transport, because there is nothing to play.
The stack opens on its cover frame, the frame that represents it in the library grid. Three
ways of moving through it are offered, coarse to fine: dragging directly on the image
crosses the whole stack in about a screen width; the dial steps one frame per detent; and a
press and hold on the dial crosses the whole stack at once with a strip overlaid, exactly
as it does on a clip. The readout gives the frame number and its time relative to the
shutter press, so frames captured before the press read negative. On the strip, the
pre-capture frames are hatched and the press itself is marked 0.
Three chips sit above the dial.
| Chip | What it does |
|---|---|
SET COVER | Makes the current frame the one the library shows for the stack |
MARK | Marks or unmarks the current frame. Marks show on the dial and the strip, and stay with the stack |
KEEP | Saves every marked frame as a PearlaRAW still and deletes the stack |
KEEP carries the number of marks it will act on, as in KEEP (4), and is unavailable
until something is marked. It asks before running, since it is destructive: the confirmation
reads
The marked frames are saved as PearlaRAW stills and the burst stack is deleted. This cannot be undone.
If any frame fails to save, nothing is deleted and the stack is left alone.
Below the chips the tool row carries three tools. SCRUB is selected by default and owns
the rows above it. EXPORT offers a single Export All card, which saves every frame in
the stack as a PearlaRAW still and leaves the stack in place, and is the non-destructive
counterpart to KEEP. DELETE removes the stack.
Frames in a stack are not individually adjustable. Save the ones you want as stills and adjust those.
Burst capture is covered in Chapter 8 and the intervalometer in Chapter 9.
19.14 Captures Verana Cannot Adjust
A file from another camera or another app, and a still that exists only as a processed image, opens for looking at and nothing more.
A still opens full screen with pinch zoom and drag, a close button, and an actions button
holding Delete. A clip opens with a transport: play and pause, a position slider, and the
running time, with the controls fading out during playback and returning on a tap. Its
actions button offers Delete as well, along with the export actions the file supports.
Adjustment works from the record a capture keeps of how it was shot, and a file made elsewhere does not carry one.