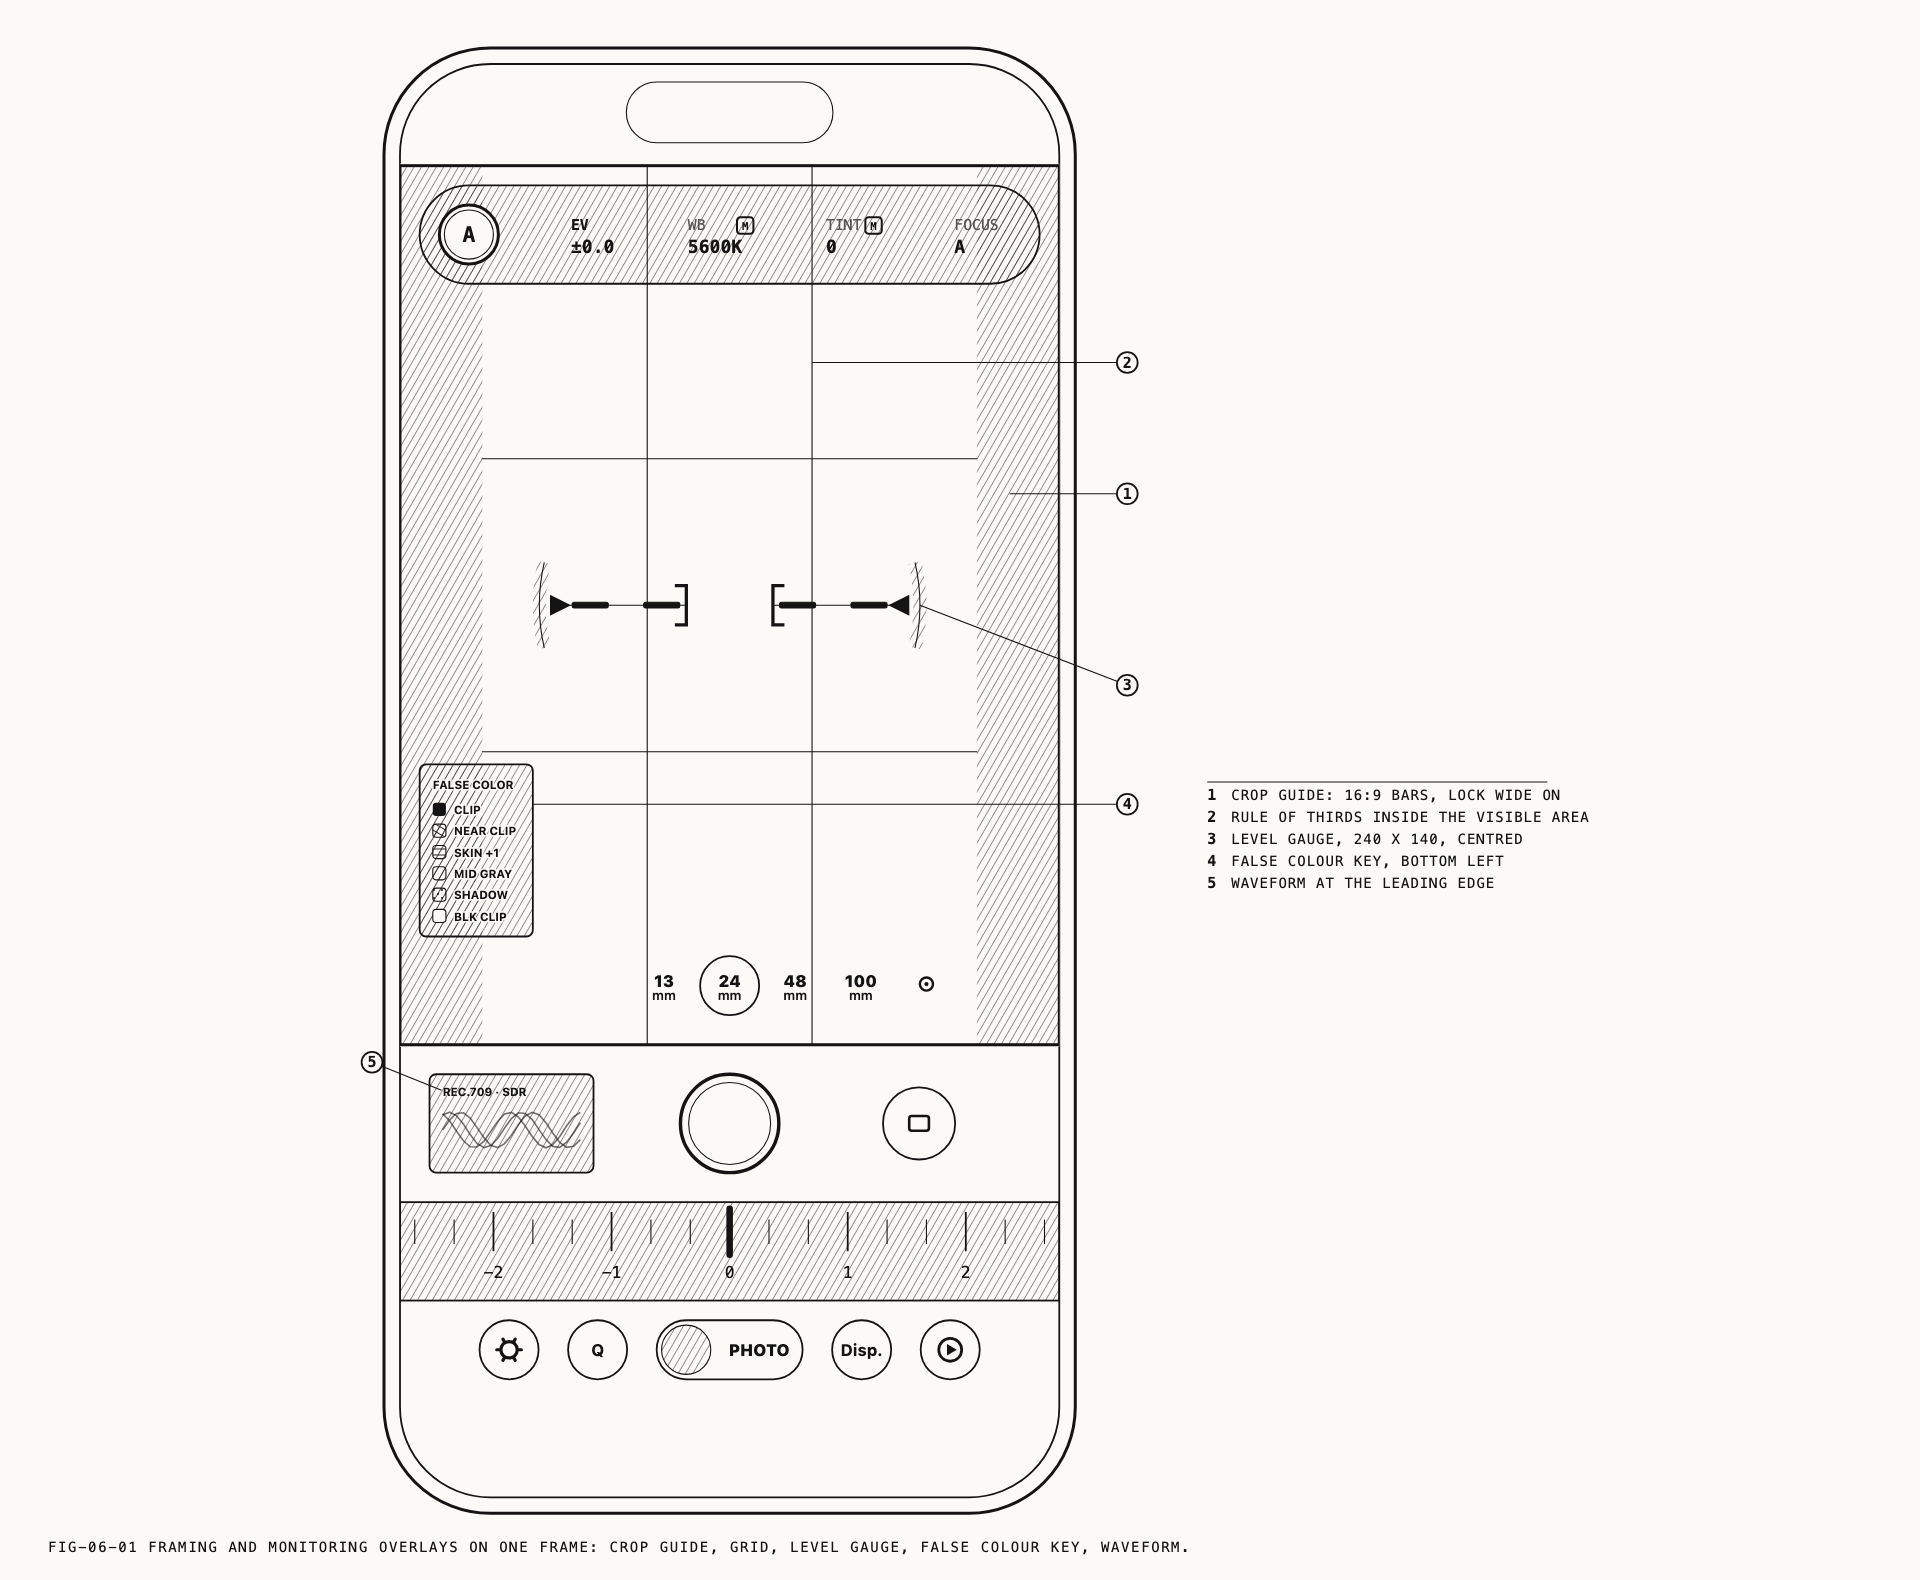
Verana draws a set of tools over the live image to help you place the frame and judge the exposure: crop guides, composition grids, a level gauge, false color, focus peaking, a waveform monitor, and a black and white preview. All of them are monitoring aids. They change the picture you are looking at, not the picture the camera records.
One exception: Border is not a monitoring tool. It draws a colored frame around the image and that frame becomes part of what Verana saves. It lives on a different settings tab and is covered in section 6.12.
Every setting in this chapter is stored separately for photo and video. A peaking color chosen while shooting video does not follow you into photo mode, and the settings screen shows the values belonging to the capture mode you are in.
6.1 Crop Guides and Aspect Ratio
A crop guide masks the parts of the frame that fall outside a chosen aspect ratio, using semi-transparent bars, so you can compose for a delivery shape while still recording the full frame.
Crop Guides switches the bars on. Aspect Ratio selects the shape.
Where to change them: Settings → Monitoring → Grids & Guides.
Fourteen ratios are available: 16:9, 5:4, 1:1, 4:3, 1.85:1, 2:3, 2.39:1,
XPan, 2:1, 2.4:1, 2.67:1, 2.36:1, 1.77:1 and 2.76:1. XPan is the 65:24
panoramic format, and is the only entry named rather than numbered.
The recorded frame is never cropped to the guide, in either capture mode. The material you bring back holds everything the sensor saw, and the reframe stays available to you later. If the ratio you select matches the shape of the frame already, no bars are drawn and nothing changes on screen.
6.2 Lock Wide
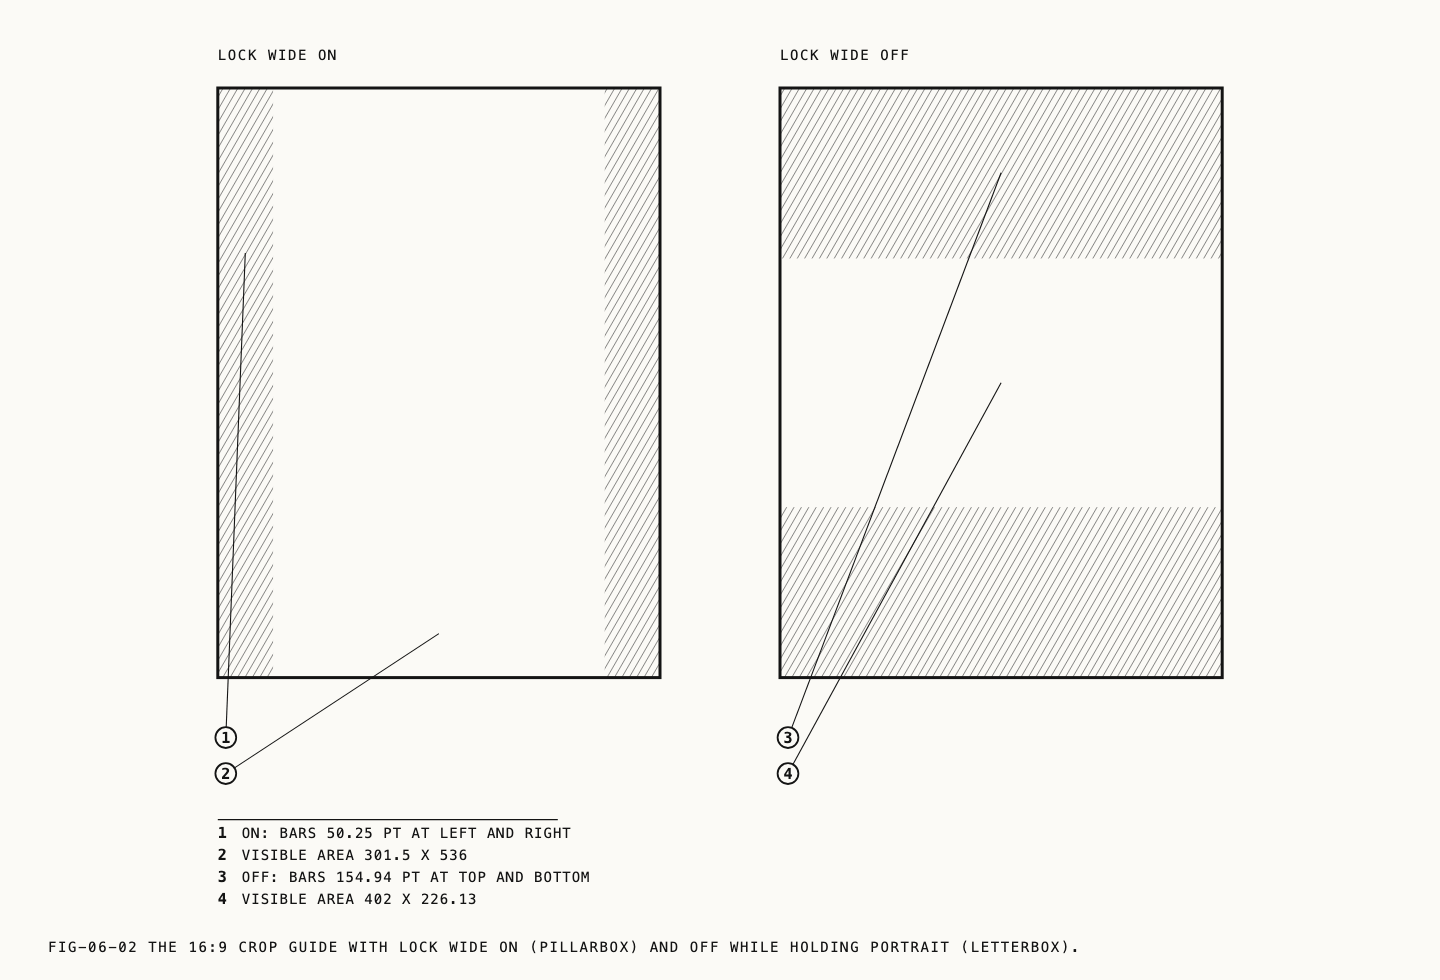
Lock Wide decides how a crop guide is oriented, and it matters most in portrait.
With Lock Wide on, the wide edge of the ratio is matched to the wide edge of the
viewfinder. A 16:9 guide in a Standard portrait frame therefore appears as bars down
the left and right rather than across the top and bottom, describing a tall 9:16 frame.
The guide does not respond to how the phone is held.
With Lock Wide off, the guide follows the device. The bars always fall on your visual top
and bottom, so 16:9 in portrait produces deep bars above and below the image, and
turning the phone to landscape produces much shallower ones as the frame becomes wider.
Lock Wide is on by default, and it also governs how the golden spiral is placed, as described below.
6.3 Composition Grids
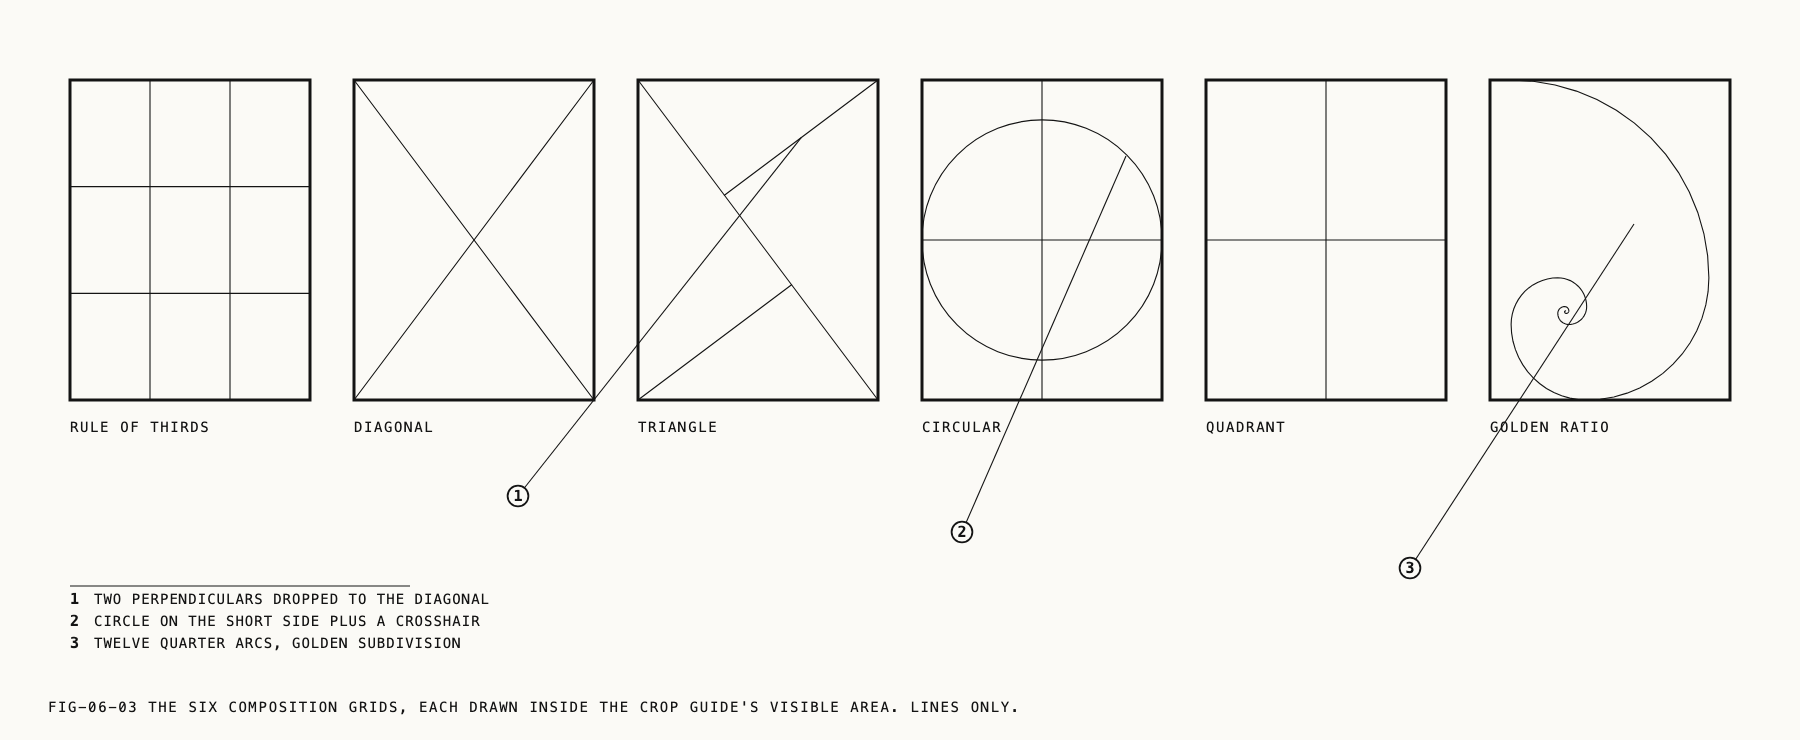
Composition switches the grid on, and Composition Type selects which one is drawn. Six are available.
Where to change them: Settings → Monitoring → Grids & Guides.
| Type | What is drawn |
|---|---|
Rule of Thirds | Two vertical and two horizontal lines at the thirds of the frame |
Diagonal | Both corner to corner diagonals |
Triangle | One diagonal, plus a perpendicular dropped to it from each of the opposite corners |
Circular | A circle inscribed in the shorter dimension of the frame, with a crosshair through the center |
Quadrant | One vertical and one horizontal line through the center |
Golden Ratio | A golden spiral |
The grid is drawn inside the area the crop guide leaves visible, not across the whole viewfinder. Change the aspect ratio and the grid redraws to fit the new shape, so it always describes the frame you are actually composing.
Triangle is the dynamic symmetry construction familiar from painting and from cinema
framing charts. The intersections of the perpendiculars with the diagonal mark the two
strong points of the frame, and the four triangular zones give you a way to balance a
subject against a background line running the other way.
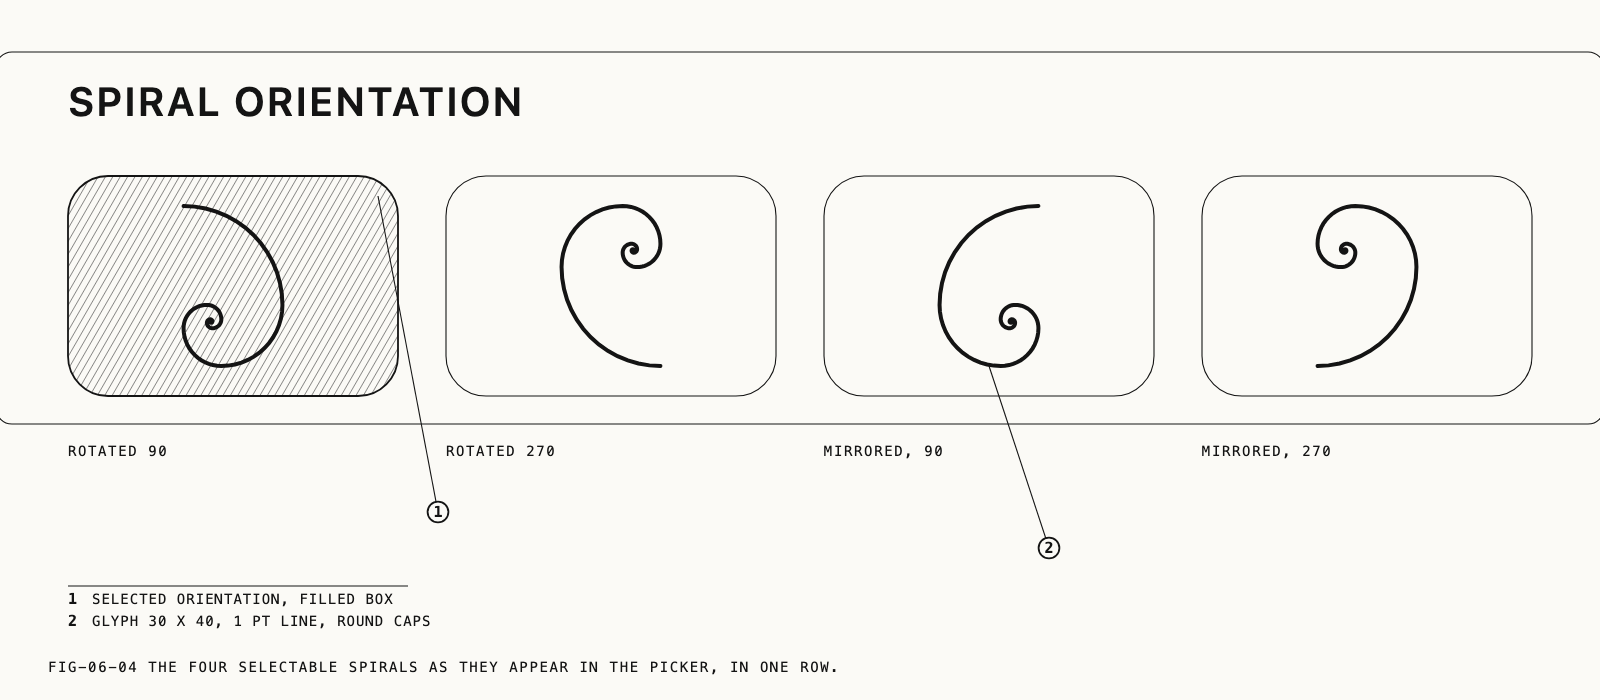
Spiral orientation
A golden spiral has a direction, and the direction has to suit the subject. When
Golden Ratio is the selected type, a Spiral Orientation control appears beneath it
offering four orientations. They are shown as small drawings of the spiral itself rather
than named, so you pick the one that matches the scene in front of you. The control is
hidden for every other composition type.
With Lock Wide off, a spiral chosen for an upright frame turns a quarter turn to fit when the guided area is wider than it is tall, so the spiral keeps its proportions instead of being squashed into the shape of the frame.
6.4 The Level Gauge
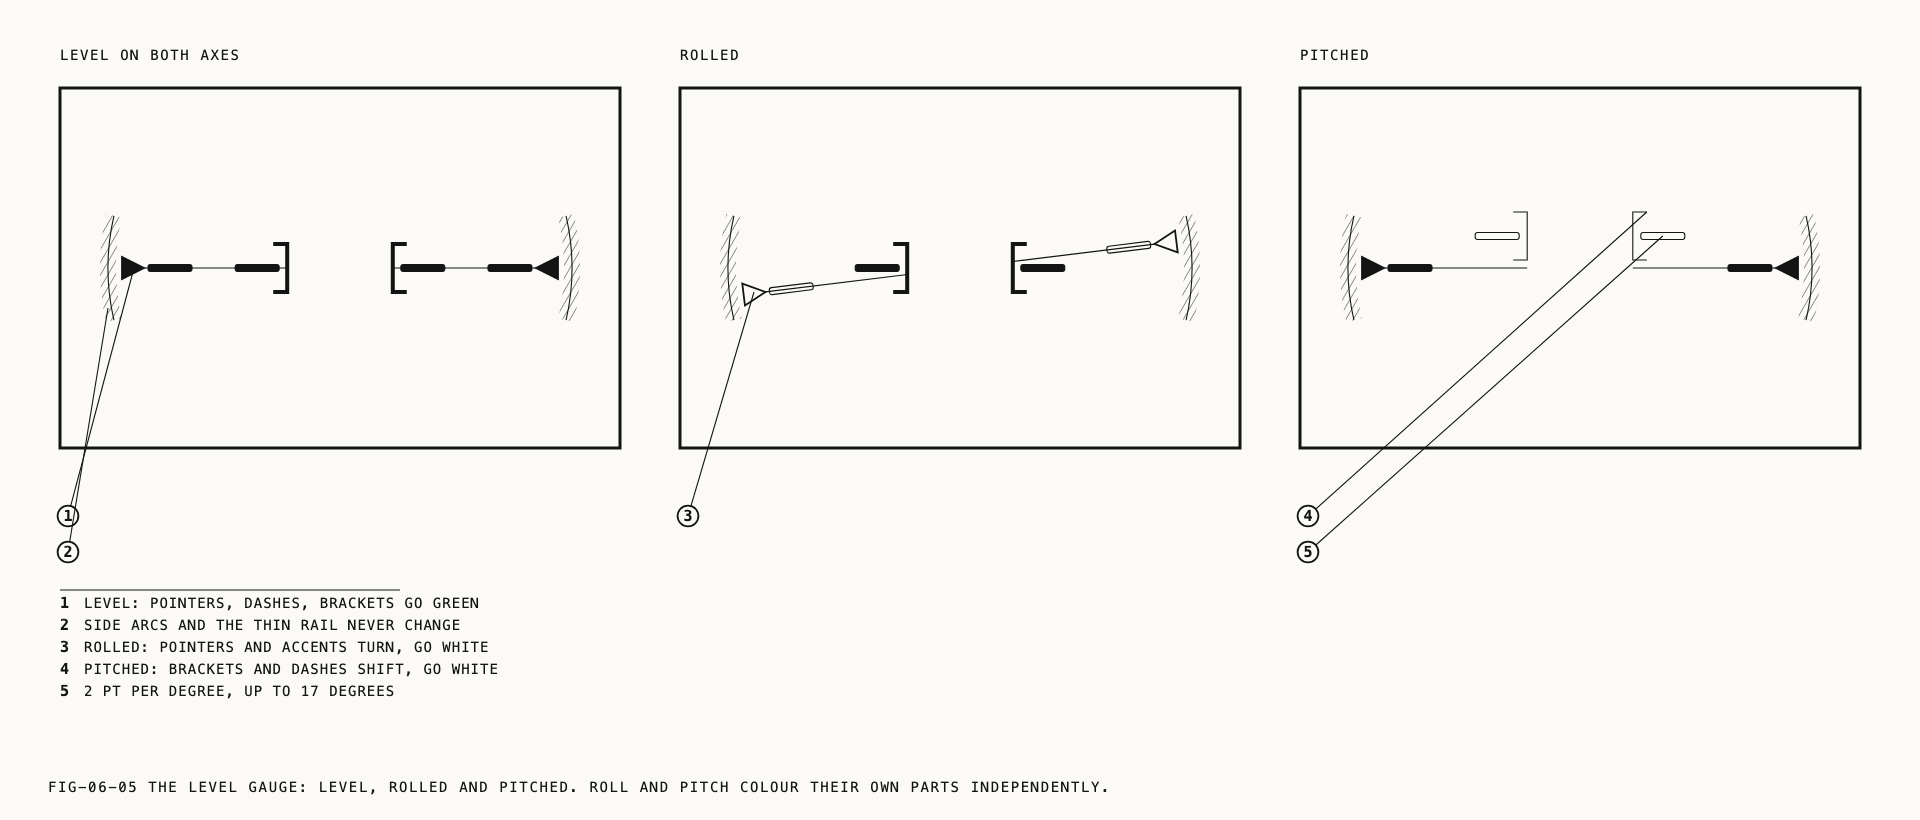
Level draws an electronic level at the center of the viewfinder. It reports two axes independently, and each turns green on its own when it comes level.
Where to change it: Settings → Monitoring → Grids & Guides.
Roll is rotation about the lens axis. The long line through the center of the gauge stays parallel with the true horizon, so it tilts against your frame when the camera is tilted. Roll is measured against the nearest quarter turn, which means the reading is correct whether you are holding the phone upright, on its side, or inverted.
Pitch is the front to back tilt of the lens. The bracket pair at the center of the gauge slides up and down and comes to rest on the line when the lens is pointing at the horizon rather than above or below it. That is the reading that matters for architecture and for copy work, where a lens tilted a degree or two produces converging verticals no amount of care with the horizon will fix.
The gauge holds a small tolerance around level so the indicators do not flicker between green and neutral while you settle the camera.
The level gauge is part of the interface rather than part of the image, so it is hidden along with the rest of the interface once you step past HUD off in the display cycle. Display modes are covered in Chapter 2.
6.5 False Color
False Color replaces the viewfinder image with a map of exposure. Each part of the frame is painted in the color of the exposure band it falls into, which turns a judgment about brightness into a judgment about color. Color is far easier to read at arm’s length on a small screen.
Where to change it: Settings → Monitoring → Tools.
The bands are measured against the signal being recorded, so red means the same thing in a log profile as it does under RealHUE: the highlight has clipped, and there is nothing there to recover.
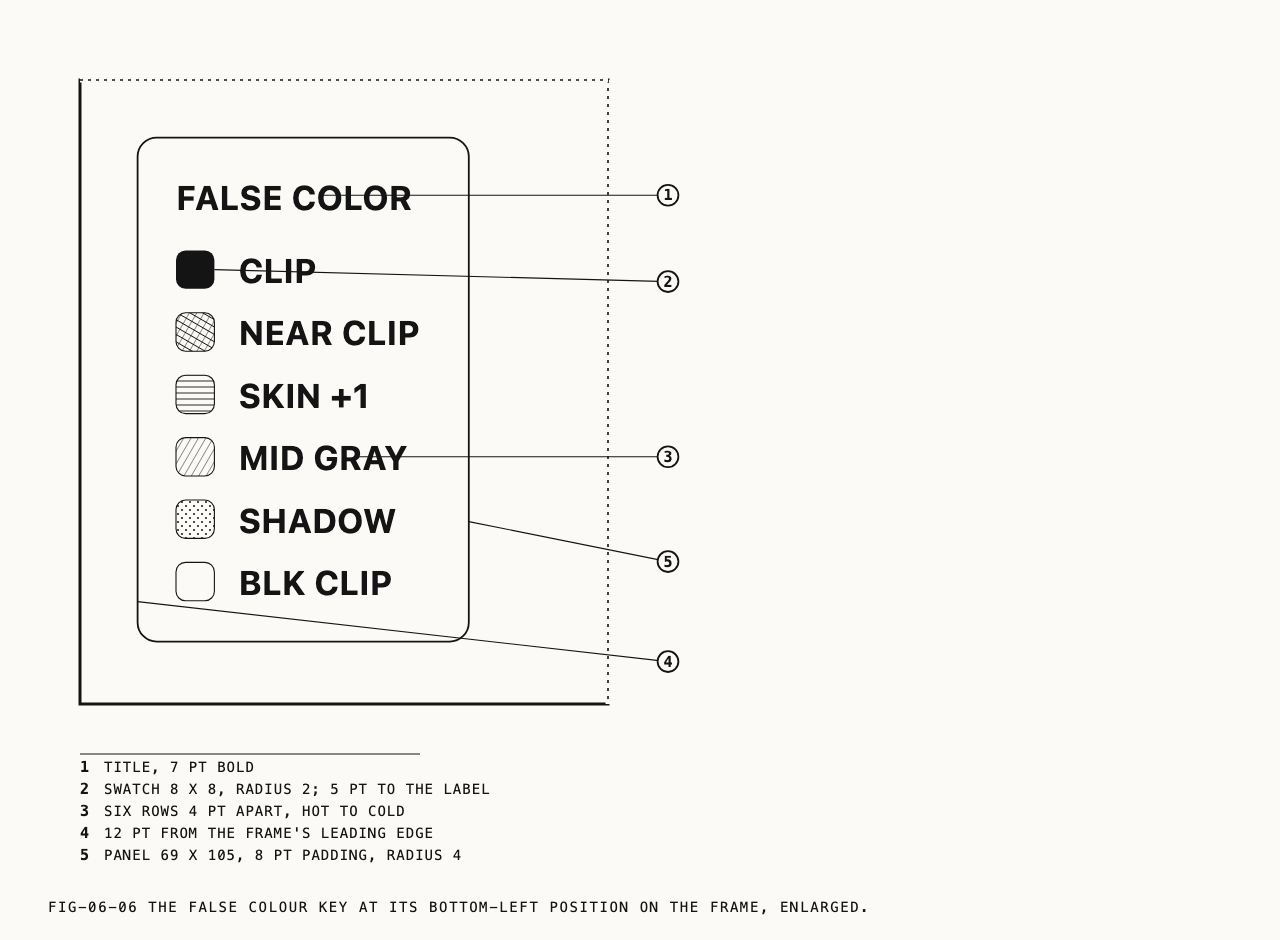
A key appears at the bottom left of the frame while false color is on, listing the bands from hot at the top to cold at the bottom.
| Key entry | What it marks |
|---|---|
CLIP | The signal has reached its ceiling. Highlight detail here is gone |
NEAR CLIP | Within about half a stop of clipping. The warning band |
SKIN +1 | Roughly one stop above mid gray, where a lit skin highlight usually sits |
MID GRAY | Correctly exposed mid gray, within about a third of a stop |
SHADOW | Deep shadow, approaching black |
BLK CLIP | Black clip. Below this nothing is being recorded |
The two extremes are the ones to act on. The middle three bands report placement rather than danger, and they are what make false color useful for lighting: put a face in the pink band and it is one stop over mid gray, wherever the rest of the frame falls.
False color is applied to the image itself, so it remains visible in every display mode. The key is an overlay and behaves like one, hiding from HUD off onward. Once the colors are familiar, that leaves the exposure map over an otherwise clean frame.
6.6 Focus Peaking
Focus Peaking outlines the parts of the image carrying the most edge contrast, which in practice means the parts that are in focus. It is the fastest way to confirm focus by eye at video resolutions, where the viewfinder is far smaller than the frame you are recording.
Peaking Color sets the color of the outline. Tapping it opens a color picker, and the control shows the chosen color as a swatch with its hex value beneath. Choose a color the scene does not contain. The default is a red orange, which reads clearly against most subjects but disappears against autumn foliage and against skin in warm light, and in those situations a blue or a green is the more useful choice.
Peaking is drawn into the preview only and never reaches the recording.
6.7 The Waveform Monitor
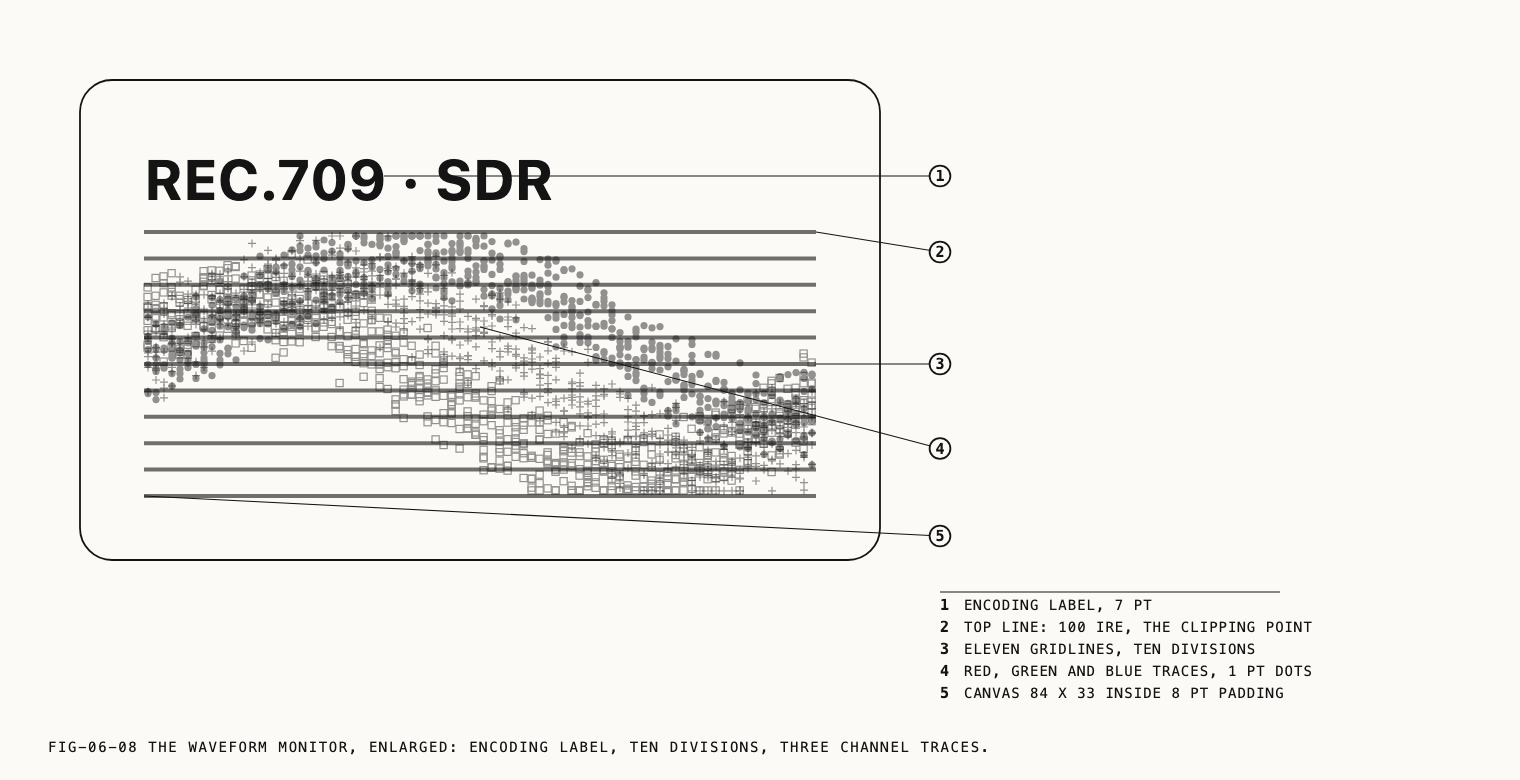
The waveform monitor sits at the leading edge of the frame, level with the shutter button, and reports the distribution of light across the image.
Read it left to right as the frame itself: a point on the left of the waveform describes the left of the picture. Vertically it is a scale of level, black at the foot and the clipping point at the top, divided into ten by faint gridlines. The three traces are the red, green and blue channels drawn together, so a neutral gray wall stacks the three on top of one another and a color cast pulls them apart.
The label at the top of the monitor names the encoding the scope is assessing, for example
REC.709 · SDR under standard delivery, PEARL-LOG · RAW while recording raw, or the
name of the active log profile when you are shooting log. The label follows the camera,
so the signal being measured is always stated.
The top of the scale is the point at which the recorded signal clips, whatever it is
being recorded in. The two exposure tools therefore agree: a highlight that reaches the
top of the scope is in the CLIP band on the picture.
In video mode the waveform can be switched off from the quick menu, using the WAVEFORM
tile. Photo mode has no tile and the waveform is always available there. Building the
quick menu is covered in Chapter 22.
6.8 Monitor Color
Monitor Color offers Color and B&W. Set to B&W, the viewfinder is shown without
color while the recording keeps it.
Where to change it: Settings → Monitoring → Tools.
Removing color from the preview leaves tone and contrast, which is the usual reason for choosing it: separation between a subject and a background is easier to judge without color to carry it, and a flat log image is easier to read for contrast alone.
6.9 Monitoring a Log Signal
A log recording looks flat and low in contrast on screen, which is correct for the file
and unhelpful for judging a shot. Verana offers three ways to view it: Log shows the
signal as it is, LUT previews it through a chosen lookup table, and Gamma Assist
shows a corrected image without a table.
Where to change it: Settings → Image Processing → Log, under Monitoring.
All three are viewfinder treatments. The recording stays log in every case. Log profiles, the choice between the three, and what to do with the footage afterwards are covered in Chapter 15.
6.10 Flipping the Image
Flip Image X mirrors the preview horizontally and Flip Image Y flips it vertically.
Where to change them: Settings → Monitoring → Tools.
These are rigging tools. A camera under a mirror box, or inverted on a gimbal or a copy stand, produces an image that is correct in the file and wrong on the screen, and flipping the preview lets you work with it. Neither flip is ever applied to the recording.
Because a flipped preview is indistinguishable from a mistake, Verana marks it. A badge
reading FLIP X, FLIP Y or FLIP X·Y appears at the top right of the frame for as
long as a flip is active.
6.11 Anamorphic Desqueeze
An anamorphic lens compresses the scene onto the sensor, so the recorded frame is geometrically squeezed and faces come back tall and narrow. Desqueeze corrects the viewfinder so you can compose the picture you are actually making.
Where to change it: Settings → Monitoring → Anamorphic.
The three controls below the toggle are inactive until it is on.
Lens Squeeze identifies your lens. Eight are supported, from 1.25× to 2.00×. Each
entry shows the figure for the convention you are working in, with the equivalent in the
other convention in brackets beneath it, so you can match whichever number is printed on
your barrel without doing the arithmetic yourself.
Lens Orientation states how the adapter is mounted: Landscape when it squeezes
along the long axis of the phone, which is the standard grip, or Portrait when it
squeezes along the short one. An adapter is clamped to the body, so this does not change
when you rotate the camera.
Desqueeze Axis decides which axis pays for the correction in what you deliver.
Horizontal expands the squeezed axis, keeping everything the sensor recorded and
producing a larger image. Vertical reduces the other axis instead, producing a smaller
one. Both give the same final shape, and the viewfinder looks identical either way. The
choice only affects delivered dimensions.
Nothing is baked at capture. The recording keeps the geometry the sensor delivered and carries the lens factor with it, which is what lets the file open correctly in an editing application and lets the correction be changed or removed afterwards. Processed exports carry the corrected geometry. Export is covered in Chapter 20.
While a desqueeze is active the corrected image occupies a band of the viewfinder with empty space beside it. Crop guides and composition grids are measured against that band rather than against the whole screen, so they describe the frame you are composing rather than the space around it.
6.12 Border
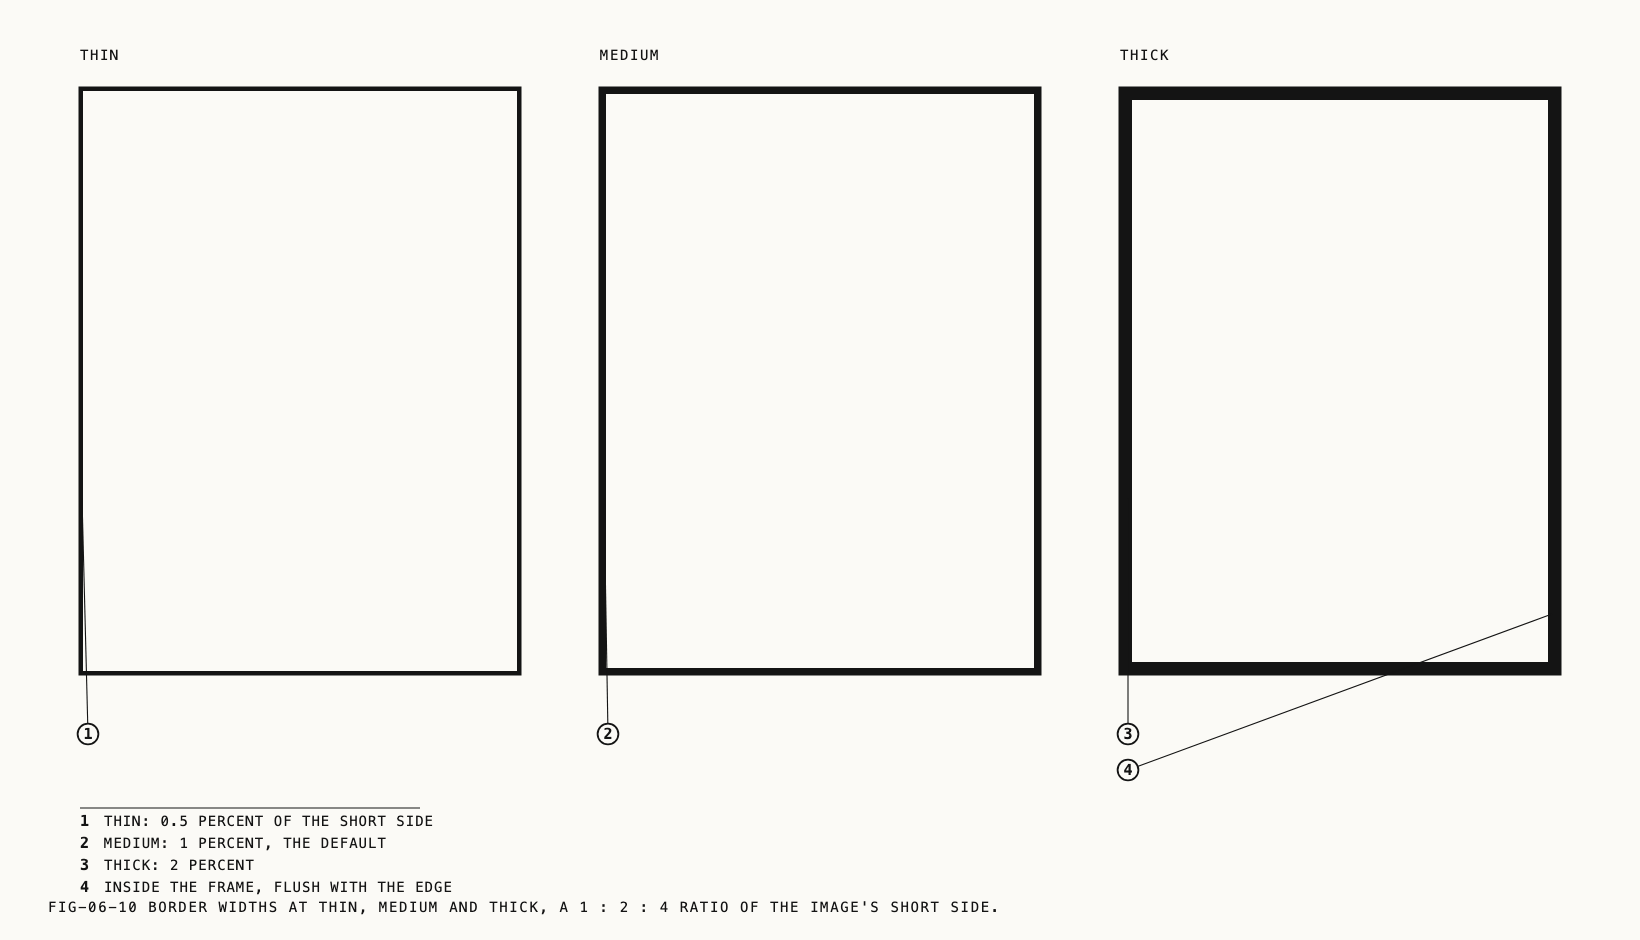
Border draws a colored frame inside the edge of the image. Unlike everything else in this chapter, it is recorded: the border is part of the picture Verana saves, not something drawn over the preview.
It does not live with the monitoring tools.
Where to change it: Settings → Image Processing → Process.
Border Color opens a color picker and shows the chosen color as a swatch with its hex value beneath. The default is an off white.
Border Width appears once Border is on and offers Thin, Medium and Thick. The
width is proportional to the image, so a border keeps the same visual weight whether you
are shooting at 12 or 48 megapixels.
Monitor decides whether the border is drawn in the viewfinder as well. It is on by default, and while you are composing that is the useful setting, since the border eats into the frame and you need to see where the edge falls. Turning it off hides the border on screen and changes nothing else: the border still reaches the recording. It is the one control in Verana where the viewfinder shows you less than you are capturing.
Note: raw files are stored without the border, along with everything else Verana keeps out of a master so that it stays adjustable. The border appears in the processed image saved alongside them.